
This is a detailed guide on painting hair and fur—whether that be human hair, artificial hair, animal fur, whiskers, etc. I’ll broadly refer to all this as “hair” from hereon.
- Big, Simple Shapes
- The Underlying Form and Structure
- Highlights and Dark Accents
- Utilizing Visible Brushwork
- Feature Details
- Multicolored Strokes
- Different Hair, Different Approach
- Other Techniques and Tips
- Key Takeaways
- Want to Learn More?
- Thanks for Reading!

I’ll walk you through the entire process using one of my recent paintings. You’ll see how I go from idea all the way through to reflecting on the finished painting.

Big, Simple Shapes
One of the most common mistakes beginner artists make when painting hair is getting caught up in the tiny details. They paint every single strand of hair whilst overlooking the big-picture aspects. To break out of this, you must first observe and paint the hair as big, simple shapes. Once you have that right, you can move on to the more particular details, but no sooner. The foundation must be right before you add any frills.
I’ll show you an example. Here’s a photo of Kobe (thanks Kobe for being such a great model for this post!). Notice all that detail and noise.
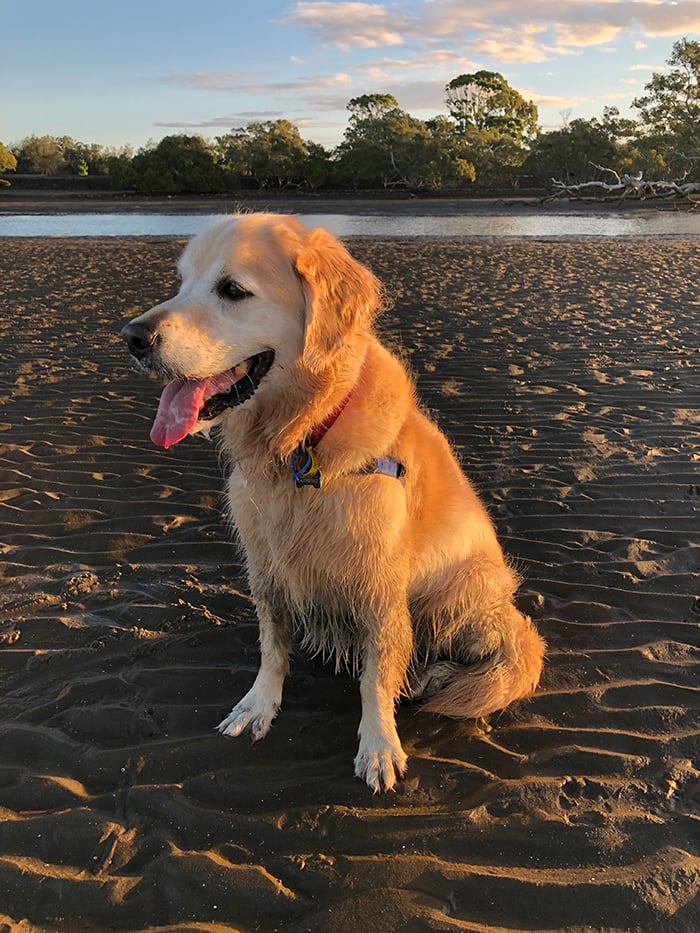
To paint this photo, you would need to simplify all this noise into something more concise. Observe Kobe as an abstract arrangement of colors and shapes. Here’s what I see:

This simplifies and flattens the subject and gives a starting point for the painting. From here, you can add structure, form, and movement. Or you could leave it there if you’re painting in a more abstract or impressionist style. If you get the basic shapes and colors right, particularly the light and dark shapes, the subject will appear somewhat realistic. See the dog in Valentin Serov’s Portrait of Felix Yusupov.

The Underlying Form and Structure
You must paint the hair in a way that reflects the underlying form and structure. Hair does not float in space; it grows or extends from something.
The following questions will help with your observation of the subject and its form and structure. No prerequisites are needed to clearly observe, other than your eyes and an open mind.
Where are the major planes?
What planes are in light and what planes are in shadow?
Where are the major edges and contours?
Is the surface curved or flat?
Where is the form stretching or pinching?
It also helps to have an understanding of the subject and anatomy. If painting a portrait, you cannot expect to paint the hair well if you don’t know the basic shape and structure of the skull. The same goes for painting a cow, dog, cat, lion, or any other subject with hair.
Take a look at the painting below, Lying Lioness by Frans Snyders. This is a complex subject, with the lioness twisting, stretching, and flexing. Observation would only take you so far with a subject like this. You would also need to understand the lioness’ anatomy, skeletal structure, and how her muscles contract and relax. With this understanding, you could paint the hair to reiterate the lioness’ form and structure rather than guessing what’s beneath the surface.

Unfortunately, there’s no shortcut here. Study and practice are needed. It also pays to spend time focusing on a particular subject or genre so that you can develop a deep understanding and familiarity of it. The best paintings are rarely one-offs. It’s often the case that the artist becomes enveloped and fascinated by the subject and studies it in and out. Look at Claude Monet with his Water Lilies series; John Singer Sargent with his countless sketches, studies, and paintings of wealthy individuals who could afford a commission; or Rosa Bonheur with her animal paintings.

Highlights and Dark Accents
Highlights and dark accents are small but powerful. You must apply them carefully and strategically. Some tips:
- You must earn your highlights. Set the stage before you apply them (unless using watercolors, in which case you typically start with the highlights and then work back to the darks). Getting the highlights right is all about contrast. The mid-tones and shadows are what make the highlights “pop”. More titanium white is usually not the answer.
- The late Richard Schmid suggests that dark accents are typically warm in temperature relative to the surroundings and regardless of the light source. But this is just a rough guideline and it does not override observation. In my Kobe painting, the dark accents in the reference photo were indistinguishable in color. This is often the case with photos: the darkest darks tend to be underexposed and lack the nuances you would see in life. Instead of using black for the dark accents, I drew on Richard Schmid’s advice and painted them warm.

- You can use highlights and dark accents to reiterate structural points or to draw attention to your focal point. In Charles Barber’s A Special Pleader, notice the highlights that run along the dog’s side and how they reiterate its form and structure.

- The position of a highlight is influenced by: the position of the light source, the position of the object reflecting the light, and the position of the viewer.
- The appearance of the highlight is influenced by the nature of the surface reflecting the light. Smooth, glossy hair tends to have sharper highlights than messy hair. Greasy hair tends to have sharper highlights than matte hair.
Utilizing Visible Brushwork
Visible brushwork is one of your most valuable tools for painting hair. Below are some close-ups of my Kobe painting. Look at how each strand of my brush leaves a tiny indent and how my strokes follow the broad contours.


You can vary your brushwork by varying your brush. Firm-bristled brushes will produce the most visible brushwork. The finer brushes, such as those made with Kolinsky hair, leave finer indents in the paint.
A good rule of thumb is to match the nature of your brushwork to the nature of the subject. For example, if I were painting a portrait of a woman with neat and glossy hair, I might opt for the more subtle brushwork of a Kolinsky brush (Sargent’s Portrait of Madame X comes to mind). But for a more rugged subject like Kobe, a firm, hog-hair brush is more suitable.

Feature Details
Instead of trying to paint every strand of hair, narrow down on a few key details to feature and simplify the rest. The feature details will give context to the simplified surroundings. This is an efficient way to paint.
The key is deciding on the right details to feature. Ideally, you should choose details that have some kind of inherent strength and are close to your focal point. A stray cluster of hair that flows gracefully down the side of the model’s face has a natural aesthetic and can be used to draw attention to her facial features. The painting below is a great example, Marie Joséphine Charlotte du Val D’Ognes by Marie Denise Villers.

Multicolored Strokes
You can use multicolored strokes to convey hair with variance and depth without it appearing labored and tedious. To do this, pick up multiple colors with a medium to large-sized brush and leave them partially unmixed. Then, make a single, decisive stroke. Avoid blending if possible.
You can vary the appearance of your multicolored strokes in many ways: the size and type of your brush; the colors you use; whether you paint on a wet or dry surface; and how unmixed you leave the colors. For a more subtle approach, use low-contrast colors and gently mix them together on your brush whilst keeping them somewhat distinct. Circled below is an example from my Kobe painting.

This is an advanced technique that has unpredictable results. You never really know what will happen when you pick up several colors on your brush and lay them down. That’s the exciting part. The Russian Impressionists do it best. Artists such as Bato Dugarzhapov (featured in my Exploring the Masters series), Slava Korolenkov, and Chirun Ilya.
Different Hair, Different Approach
Hair comes in infinite variations. It could be thick, fine, curly, straight, dense, thin, orange, green, bright, dull, short, long… you get the idea. This means there’s no one approach that applies to hair in general. You shouldn’t paint thick and matted sheep hair in the same way as short and fine rabbit hair. You must tailor your approach to match the subject.
That’s why I focus on fundamental principles that you can apply broadly across subjects rather than specific techniques and tactics than have limited uses.


Other Techniques and Tips
Below are some other techniques and tips for painting hair:
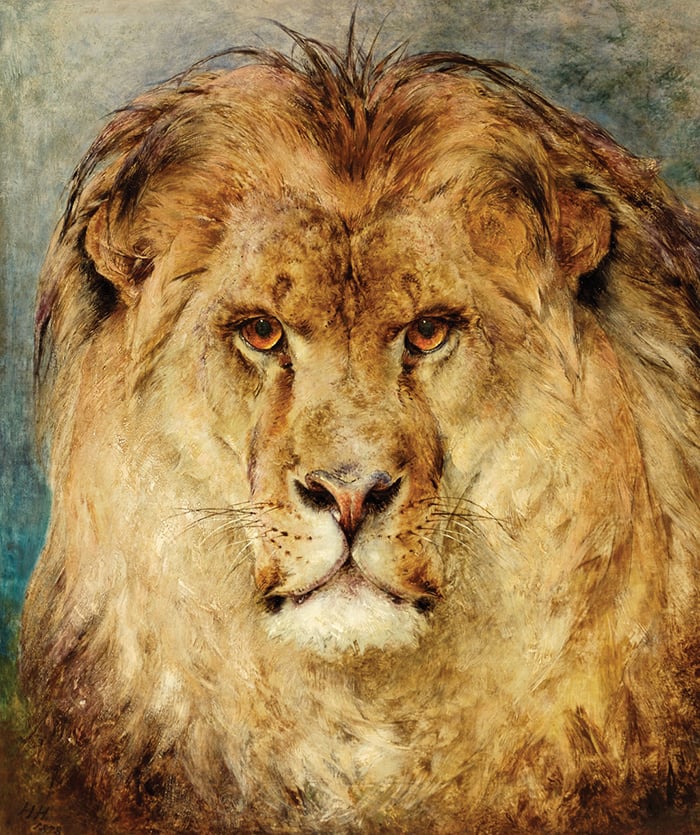
- Use scumbling to give the hair depth and color variance. Heywood Hardy did this in A Lions Head.
- Can you link parts of the hair with the underlying subject or the background? If you’re painting a portrait, perhaps you could link the hair in shadow with the dark background. If you’re painting your dog in the backyard, perhaps you could create a subtle link between the grass and the dog’s legs. This is all about making the parts work together as a cohesive whole.
- Can you combine different mediums to convey different aspects of the hair? For example, gouache to capture the general colors and shapes combined with pen and ink for detailing and outlining.
Key Takeaways
Here are some of the key takeaways from this post:
- Start by breaking the subject down into big, simple shapes and colors. Then move on to the more particular details.
- You must paint the hair in a way that reflects the underlying form and structure. Hair does not float in space; it grows or extends from something.
- Highlights and dark accents are small but powerful. Use them to reiterate key structural points and gestures.
- A good rule of thumb is that dark accents tend to be warm in temperature relative to the surroundings.
- Visible brushwork is one of your best tools for painting hair. Combine it with multicolored strokes to convey realism without it appearing labored.
- Feature details allow you to simplify most of the subject whilst retaining a sense of realism. The feature details give context to the simplified surroundings.
- Hair comes in infinite variations. There’s no one approach to painting it. You must tailor your approach to match the subject.

Want to Learn More?
You might be interested in my Painting Academy course. I’ll walk you through the time-tested fundamentals of painting. It’s perfect for absolute beginner to intermediate painters.
Thanks for Reading!
I appreciate you taking the time to read this post and I hope you found it helpful. Feel free to share it with friends. Let me know your thoughts on the painting in the comments.
Happy painting!
Dan Scott

Draw Paint Academy

Thank you for the time you took to put this article together and for sharing your knowledge and experience. It’s been a big help and I’m going to look at hair and fur with different eyes!
Thankbyou for so much detailed guide , i learn a lot from the course
Here’s a tip concerning the foundation layer I’ve always used since my childhood. To clarify, I stopped painting for something like 30 years, maybe more, but returned to it around 3 years ago. It’s like riding a bike I guess! Back to foundation layers for hair… Deliberately blur your vision and paint the foundation layer shades from this and don’t be tempted to get too persnickety. It removes the need for abstraction and my middle aged, deteriorated vision has proved beneficial!
Thanks for this instructive and important chapter dealing with hair and für.
Dan,
Always love your posts and teaching. Thank you. I, too, want to paint sheep from a photo I took in Ireland! My current medium is watercolor. Are there any differences in painting sheep in watercolor that you might recommend.
Blessings for you and your family!
Patty
I loved reading this guide! super insightful. I am trying to simplify my artworks a little bit more and give them more impressionist like feel. Your posts are really helping me with it! Thank you
Concise…very helpful. Appreciate the “Observation Checklist” at the start of the post. It seems to apply for many subjects.
Also turning Kobe into a puzzle was brilliant. Hope you paid him well for the modeling session!
I read about art far more than ever doing art (the latter is actually hardly ever). Thank you for your generosity; sharing your knowledge, experience and providing supporting works freely. One day I’ll “do”…
As always Dan the info you provide is so informative, from the examples to the step by step “how to”. Love your posts and can’t thank you enough,
Seasons greeting, Merry Christmas and Happy New Year. Can’t believe Christmas is less than a month away. God Bless. Regards, Jean
Great advice. Thanks Dan.
Sheep wool has always confounded me. Any suggestions?
Hi Pat! I haven’t painted sheep before, but I would start by laying down a dark foundation then apply highlights over the top. I’d use broad scumbling for general areas and more detailed brushwork for feature areas. You should also see if you can find a large photo of Rosa Bonheur’s sheep painting. Zooming in on it might give you some clues as to how she painted it.
I love the simple way you explain using paint. You take the fear out of experimenting. Thank you Dan.
Dan, your ongoing instruction, ideas and assistance, not to mention the encouragement, keep me motivated to paint, even during periods of time when painting occasionally takes a back seat to more pressing things. Thanks ever so much, you keep me motivated.
I couldn’t believe my eyes when i opened my email this morning and saw that your post was on the main subject that i have been trying to get help with. Thanks very much for all your posts. They help me so much. Do happen to have a post on painting bird feathers hidden somewheres in your files. I am a beginner painter and could use all the help i can get.I have only been painting for bout 11 months now and I love it!
Thank you for this very helpful article. I have painted several animals and birds now but still find them rewarding and challenging, especially the way fur changes with an animal’s form.
I have picked up some useful tips from this article. Thanks.
Your hints and examples are very much appreciated. Thank you.
Thanks for this! It could not be more timely, as I’m attempting a memorial portrait of our great cat who recently passed. My next attempt will be better.
Thank you for all the instructional iformation you share. As a beginner painter. I look forward to your emails and classes. Thank you for your time and effort and being available to help when asked.
Hi I’m thankful for everything in ur painting ,but I’m not there yet it’s been three yrs to learn how to sketch what my on line schooling want from me because I’m a very busy person since retirement I got hobbies n a wedding planner .. so I couldn’t really finish what I started . I did good tho and I’m still learning I got lots to learn before I can paint n sketch hair which I love to learn and thank u I love ur way of doing things
Dan,
I as beginner, I really appreciate and look forward to all your emails arriving in my email box. I have learned so much from your courses, analysis of artists techniques, critiques of students work and so much more.
Thank you for your commitment to sharing your knowledge of all things “painting” to fellow students.
Sally
I have not even finished reading this absolutely important and instructive subject on painting pet hair etc, but I wanted to tell you THANK YOU!
Just this alone makes the course well worth it!!!
Thanks, Dan. I always learn from your articles. This is timely for me as I’m preparing to paint a portrait of a family member’s white cat that recently passed. I paint in acrylics, and I’ve been studying several books and videos on animal portraits. I picked up several tips from your article that are not covered in other sources. Thanks again.
How can I thank you for the terrific insights you share. Thank you, for hitting on a subject that adds so much to art culture. Without knowledge we have no culture.
Ms. Rusty R
Brilliant, Dan
Best take-away: hair does not float in space. It grows or extends from something. You solved my problem!!
Many thanks
Gladys
Every article is an incentive to attack a next subject to paint and experiment. Just this morning you have given me the kick to get back to my brushes after a too long break 🙂
Carole D.
This is great. I have issues getting the highlights right and now see it’s because my mid and dark tones aren’t dark enough. Thank you!
Really enjoyed this article and appreciate the research you put into finding examples of works to explain different techniques and brushes etc.
Loved Kobe!
Will tackle my little Jack Russell in watercolours, I think. Still a stranger to acrylics and oil. But you never know…
Thank you so much,
I am still hesitant to start painting (again)..canvases, paint, brushes have been waiting eagerly for quite awhile, years ..attending overdue life drawing class no.2 on Wednesday, the last offered this year…been to an art exhibition of selections from the Tate art gallery: your article resounded with me as though I was meant to be moved, energised, empowered and inspired to move forward as an artist..who creates art…this is the true artist’s way, so thank you for your dedication, commitment, your inspirational consistency….:) Best Regards, Kyriaki
Thank you for this great guide – it’s true – more Titanium White is not the answer. Awesome examples chosen as well 🙂 I enjoy reading your posts. So helpful, thank you. ( courses of course as well )
Thank you for your kindness in sharing your knowledge. It is always appreciated.