
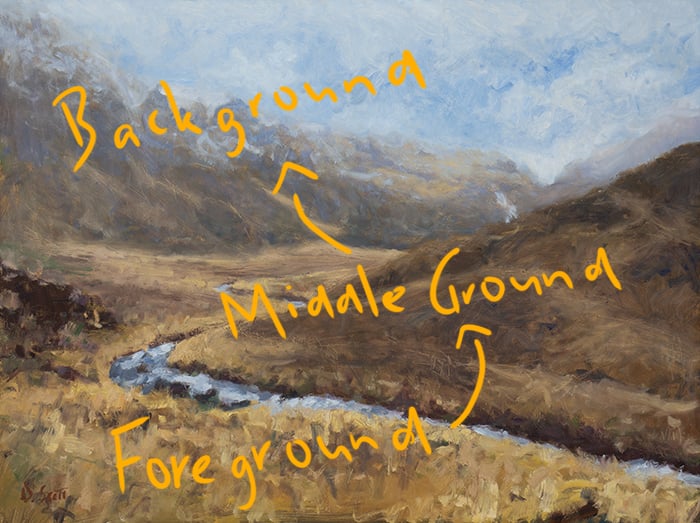
Let’s take a look at how to paint overlapping objects.
As you might already know, I’ve been working on a tree series lately. The main challenge with this series has been dealing with the complex arrangement of overlapping objects. All the leaves, branches, sky, grass, dappled light, and shadows are so tightly woven together it can be difficult to make sense of it all. Below are some of the strategies I’ve used throughout the tree series and some of my other recent paintings.
- Dark Wash Then Apply Highlights
- Broken Color (All at the Same Time)
- Part by Part
- Start With the Focal Point
- Work Back to Front
- Thin Wash Then Apply Dark Accents and Highlights
- Want to Learn More?
- Thanks for Reading!
I’ll walk you through the entire process using one of my recent paintings. You’ll see how I go from idea all the way through to reflecting on the finished painting.

Dark Wash Then Apply Highlights
Start with a wash of dark color, roughly matching the shadow colors. Then carve out the highlights. Most of the rendering is done on the highlights; the shadows are best left vague.
This works particularly well with dark, high-contrast scenes. Below is a recent example, Tree in Shadow. I started with a dark wash of blues and purples. Notice how you can roughly make out the subject.
")
I then worked on the highlights in the back.
")
To finish, I refined the shadows, being careful not to overwork it. It’s important that the shadows are distinct from the lights, especially for high-contrast scenes like this.

I also used this strategy for the following paintings:


Broken Color (All at the Same Time)
Build up a patchwork of distinct strokes until the subject emerges. This is the classic Impressionist approach. It’s particularly effective for subjects that do not have clearly defined edges between objects.
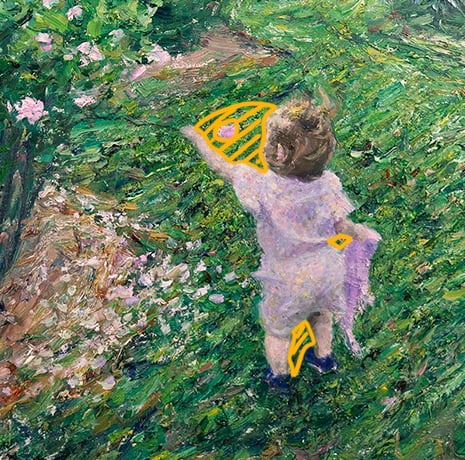
I used this strategy for my Tree Series, Overcast painting. Below are some progress shots showing the build up of broken color (plus a sneaky photo of Elora and Chontele).
")
")
")
")
")

Elora was only three months old in the above photo. She is now almost six months and looks completely different! We have asked her politely to stop growing up so fast.

Part by Part
Work on a certain object until near completion, then move to the next object. This strategy works better when objects are clearly defined.
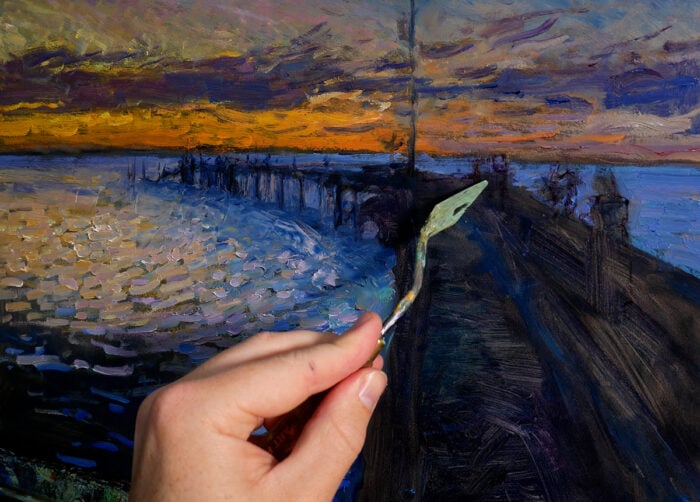
I used this strategy for Wellington Point, Shimmering Light. I started with all the light blues of the sky and sea. This ensured the colors stayed crisp.
")
Then I worked on the mangroves stemming from the shallow water. The challenge here is ensuring the light blues did not compromise the darker colors.
")
I finished with the foreground and the shimmering light.

Start With the Focal Point
Start with the focal point and bring it to near completion. Then work your way around the rest of the painting. I use this strategy when there is a dominant focal point that requires a bit more care. Painting it first means I can give it my full attention. By the end of a painting, I tend to be tired and more prone to mistakes.
The challenge of this strategy is that you spend the rest of the painting having to tip-toe around the work you did on the focal point.
I used this strategy in Minnippi. The dark trees are the focal point. They command attention in a sea of muted greens and grays. I painted them first for two reasons:
- They are delicate and required more care; and
- All the other colors are anchored around this dark accent. Painting the dark trees first allowed me to better judge the surrounding colors.
")

Work Back to Front
Start with the distinct objects, then work your way forward. This is one of my default strategies for simple compositions. It feels like a logical approach.
I used this strategy for Gold Coast, Sand Dune and Wellington Point, High Contrast:
")


")
Thin Wash Then Apply Dark Accents and Highlights
The Russian Impressionists often use this strategy to great effect. Start with a thin wash of muted color, then apply the dark or colorful accents and highlights.
I’ve been testing this strategy with some interior scenes lately. Below are a few paintings featuring my grandparents’ dining room. Interior scenes like this tend to be complex, so it’s important to simplify. Starting with a wash of muted color allows you to simplify most of the “noise”. You can then use highlights and dark accents for the important details.


Want to Learn More?
You might be interested in my Painting Academy course. I’ll walk you through the time-tested fundamentals of painting. It’s perfect for absolute beginner to intermediate painters.
Thanks for Reading!
I appreciate you taking the time to read this post and I hope you found it helpful. Feel free to share it with friends.
Happy painting!
Dan Scott

Draw Paint Academy


Thank you Dan, really enjoyed this primer. Expanded my awareness of what was possible, very helpful.
Thank you so much, new to oil painting as I always painted in acrylic. But I am ready because of you!! Also so you actually inherited your talent . I can’t imagine how wonderful that must feel when you found that artwork and to find out how talented he was.. Again thank you for the inspiration, all the knowledge and talent you share with us !! Wish me luck on my journey painting in oils.. just purchased all my supplies and I am ready! Well at least I think I am , it’s a little scary, intimidating.. Thank you again
Dry nice commentary – many thanks!
Dear Dan
Thanks a lot for this article. I was confused about various processes of doing a painting but your article clarified it. Very helpful.
Reza
Thank you very much!
Your original is admirable. Thanks for sharing so much! By the way, I suspect that Elora declined your polite request that she quit growing up so quickly. This will be the first of many such shows of her independence. What a lovely daughter.
Thank you so much for all the tips. Your paintings are terrific. That one of the tree is my favourite, all the different colours and lots of paint give it a life of its own that stands out to the viewer. In fact it does more than that, it invites you to come into the painting. I love paintings where the paint is so thick, it almost comes out to meet you. Magnificent work
Like your paintings also
It was amazing to see the final painting pop after watching the earliest stages of the paintings. I really enjoy your posts and have learned so much. All of you have a delightful year and stay well.
Love your paintings
I also paint in watercolors yet was inspired to try oil and acrylic.
I paint in watercolours. But have found your “kick start” applicable to everything. Most all your instructions and ideas very valuable indeed. Thank you. I love seeing a painting as it is being created.
I agree.
I was inspired to do a small oil painting 2 days ago ….
Dan, you are such a great educator – no other instructor has ever shared similar tips (so far). I don’t paint in oil – too intimidating for me – but I bet I can apply these for acrylics. Each of your posts is well-written: I love reading them, whether tips or art analyses. Wishing you many happy students! Your daughter is beautiful and I bet she will paint as soon as she can hold a brush.
Thank you so much for sharing your knowledge with us. I find your strategies very interesting, and your paintings are beautiful.
Your painting s are radical , thanks Dan!
Thank you Dan for these beautiful paintings and inspiring hints.
I liked very mush the photo of Elora. I’m sure she will be inspired by her dad’s pantings
Very good posting. Cant wait to try your suggestions when I start my next landscape project.
Thank you for sharing your knowledge. These paintings are beautiful. I will refer back to this and try to improve some paintings…Maybe I could post somehow if I improve them.. You were generous with us! Regards, Emily
Oh thanku so much for your inspiring very helpful hints of How to paint Overlapping Object with trees. Brilliant !!!! I will start doing some paintings first thing in the morning. We have a park nearby with trees ponds and ducks!!!!
Thank you! Dan..for sharing such insights to paint intricate, overlapping objects. All the examples are very useful and inspiring.
Regards.
I really like your posts. They are informative and can translate to acrylics quite well. No matter what I always learn something. My favorite is Welllington Point 🙂
Seeing the variety of methods for painting different subjects is very helpful, and your showing the steps in the process is most helpful. Thank you so much, Dan! Also, Elora looks like she’s figuring things out and way too cute!!!
This is brilliant! Thanks for sharing your process. It’s been a while since I have stepped out for a landscape painting. I’d often get ‘lost’ in the details and lose focus. This helps to simplify the process!
Whenever I receive an email with your tips/ blog post announcements! I drop work a bit and just read that little dose of art. It gives me both motivation and inspiration to paint. Thank you
What a great childhood to grow up around colors and paintings, to form at an early age a taste for the colorful nature.
All your advices are great gor my work, but I often find myself as trying to joggle with 5 or more balls. Well it’s a good thing at least I can see those balls. In time I hope I will also be abble to control them.
HI Dan
I so enjoy your instructional posts. And the baby pic was a special treat. Keep up the good work on both fronts.
Faithful follower,
Mary White
Dan thank you so much for sharing your skills. I love your easy to understand approach and pictures of the graded way you complete your paintings. I am a rank beginner but you are teaching me so much. I love the way you are so proud of your lovely family. Thank you again Dan and I hope you have a wonderful Christmas and all the best for 2023
Impressive, Informative and a great resource – thank you
Thank you for all your posts. So informative . I look forward to them weekly. You are very inspirational. Love the tree series.
You have a beautiful family.
This post is so helpful, really gives me a handle on how to deal with “busy” subjects. It’s why I love your posts, so approachable and understandable. BTW. That little girl is a sweetie, and no you can’t slow down the growth. Just enjoy every moment as it won’t come again🥰
Thank you for sharing 🙏 Some wonderfully valuable tips!! Your paintings have come a long way since I first took one of your courses.
Love seeing the photos of you beautiful family!
Thank you for sharing 🙏 Some wonderfully valuable tips!! Your paintings have come a long way since I first took one of your courses.
Love seeing the photos of you beautiful family!
Thanks for your painting tips.I really must get my paints out. Love seeing your wife and little one..she seems to like your painting,too!!
Beautiful paintings that make me feel joy, alive, and like dancing!!!
The family is precious and blessings to you three.
It is only December 6th here in Canada. I really love your tree series as I am partial to trees myself. Good advice, Thanks.
You have a sweet little one and she seems to enjoy your paints also!
This is tremendous stuff! Good enough to get me back on the paints.
Most helpful and practical.
I know I will refer back to this informative, jam-packed newsletter from time to time and hope that you will include more photos of sweet Elora in subsequent newsletters from time to time. THANK YOU!
Thanks very much..I’m wondering if you could show how you do the strokes for the broken color? Do you paint one color and wait to dry before doing the next color in the gaps? All at once? Some other technique? Many thanks..
Hi Scott
This post of Dan’s might be a good read:
https://drawpaintacademy.com/broken-color/
Chontele
Love your landscapes, color and movement.
i am a amateur watercolor of very advanced age, but watch your videos and learn quite a bit.
I dabble in acrylic, but not well.
you are an inspiration.
Thank you for your efforts and sharing.
Thank you for the pictures showing the progression. Absolutely inspiring.
This is a wonderful lesson. I love all of the progression images.
Dan, This was a fabulous “class”. Thank you.
Could we also have a current photo of Alora and Chontele?
xoxoxo
Yes of course! I am sure Dan will email out some soon 🙂
Chontele
DANU Z DRUŽINO LEP POZDRAV!
Kar potegne me, da bi stopil v atelje, ko pregledujem vaša dela. Hvala DAN , za iskrena vodenja v slikarstvu. Mnogo svetlih trenutkov v novem letu Vam želim, Oskar iz Slovenije!
Thank you so much for illustrating/explaining the many different approaches. Plein air is challenging, so having ideas how to begin are very valuable!!
Thank you for all of your sharing and tips – very helpful!
Thanks for including Elora & Chontek they compliment your painting looks. like they are looking out a window on a beautiful scene, This Canadian Grandfathers advice enjoy Elora they grow up so fast.Your work is fabulous and inspiring, thank for your post.
Dan, first newsletter and I have learned a bundle!
At the present time I am doing a acryllic paint by number on canvas–I had begun with the dark edges–going in at least 2″–I stared at the pictuie and made a change of howe I was painting the picture–it is of a Wolf–istead of the borders around the WOLF–I am now spending 100% of my time completing the WOLF-then go back and fill in the sky–blue–and the shadow around the WOLF–black.
You have opened my eyes to how to do a painting–even a paint by number with ease.
Thank you!
By the way, this is your first newsletter I have received–just signed up–very good expanations.
Thank you very much
You so inspired me with color
Dan, thank you for the progress photos, I find these very helpful. I usually do part by part or back to front and the idea of broken color all at once both intrigues and scares the daylights out of me. So I should probably try it!
Your family is lovely. Elora seems really into that painting! Wishing you very happy holidays.
With gratitude,
Lola
Thanks for all the advice !
Thanks, Dan! It is amazing what outcomes you got with your techniques! I am inspired to do some loose paintings now that I’ve had artist block for a few weeks! Take care of your beautiful family!
Liz from not so Blue Hawaii where winter has begun with cooler temperatures and rain!
I haven’t painted for years. It had been my principal “hobby.” I still have not yet taken brush to paper, but I am feeling the impetus because of your “visits.” You talk about doing and I am with you, willing to try again: to respond to the results I like with equanimity and detailed awareness, and the results I don’t like, with motivation to discover what it is that I do not want to repeat. Thank you.
Very informative. Thank you
Dan, i just love your posts! Somewhere I picked up the notion that I have to pick an approach and stick with it! What freedom to explore them, judging the effect and noting usefulness!
Thank you from a new member in Santa Fe, New Mexico! This information is very helpful. I’m focused on how to translate your techniques to watercolors.
All the best for the holidays!
I’m doing the same thing, Lisa. It’s a struggle at times but, generally, I can work out the translation. I just keep moving my brush around and try several “ideas” from these posts as little color-sketches until things start looking the way that I’m aiming for. Good luck. 🤗
Just love the way you present your teachings. As always very informative. Many thanks for sharing your knowledge. Kind regards
Excellent démonstration Dan! Thanks à lot.
Many thanks Dan – great teaching!
Thank you Dan
You are a considerate, talented and helpful teacher. Your technical advice and step-by-step guidance are very informative.
Stephan
Ps. Elora will blissfully ignore your request, and grow at her own pace. Enjoy every moment of it!
Thanks, Dan for all your informative tips. I so enjoy watching your works in progress. It is so very helpful. (And you have 2 beautiful ladies to help inspire you)
Great post, so helpful thank you. I love seeing your beautiful family, have a wonderful holiday,
I really appreciated this post. Very good and well-explained. Thank you Dan!
I agree!
I wish I had seen before starting my most recent painting.😂 i put in my dark masses first, including a tree in shade. Putting in the sky was very tricky to keep crisp and avoid polluting with the dark.
Thank you Dan, this is very helpful. Not knowing how else to make sense of an approach to a painting, I’ve always worked back to front. Good, but limiting when doing intricate patterns like trees. Your ideas have opened my eyes to the other possibilities.
Excellent! Thanks for the lessons. Likely’s !
thANKS
Excellent! Thank you for the different techniques .Lovely’s!
These works in progress explsin all these different approaches so well. You are a wonderful teacher. I look forward to each post with expectations of a new clue to the painting process. Thank you.
Dan,
Thank you for the wonderful tutorials and I enjoy seeing your work they are very exciting.
Enjoy your first Christmas with your daughter and family.
Vivianne
Thank you so much! Lovely pictures and really helpful explanation of the steps involved.
Im not at all sure if you are using water colors, acrylic, or oil paint. Please let me know. The colors are gorgeous and the explanation of your techniques very helpful. Thank you for sharing.
Hi Barbara.
They were painted in oils.
Dan
Thank you Dan, great tips to have at hand. I love your paintings.
Wow, I’m a beginner and I cant follow any of that! Guess I better go to beginners class
Thank you so much! I love these pictures!
Yes – the photos of your artwork in progress give a better understanding. Thank you very much!
Thank you, really useful instructions if how yo build up a painting
Sometimes I just don’t know how to begin. This post is so helpful, giving me a variety of strategies. Lovely work. Lovely family!
Thank you for this enlightening tutorial! I love your approach to composition the idea of working back to front, your method of overlapping and under-painting strategies. So inspiring! I will have a look at your class schedule!
I can’t tell you how much I enjoy your photos of art work in progress. They bring the end result into focus with an depth of understanding I didn’t think I processed. Being new to painting, your emails keep me hungry to accomplish my impossible. Thank you kindly for your hard work and generosity.
Thanks for your painting tips.I really must get my paints out. Love seeing your wife and little one..she seems to like your painting,too!!
Thank you, this was very helpful for my ongoing landscape from Norway.
Just lovely! Thank you so much for your advice – so very helpful. What medium were you using and do the techniques apply to acrylic as well? Very much looking forward to learning more tips. 🤗
Hi Patience! I use oils but you should be able to use most of the same techniques with acrylics. The main challenge is dealing with the fast drying time.
Thank you Dan for the impersonistic
style ( very well explained)
I love it and I need more work to perfected !
From Eastern Canada with best wishes!!
It is only December 6th here in Canada. I really love your tree series as I am partial to trees myself. Good advice, Thanks.
You have a sweet little one and she seems to enjoy your paints also!
Thank you thank you
Such an interesting and informative article showing how you have built up different paintings. Thank you 😊👍😊
Thank you very much Dan for all your helpful tips in detail. It gives us a much better understanding of the overall painting process and what the focus point should be, where to insist and spent time for details and where not. Keep up the good work!
Your gorgeous daughter will be 5 in no time😃. Our Oliver is 5 already.😊
Thank you, this is very helpful for a beginner.
Thank you Dan from Banbury Oxfordshire UK.
A lot of us out here are inspired by the ‘Pillars of light’ that the trees are bestowing on us.
Dan-Thank you for the detailed explanations and the photos of art work in progress. They give understanding
Dan! Your work is absolutely fabulous and thank you for sharing your work! Having moved house and feeling totally wiped out of any inspiration I am finding your posts so encouraging. I love the gentle nature of your work and your vibrant palette!
Enjoy your little one! She is beautiful. They grow up too quickly and change each day. I am now a grandmother and lately a great grandmother! Happily I shall be seeing them next weekend when we have a family Christmas reunion in the middle of England! Have a happy Christmas and a healthy and prosperous 2022!
Kind regards
Marion
Inspired.
Thank you.
I can’t wait to paint again.
These are really helpful tips, and great to see the progress of each painting.
Wonderful paintings and trees are alive in these works
Thank you!!!!
Thank you so much !! I really enjoy your insights!
Very interesting, not painted impressionist style before. Thanks for this.
Thank you Dan. 💗