
This is a detailed guide on the concepts of foreground, middle ground, and background. You’ll learn what they mean and how to paint them effectively.
- What Do They Mean?
- Positioning the Focal Point
- Allocating Space
- Transitioning Between the Different Areas
- Do You Need a Foreground, Middle Ground, and Background?
- Key Takeaways
- Want to Learn More?
- Thanks for Reading!

I’ll walk you through the entire process using one of my recent paintings. You’ll see how I go from idea all the way through to reflecting on the finished painting.

What Do They Mean?
The foreground, middle ground, and background refer to areas in space. The foreground refers to the nearest area. The background refers to the area of space in the distance. The middle ground occupies the space in between.
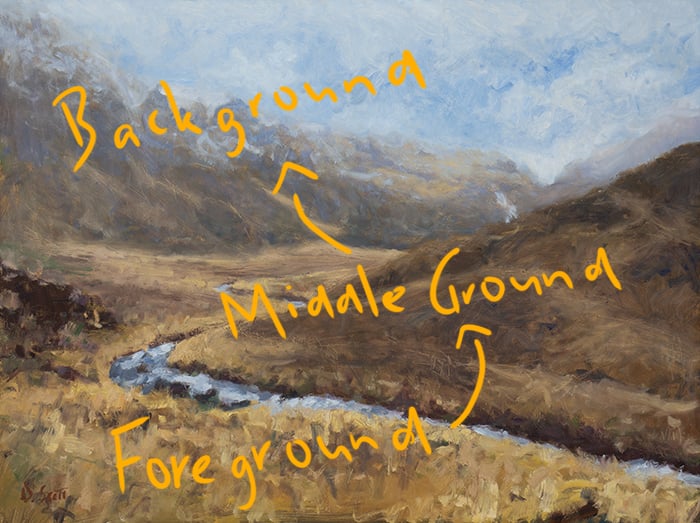
I typically think of these concepts in a relative sense rather than an absolute sense. That is, they are defined by the relationships between them.
The foreground is close in relation to the middle ground and background. The background is distant in relation to the foreground and middle ground. The concepts add meaning to each other. This also means that the concepts can be applied regardless of the actual amount of space or distance involved. An intimate still life or genre scene could have a foreground, middle ground, and background just as a vast landscape can.
In Joaquín Sorolla’s Elena Among the Roses, you could say the nearest plants and flowers represent the foreground, Elena represents the middle ground, and the greenery behind her represents the background.

Positioning the Focal Point
Where you position your focal point in terms of the foreground, middle ground, or background will influence the overall appearance and impact of your artwork.
A focal point in the foreground will appear close and intimate. In my painting, Vivid Flowers, Brisbane City, the focal point is right up close in the foreground. The middle ground and background are there to complement the focal point and provide context.

Peder Severin Krøyer did a similar thing in his Self-Portrait, Sitting by His Easel at Skagen Beach.

A focal point in the middle ground will appear balanced and natural. The foreground helps lead our eyes toward the focal point in the middle ground. The background provides contrast, depth, and context.


A focal point in the background will appear ambient and vast. The distant focal point will help pull our eyes through the painting. It’s a particularly effective strategy for dramatic sunsets and sunrises.


Allocating Space
How much space in your painting should you allocate to the foreground, middle ground, and background? The answer will vary from painting to painting. Below are some considerations:
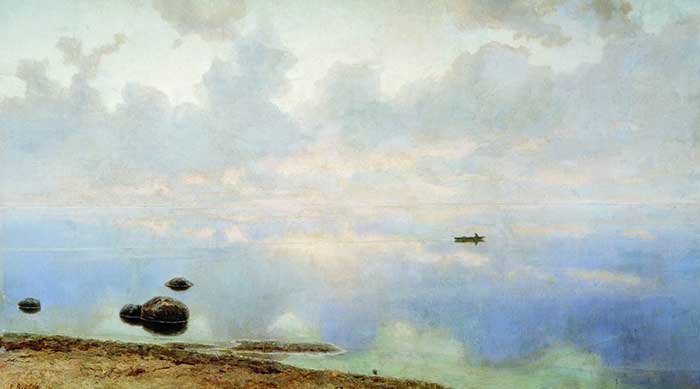
A small area of concentrated detail and activity will have the same, if not more, impact as a large area of quiet space and soft contrast. For example, if the foreground is full of activity and contrast, you might want to give it only a small area in the painting and balance it against a larger area of quiet space. Efim Volkov’s Seascape is a perfect example.
You can use the rule of thirds to find a visually pleasing balance between the foreground, middle ground, and background. One of the ideas behind the rule of thirds is that there’s an inherent and geometric strength behind the relationship of 1/3 to 2/3. You could take advantage of this idea by compressing the foreground and middle ground to 1/3 and leaving the remaining 2/3 for the background (or any other allocation that follows the 1/3 to 2/3 relationship).
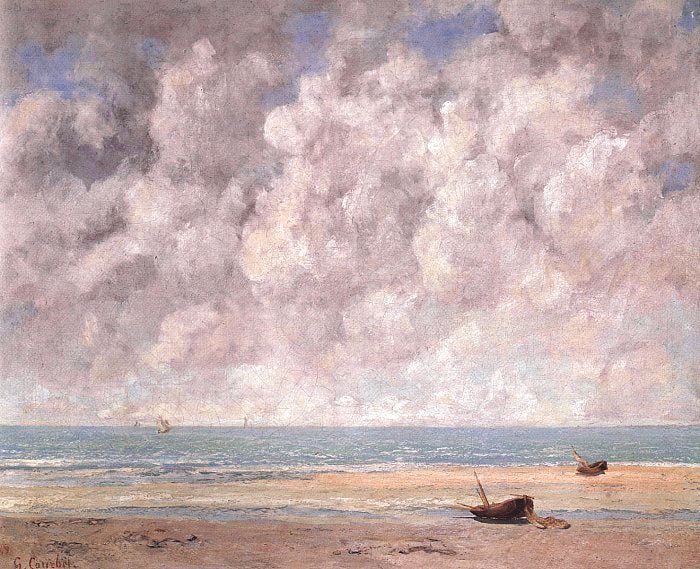
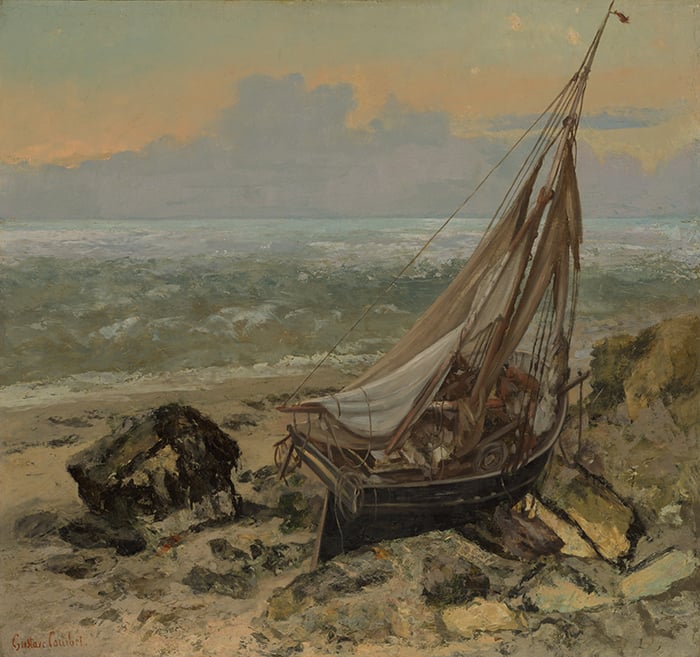
Be careful of an even split between the foreground, middle ground, and background. This can work, particularly for well-balanced landscapes, but it can also appear overly neat and unnatural. If you are going to give equal space to the foreground, middle ground, and background, you should consider other means of injecting a sense of counterbalance into your work. For example, in Gustave Courbet’s The Fishing Boat, the foreground, middle ground, and background are roughly equal in terms of allocated space. But the foreground has more weight via contrast and dark accents than the middle ground and background combined. There’s a sense of counterbalance between the small but busy foreground and the large but quiet middle ground plus background.
Tip: Don’t overthink it. If it feels right to allocate space a certain way between the foreground, middle ground, and background, then go for it. No more justification is needed. Theory shouldn’t get in the way of a gut feeling. That takes the fun out of it painting!
Transitioning Between the Different Areas
You must consider how you will transition between the foreground, middle ground, and background. Will the transition be abrupt, smooth, or somewhere in between?
An abrupt transition will make the areas in space appear more distinct and separated. It might also convey a sense of distance between them. In Thomas Cole’s The Oxbow, there’s a sharp transition between the foreground (the trees and rich greenery) and the middle ground (the refined land and river). This conveys a sense of distance between the two areas in space. It also makes the foreground appear closer by contrast (if you want to push an idea of closeness and intimacy in a subject, surround it with vast, distant space).

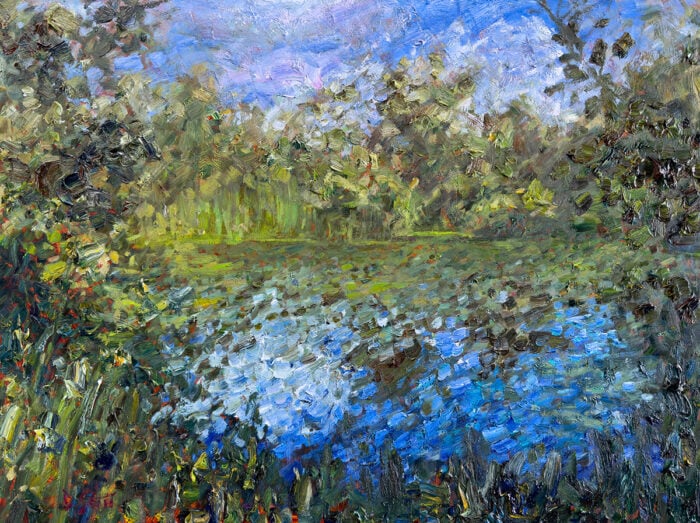
A smooth transition will make the different areas in space appear less distinct. It will also make it easier for the viewer’s eyes to travel between them. My painting below, Maryvale, Mist, is a dramatic example. The foreground melts into the middle ground which melts into the background.
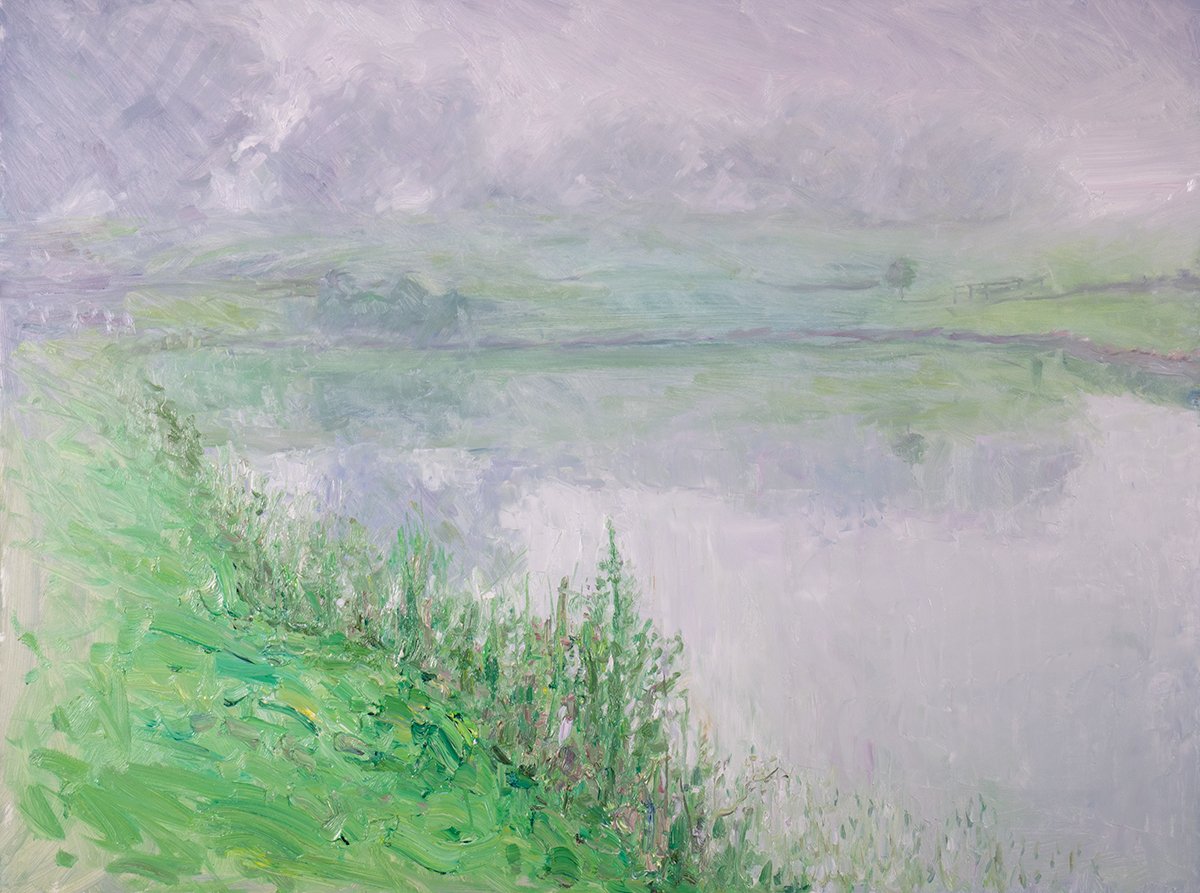
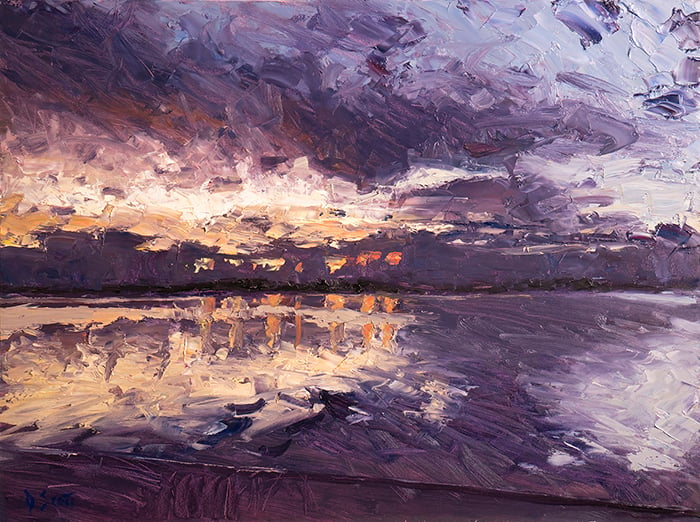
In some cases, it might be appropriate to exaggerate the nature of a transition between two areas in space. That is, you could make the transition sharper or smoother in favor of the ideas you want to convey. I did this in the Maryvale, Mist painting. I made the transitions smoother than what I actually saw in life. This helped me push the sense of ambiguity and ambience. I did the opposite in Caloundra, Shimmering Light; I made the transition from the foreground to the middle ground and background sharper and more abrupt. This pulls the foreground forward in perspective and pushes the middle ground and background back in perspective.

As for the techniques you can use to convey a transition between two different areas in space, you have a few options:
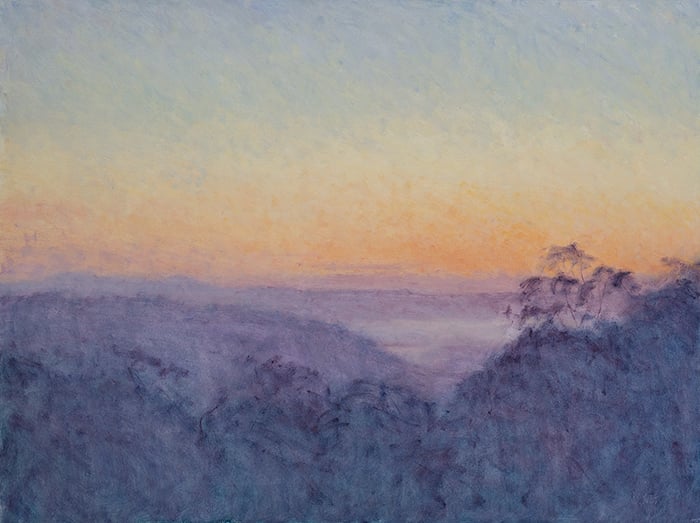
You could use color gradation to make the colors lighter/darker, warmer/cooler, or richer/duller. The finer the color gradation, the smoother the transition between different areas in space. This works well for vast and atmospheric landscapes. In my Morning Lookout painting, the colors get lighter and warmer as they recede into the distance. There are a few key jumps in color to mark the transition from the foreground, to the middle ground, to the background.
You could use suggestive brushwork to lead the viewer from one area to the next. You could use different brushwork for different areas in space. For example, in my Brisbane City, Mist painting, I used more upward, jabbing strokes for the foreground. As we approach the middle ground, I use more sweeping, horizontal strokes. You can also use your brushwork to gently push the viewer in the direction of the next area in space.
You could taper off your level of detail and rendering. That’s what I did in New Zealand, Foggy Mountains. The painting starts off with sharp detail and contrast in the foreground then it gradually tapers off and becomes more simplified as we move through to the middle ground and background. The gradual tapering allows for a smooth transition between the different areas in space and helps convey a sense of atmosphere.
Do You Need a Foreground, Middle Ground, and Background?
Having a distinct foreground, middle ground, and background would make for a balanced composition, but it’s not always necessary. Below are some alternative strategies.
Foreground and Background (No Middle Ground)
If you exclude the middle ground, you would have a sharp jump in space from the foreground to the background. This works well when you want to exaggerate the closeness and intimacy of the foreground.

Middle Ground and Background (No Foreground)
Excluding the middle ground will create a sense of distance between the viewer and the painting. The downside is you won’t be able to lead the viewer into the painting as easily.

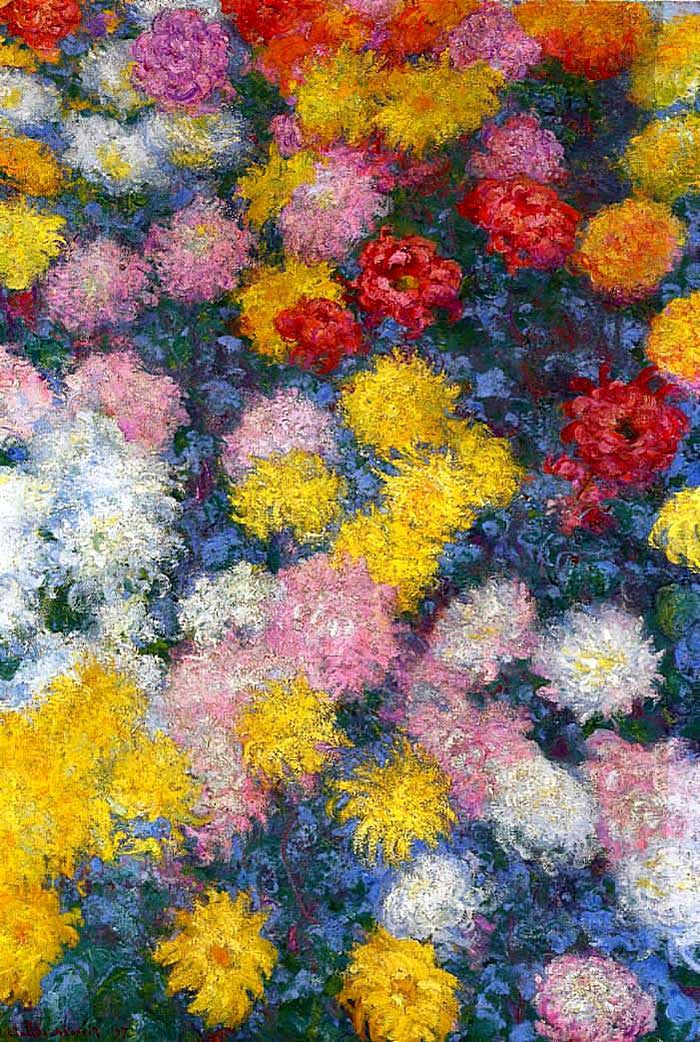
Only the Foreground (No Middle Ground or Background)
In rare circumstances, you might depart from the idea of space altogether and paint only a section of the foreground. Claude Monet’s Chrysanthemums comes to mind.
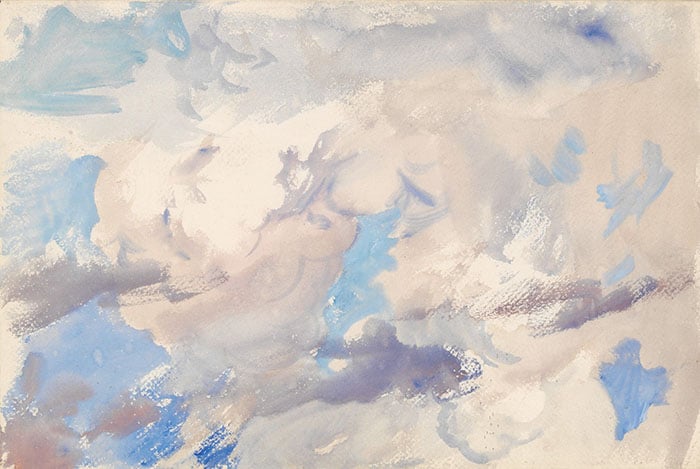
Only the Background (No Foreground or Middle Ground)
You could also paint only a section of the background without any strong sense of foreground or middle ground. This can work for ambient skies.
Key Takeaways
Here are some of the key takeaways from this post:
- Foreground, middle ground, and background refer to areas in space. I typically think about them in relative terms rather than absolute terms. That is, they are defined by the relationships between them.
- Your focal point will have a different impact based on where you position it in terms of the foreground, middle ground, and background.
- When considering how much space to allocate between the foreground, middle ground, and background, remember that a small area of busy space will have the same impact, if not more, as a large area of quiet space. You can also use the rule of thirds to help find a pleasing balance.
- Having a distinct foreground, middle ground, and background will appear balanced and convey depth, but it’s not always necessary. Sometimes it’s better to exclude certain areas in space in order to convey your ideas about the subject.
Want to Learn More?
You might be interested in my Painting Academy course. I’ll walk you through the time-tested fundamentals of painting. It’s perfect for absolute beginner to intermediate painters.
Thanks for Reading!
I appreciate you taking the time to read this post and I hope you found it helpful. Feel free to share it with friends. Let me know your thoughts on the painting in the comments.
Happy painting!
Dan Scott

Draw Paint Academy

This is gold! Thank you!
awesome. this information is very helpful, thank you!
This was a great and very informative read!!
Thanks for this. My problem is always with light and shade. I am always hesitant to paint a dark foreground when it can sometimes be what is needed… I seem to have a bit of a block on being brave with light and shade and what colours to paint shadows…
Many thanks, this article is really helpful. I have a drawing that I knew wasn’t right and now I think I can sort it out
I am so happy I stumbled on this article. It’s so informative. I’ve learnt a lot from it. Thank you.
Love both the explanations and the examples. Very enlightening. Thanks.
This was a very good article. I spend a lot of time with deciding my focal point. Reading this helped me to think how the focal point can be adjusted with the different grounds. Thank you for this article.
Thank you. I always sensed these concepts but you explain them so clearly.
Thanks for sending. It makes simple sense and gives the artist freedom to choose and not always be bound by rules.
Mary White
Great information! Thank you!
As usual best rendition of a topic. I now have a deeper understanding of F/M/B and can apply the concepts to my art.
Thank you so much
An important topic, crisply conveyed. Well done Dan!
After reading this, I find myself now observing photos and paintings with these concepts in mind on how the F/M/B work together and how I might best use them while painting.
Interesting also that now when observing in real-time, it seems to make a scene more memorable to look for, and uniquely focus on each of the three planes, rather than just try to take it all in as one panoramic scene needing to be painted.
Your emails are so informative and helpful to an amateur. Thank you
Thanks very much for this. Will refer to my notes often. Best yet, thanks for including your seen paintings. Your style reminiscent of my grandmother’s!
not know how auto correct took a misspelling of ‘own’ to make ‘seen’! LE
very comprehensive and very helpful. Thank you😊
Rey comprehensive and very helpful. Thank you😊
Thanks, Dan for the great info.
Now I am going back to check my work to see if my foreground, middle ground and background are anywhere near being right.
dee money
Question. If the focal point is a fisherman in a stream In the middle section and you want him to stand out do you assign details to him like the foreground ? Want him to be most important even if in middle. Area
Hi Rebecca. I would simplify the foreground and use it only to provide context and to lead the viewer towards the focal point (the fisherman). Then, use concentrated detail and contrast for the fisherman. Hope this helps!
Thank you Dan, very informative, I have learned a lot to work into my next painting.
How do you describe the 3 levels in geometric art?
love to read your answer!? I never asked this Question or read an answer to that particular question 🙋♀️!
Hi Lida. I’m probably not the best person to ask as I don’t paint in that particular style. My guess is that the concepts of foreground, middle ground, and background can apply to geometric art in the same way as it applies to landscape painting, portrait painting, etc.
I look forward to every one of your posts. Your generous sharing of your expertise as a practicing artist as well as the introduction to famous and not so commonly known artists’ work have expanded my art knowledge tremendously. Coming from an 81 year old artist that is high praise.
Barbara
This is a great lesson to help planning the space. How interesting to compare the different focus point of each artist based on their theme, but mainly working together the background and foreground.
Very helpfull information.
Thank you
Thank you. Very well put and clear.
Thank you for this art lesson. It’s great to see the examples along with the explanations. Although I know this it is always great to have a concise lesson with beautiful art to look at. Nice work Dan ( your art is so appealing and getting better all the time, if that’s possible)
Wonderful examples- thank you
Dan,
This is such valuable information for beginners and all artists to learn early, so helpful.
Thank you for sharing your knowledge about painting.
Charlotte Huebner
Brilliant!
very informative and insightful. Great paintings and great article. Thanks very much!
This post, as all the other post of you showed me new path in art.
Once again, many thanks for yet another very useful and timely post.
Thanks for that. It was especially helpful identifying spaces in say, still life, rather than just landscapes.
Thank you so much, Dan, for all the wonderful posts on art that you share with us. I look forward to seeing them in my email inbox! I have learned a lot from you.
I love the explanation, useful and give more skills for what I want to learn . Thank you DAN . Blessings
Merci infiniment pour vos posts si généreux et intéressants
Really excellent- this got me thinking about the work in my studio in a new and refreshing way. Thank you!
Thank you. A very clear explanation of the relationship between the.concepts of space.
Thank you. A very clear explanation of the relationship between the three spaces.concepts
Great description of foreground, middle ground and background. I’ll refer to it often. Thanks.
Very informative and interesting. Thank you.
Thank you that was was very interesting.
Carmel
THANKYOU VERY HELPFUL SALLY
As always great
This was a fabulous article! Thank you.