If you are just starting out in painting, one of the first areas I suggest you learn is how light and shadow work. It influences almost everything we do as artists – the colors we use, our compositions, our brushwork, how we render form and so on.
It is also one of the few aspects of art which is not that subjective because it is based more on science. With light and shadow, you either have it right or wrong. There is usually no in-between. This is handy for artists as so many other aspects are subjective by nature, like color and composition.
This post is a beginner’s guide to how light and shadow work. I will be painting an egg to demonstrate my points. I will cover:
- What Do You Need?
- Light and Shadow Terms
- Direction of the Light and Contour of the Egg
- Block in Light and Dark
- Giving Context to the Egg and Adding Mid-Tones
- Render With More Detail
- Summary
- Want to Learn More?
- Thanks for Reading!
What Do You Need?
If you are a beginner, then you might want to follow along with this egg tutorial. Here is what I used:
- Burnt sienna and titanium white to represent dark and light.
- A reference photo of an egg (which you can download here).
- A small canvas.
- A few medium sized filbert and flat brushes and a small round brush (you can learn more about brushes in this post).


Light and Shadow Terms
Before I go any further, I will run through some of the common light and shadow terms.
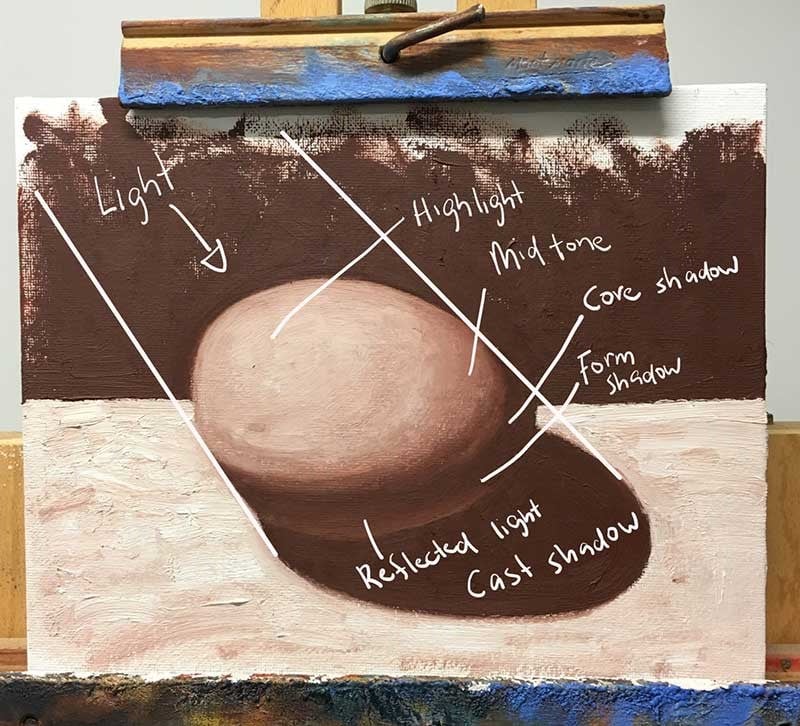
Light: Direct light from a light source.
Highlight: Where the light is directly bouncing off the object. This is usually the lightest part of the object. The position of the highlight varies depending on the position of the light and the viewer. If either of these move, the highlight will move (it is not fixed on the object).
Mid-tone: A range of tones which transition from light to dark.
Form shadow: Area of the object which is in shadow.
Cast shadow: Shadow which is left by the object (but is not on the object itself).
Reflected light: Light bouncing back into the form shadow from the surroundings.
Core shadow: Area of the form shadow which is not being hit by any reflected light.
There are some other light and shadow terms which I have ignored to make this a simple process.
Direction of the Light and Contour of the Egg
First, you need to determine the direction, distance and intensity of the light. This influences the way light and shadow fall on the egg.
In this case, the light is coming from the upward left corner and appears to be close and intense. As a result, there is a sharp cast shadow.
I start by indicating where the light is coming from and drawing the contour of the egg and shadow. I am not that worried about how well I render the egg at this stage as I can easily fix mistakes in the wet paint later on if needed. I am really just trying to develop an understanding of the form and where the light and shadow is falling.

Block in Light and Dark
I then block in the light and dark areas of the egg. This is what you get when there are no mid-tones. Notice how little information is conveyed from this. You don’t get a sense of form without the mid-tones and it appears very flat.
This is kind of like a notan study, in that you get to see the most basic abstract design created by the balance between light and shadow. Once you introduce the mid-tones, this basic design can be difficult to spot.

Giving Context to the Egg and Adding Mid-Tones
I then did the following:
- I added context to the egg by painting in a dark background (otherwise the egg just appeared to be floating in space). This also allowed me to create an interesting pattern with the darks of the egg linking with the dark foreground.
- I started to add some basic rendering to the egg with mid-tones. Notice how much more information is conveyed with these mid-tones. Suddenly, it appears to be a round form rather than a flat surface. The balance of lights and darks has not changed, but now there is a subtle transition between them.
- I painted in the cast and form shadows, but I ignored any reflected light. As a result, there is no way to separate the dark of the egg from its cast shadow.

Render With More Detail
An interesting point from this tutorial is that the more you render the egg, the more realistic it appears. But, if you over-render the egg then you lose the distinct line between light and dark. It all just becomes a soft gradation of mid-tones. You will usually want to avoid this, even just for stylistic reasons. There are many benefits to keeping a strong notan design (strong lights and strong darks).
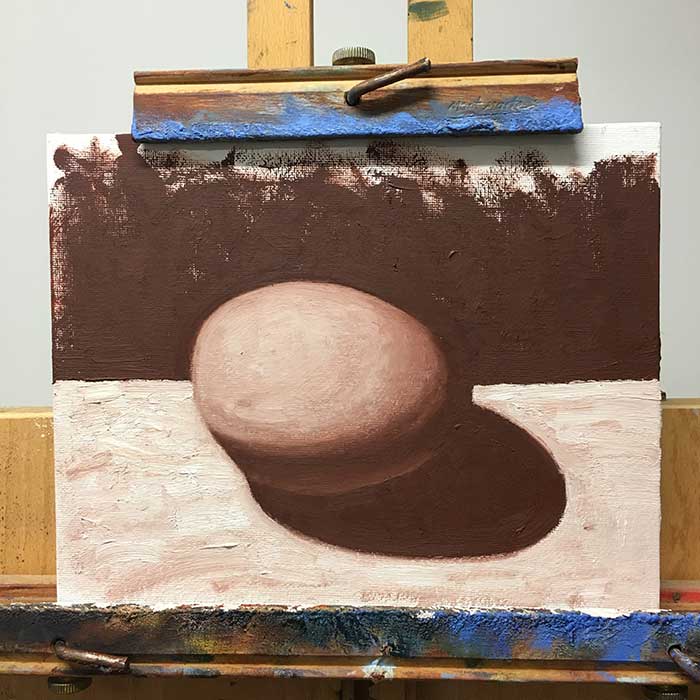
Below, you can see I rendered the transition from light to dark with more detail, but you can still tell there is a clear line between light and dark. I did not want to lose this line. Also notice how I took advantage of my brushwork to follow the form of the object.
I added reflected light to the form shadow (light which is bouncing back into the shadow). This is an important part which many people miss. The reflect light introduces light into the shadow, but you need to be careful that you do not compromise the integrity of the shadow itself. For stylistic reasons, you might want to consider darkening the core shadow and cast shadow rather than introducing white to the shadow itself.
Summary
Here are some of the key points from this tutorial:
- To accurately paint light and shadow, you just need to know the direction, distance and intensity of the light from an object. With this information you can reliably predict how light and shadow will fall on an object (this is not subjective like color and composition).
- Get familiar with the light and shadow terms as they will be used frequently throughout your art journey.
- Mid-tones give a sense of form to an object.
- The more you render the transition from light to dark, the more realistic the object will appear. But, this comes at the expense of distinct light and dark areas. Be careful not to lose that distinct line which marks the point where light goes to dark.
Want to Learn More?
You might be interested in my Painting Academy course. I’ll walk you through the time-tested fundamentals of painting. It’s perfect for absolute beginner to intermediate painters.
Thanks for Reading!
I appreciate you taking the time to read this post and I hope you found it helpful. Feel free to share it with friends.
Happy painting!
Dan Scott
Draw Paint Academy

Very helpful as always
Thanks Hetta!
Very understandabel! Viveca
Thanks Viveca
The assignment is hard thoo for meeeeeeeeeeeee
Thanks Dan. Love your tutoring. Stela
Thanks Stela! Glad to hear. Dan
I enjoy your posts!
Thanks Judy
Muy interesante y luz util,toda la información. Gracias
I will translate for others “Very interesting and useful light, all the information. Thank you”.
Thanks Jorge!
Hello Dan,
I don’t have much time to paint so many things, but it is true: things need light and shadow will they are interesting and visible.
kind regards Hans Peters
Thanks Hans
Thank you so much! You explain everything so well!
Glad to hear thanks Lavinia! Dan
Very good explanation. Thank you.
Thanks Jamie
Thanks…. very useful tips…. Sir…
No problem thanks Anagha
Thank you – your explanations and demonstrations are very useful to me as a beginner.
Thanks Heleen
Thank you !
No problem Cristina! Dan
A really good, clear explanation Dan thank you. A question, midtones and halftones are the same thing right?
Thanks again.
Thanks Ben! Yes same thing. Dan
When I was taking a beginners class, we painted an egg. Although it was white, she explained the cast shadow and reflective shadow. Your article was great. It was a good class. Not as easy as it looks
Thanks Bonnie. It is oddly difficult.
Wonderful, thanks a lot.
Thanks Frances!
Thank you for explaining how to create a three dimentional form. Is midtone same as turning color. Thanks again.
Great explanation i will never look at an egg the same again thanks Dan
My pleasure Paul! Keep up the good work. Dan
This course is great. So much information and a great review of things I learned before and totally forgot.
Thank you! Your lessons are so clear -exciting as one considers the spiritual aspects of light and dark too .
Learning art terminology for the first time .