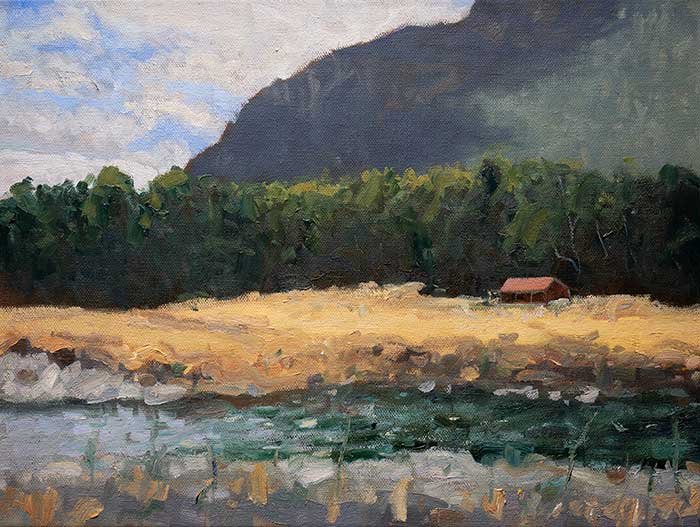
I recently put the finishing touches on this painting which features a secluded red house amongst the beautiful New Zealand landscape. I will walk you through how I painted it and what went on behind the strokes of my brush.
In this post, I’ll cover:
- Supplies Used
- Breaking Down the Reference Photo
- Stain and Sketch
- Block In Stage
- Detailing Stage
- Adding Highlights
- Finished Painting
- Key Takeaways
- Want to Learn More?
- Thanks for Reading!
(Before diving into this post, make sure to pick up a copy of my free Landscape Painting Starter Kit.)
Supplies Used
I recently invested in some Rosemary & Co brushes and this painting was my first experience using them. They did not disappoint. Here are all the supplies I used:
- Large And Medium Flat Brushes
- Large And Medium Filbert Brushes
- A Small Round Brush (For Detailing)
- Toned Disposable Palette
- Linseed Oil
- Odorless Solvent
- Gallery Stretched Canvas (Thin Edge)
Here are the colors used:
- Burnt Umber
- Ultramarine Blue
- Cobalt Blue
- Viridian Green
- Alizarin Crimson
- Cadmium Red
- Cadmium Orange
- Yellow Ochre
- Cadmium Yellow
- Cadmium Yellow Light
- Titanium White

Breaking Down the Reference Photo

Here is the reference photo I painted from. Whilst hiking through New Zealand we stumbled across this almost hidden red house amongst all the beautiful scenery. I thought it would make for an interesting painting reference, especially with all the vivid colors which are typical of the New Zealand landscape.
Here are some of the things I considered before I picked up my brush:
- The red house needed to be a feature but it should not dominate the landscape, so it was important that I did not use overly saturated colors for the house.
- Part of the scene is basked in a cool light from the blue sky and part is basked in a warmer light directly from the sun. This means that the areas in shadow from the direct sun should be cooler than the areas which are being hit by direct sunlight.
- I painted with warm lights and cool shadows throughout the painting (if you want to read more about color temperature, you should check out this post).
- There is a beautiful notan pattern that links the mountain in the background with the dark trees in the middle ground. The mountains in the background are around the same value but the colors are less saturated (closer to gray).
- The foreground and water are great areas to demonstrate some visible and playful brushwork.
Stain and Sketch
I stained the canvas using burnt umber and quickly sketched the dominant shapes and lines. I also indicated where some of the darkest darks will be in the painting.

Block In Stage
I started with the red house as I wanted to make sure I got that part right before I moved on to the other areas. My new Rosemary & Co brushes helped immensely here as I was able to use a flat brush to block in clean shapes of color.
The tricky part about doing the house first is that I did not have the surrounding colors in place to compare against. So I needed to make sure I was very objective with the colors I used for the house.
For the light roof (the most important part of the house) I used cadmium red, titanium white and burnt umber. This produced a nice, light red with a low saturation. For the dark areas of the house I just used burnt umber plus ultramarine blue (I wanted the dark area to be relatively cool compared to the light roof).
For the trees, I just used a mix of burnt umber, ultramarine blue and viridian green, applied in a very general manner.

The mountain in the distance was tricky to paint as I needed to indicate that:
- Part of the mountain was in shadow and part was in light; and
- The mountain was all back in the distance.
The mountain would look off if I miss either of these parts.
To achieve this, the lights on the mountain actually needed to be cool compared to the rest of the painting, but warm compared to the mountain in shadow.
For the yellow-ish grass I used yellow ochre, burnt umber and titanium white. I wanted this area to have a nice “glow” to it.

For the water I used ultramarine blue, viridian green and a touch of burnt umber to dull it down. The idea was that I would lay down a dark base of color, then go back later and scumble highlights across the top.
For the foreground I just used gray which leans slightly towards green.
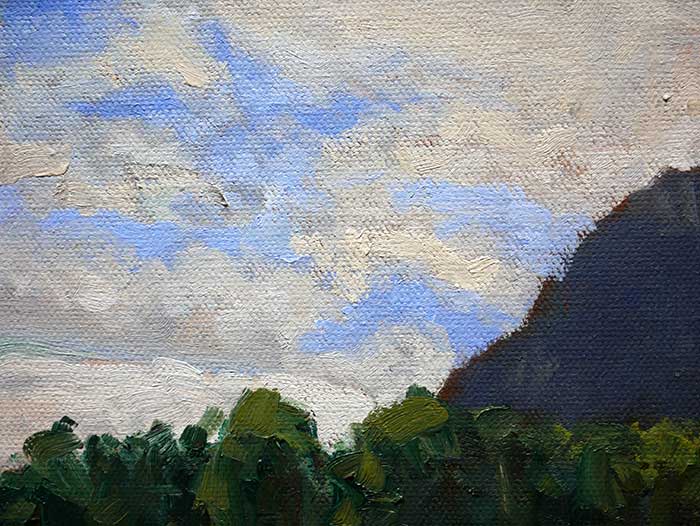
I also started to show hints of the blue sky peering through the clouds.

For the clouds I loosely applied a mix of titanium white, cobalt blue and a touch of burnt umber. I made sure that I was always changing the tone slightly throughout the sky so that it creates the illusion of fluffy clouds.
I then blended the edges in slightly with a clean brush. I did not want any hard edges in the sky, just lost and soft edges.

Detailing Stage
With the general foundation in place, I started bringing everything together and adding those little details which could make or break a painting.
This can be a tricky stage where many people overwork the painting. So I am careful to keep my brushwork as loose as possible, but not out of control. I also keep using large brushes as much as possible.
With the house, I just add some lines and block in some shapes and leave it at that. I do not want to over-render the house, as it would look out of place. I wanted to paint the house as I saw it in life.
You may also notice that I added some saturation and lightness to the sky and indicated some exposured cliff-face of the mountain.


Adding Highlights
Now for the fun part – adding the finishing highlights. I usually try to hold back on adding highlights until as late as possible in the painting. If I add them too soon, then I spend the rest of the painting trying to preserve them.
With the water, I used very loose brushwork and just scumbled various colors over the top of the dark green base to indicate light reflecting off the water.
In the foreground, I added some thick strokes of color to indicate plants, rocks and other natural elements. This texture helps create a sense of depth in the painting.
I also added some highlights to the trees, but you may notice that I overdid it. I had to go back and reduce the saturation of that green and make it warmer.

Finished Painting
Here is the finished painting plus some close-ups of the detail:



Key Takeaways
- It is so important that you understand the light which illuminates your scene. If you don’t understand the light, then you will essentially be painting blind.
- If you have a rigid focal point (like a building) then it can be easier to start with that area before moving onto the more general parts of the painting. With rigid objects, it is important that you get them right otherwise it may throw the rest of the painting. It is much easier to spot mistakes in rigid objects like buildings than it is with organic natural objects like trees, mountains and clouds.
- Just because a color appears vivid and saturated, does not mean that it actually is. In this painting, I bet many people would use too much saturation for the red in the building. Sometimes, you need to ignore what your eyes are telling you and rely on the colors which you will place around a color.
I hope you enjoyed this landscape painting tutorial. Let me know your thoughts in the comments below.
Want to Learn More?
You might be interested in my Painting Academy course. I’ll walk you through the time-tested fundamentals of painting. It’s perfect for absolute beginner to intermediate painters.
Thanks for Reading!
I appreciate you taking the time to read this post and I hope you found it helpful. Feel free to share it with friends.
Happy painting!
Dan Scott

Draw Paint Academy

Really useful post, thanks for all the insights to process of painting. The bit about saturation and identifying colour properly was particularly useful. Thank you again.
Thanks Suzanne! Yes color saturation can be a tricky area but very useful once understood. Dan
Wonderful tutorial!Thank you for explaining all your moves so explicitly.It is a beautiful landscape.I try to learn from tutorials as self taught painter
Thanks for the kind words Jayashri! Dan
fabulous and really helpful. so wasy to misinterpret colour and light and shade. thank you
Thanks Bea!
Wonderful guide; thank you! I love your mountain colors, warm and cool. You didn’t mention colors used. Same as trees, but using more ult. Blue? Lightened for sunny section?
Thanks Char!
The mountains are pretty much just ultramarine blue plus burnt sienna (leaning towards blue) and I believe a touch of viridian green. Yes just lightened with titanium white and actually a bit of cadmium yellow to warm it up a bit. I had to play around with this area a fair bit as it was tricky to get the temperature and depth correct.
Cheers
Dan
Yes thank you I enjoying this tutorial too! Really like the way you show the steps to
Get to the finished painting ..helpful seeing each stage and comparing.
Thanks Shirley! Dan
I really love this – the tutorial itself as well as the finished painting. I would love to see you paint this SAME picture and do a tutorial but using acrylic paint. I’m currently taking a class (it was advertised as oil or acrylic, but the teacher primarily paints and teaches in oils) and I’m really struggling since the paint dries so quickly. It would be really helpful to compare your oil method to an acrylic method on the exact same subject…if you have time! Thank you so much, your drawpaintacademy is really helping me (novice).
Hi Mary. Interesting question. To be honest the fast drying time is exactly why I moved to oils many years ago from acrylics. It is a struggle to deal with.
If I was using acrylics, I would paint generally the same BUT I would be more careful with my strokes rather than just applying paint and playing around with it on the canvas as I do with oils. I would also do a lot more scumbling (letting the paint dry, then building up layers of paint on top with a broken color effect).
But other than that, I would paint mostly the same.
Hope this helps. Thanks Mary
Beautiful work! I really appreciate a pro like you telling not only your process but also how you had to reconsider and redo something. It gives me confidence that I don’t have to get it right at first try!
Thanks Deb! I certainly wouldn’t consider myself a pro, maybe one day. But thanks!
Trust me, there is nothing wrong with making mistakes. Every artist does it, no matter how great. The really top artists are just able to quickly identify mistakes and correct them. But I agree, you will not often hear about top artists talking about mistakes they made, they only show the finished product.
Cheers
Dan
Thank you very much for sharing a very informative tutorial. You inspired beginner artist to learned the basic steps in oil painting.More power to you.
Thanks Ally! Dan
Thank you for sharing your expertise in this painting. Also love that you share the enlarged areas so that students can see your brush strokes well.
Thanks Joan, yes I always find the close-up shots to be the most interesting. You really get to see how the brush moved. Dan
Really helpful, especially because of the insightful comments. Love your emails.
Thanks Chris, that is what I want to hear! Dan
Thank you for the tutorial and the information of how you painted it. Being a commercial photographer and painter, and being used to changing shots etc. I would have made the house larger by 25%, but that is just me. Keep up the great work, and educating the masses.
Thanks Dennis – interesting point. I noticed later in the painting that I understated the size of the house slightly but decided against changing it. Cheers! Dan
Dan,
Great tutorial! Your painting is wonderful! Studenets will be able to glean alot of great painting, composition and color information. Great job well done!
To me the scale of the house is perfect. This scale shows the comparative height and power of the hills/mountains within the composition.
Great painting, great tutorial!
Thanks Dorine! Really appreciate the kind words.
Dan
Yes I like the details of your approach to the subject
Thanks Gerry
Thank you so much for your very informative post! I have learned a lot from you.
Really glad to read that Tony! Thanks, Dan
Added a new lesson plan! You have away of “sifting “to come up with truth!
No phony and really generous! If I am wrong,don’t anybody tell me!
Que hermosa pintura te felicito