
I recently put the finishing touches on a painting based on a photo from my Bali travels. It was an overcast day and we were walking through a temple which was claimed by monkeys.
The temple was situated amongst the trees on the top of a cliff. The winding path around the side of the cliff allowed for some very stunning views of the ocean and the cliff face.
This post is a step-by-step oil painting tutorial that will walk you through how I painted the following scene. I cover:
- Analyzing the Reference Photo
- Colors and Materials
- Part 1 – Preparing the Canvas and Sketching the Composition
- Part 2 – Blocking in General Shapes and Colors
- Part 3 – Building Form
- Part 4 – Refining What Is There
- Part 5 – Signing the Finished Painting
- Summary
- Want to Learn More?
- Thanks for Reading!

I’ll walk you through the entire process using one of my recent paintings. You’ll see how I go from idea all the way through to reflecting on the finished painting.

Analyzing the Reference Photo
Before you pick up a paintbrush, you should have a serious think about why you want to paint the subject and what you want to get out of it. Usually, there are only 2-3 things that really attract your attention in a scene. So you want to identify and focus on those things.
In this photo, I am interested in the snaking curves of the cliff and the ocean. These curves seem to contrast nicely against the linear edges of the horizon and cloud line.

I am also very interested in the light area below the dark clouds. It gives a nice sense of depth in the painting and creates an interesting value structure.

Colors and Materials

I painted this using oils on 28×21 inch stretched canvas. Here are the colors I used:
- Raw umber
- Ultramarine blue
- Cobalt blue
- Alizarin crimson
- Cadmium red
- Cadmium orange
- Yellow ochre
- Cadmium yellow
- Cadmium yellow light (not pictured above but introduced later in the painting so that I could mix a cool green)
- Titanium white
Part 1 – Preparing the Canvas and Sketching the Composition
I start the painting as I usually do by staining the canvas with raw umber and briefly sketching the composition. I wrote more about this process in this post.

Part 2 – Blocking in General Shapes and Colors
After I have the canvas prepared and a general sketch mapped out, I then start to block in the general shapes and colors. The end result of this should be a no-frills painting (the general structure with none of the bells and whistles).
This part is important for setting the general color harmony and composition of the painting. If my colors and shapes are wrong here, it will be difficult to fix later on.

Part 3 – Building Form
Once the general structure is set, I start to build form and add detail throughout the painting. I am still trying to paint generally, as it is still too early to get caught up in the particular details. This means using relatively large brushes.
I start to indicate the path snaking around the edge of the cliff, the orange huts and the rough texture of the cliff face. One thing I am focusing on is retaining some kind of simple value structure in the painting. I do not want the cliff face to be broken up into lots of smaller value groups. I would much rather it be one solid value group.
For the cliff face, I leave various colors unmixed on my brush so that I get this kind of streaking effect with my brush strokes. This mimics all the different colors of the stone and dirt without having to paint every individual detail. A common problem of beginners is they try to paint individual objects rather than masses. Instead of trying to paint every single rock or tree, try to paint what a large mass of rocks or trees look like.


Part 4 – Refining What Is There
This part is all about taking what is on the canvas and refining it. Most of the work I do here is on the water. I really want to capture that nice greenish-blue and the chaotic whitewash on the water. But I also want to balance the chaos against the orderly flow of the water.
I already have a dark foundation to paint on top of, so now it is time to pull out the lighter colors. I mix various combinations of titanium white, cobalt blue and cadmium yellow light for the highlights on the water.
I also try to make sure there is a gradation from dark to light as you go from the foreground to the horizon line. This helps create an interesting sense of depth in the painting.


Part 5 – Signing the Finished Painting
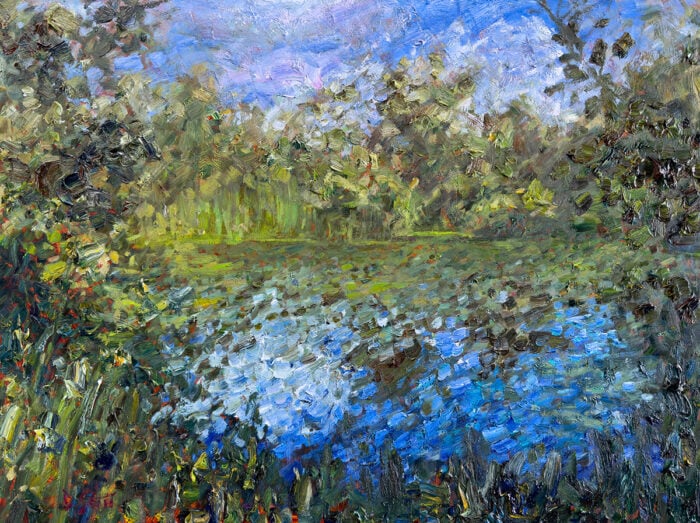
I basically continue to refine the painting until I have run out of problems to solve. Below is what I ended up with.
I signed the painting with a dull green which can be read clearly but does not look obvious or out of place.
The colors look slightly more vibrant in this photo as it was taken outside where there was more light. I try to get as much light in my studio as possible but nothing really comes close to the light you get from nature.

Summary
I hope you enjoyed this step by step oil painting tutorial. Some of the key takeaways from this painting are:
- Start with large brushes so you can quickly cover the canvas. This is especially important with large-scale paintings.
- Try to identify the top 2-3 things you want to capture from the scene you are painting and focus on those things.
- Sometimes it is important to simplify the values so that there are just a few dominant value masses.
- Try to get as much light as you can in your art studio!
Want to Learn More?
You might be interested in my Painting Academy course. I’ll walk you through the time-tested fundamentals of painting. It’s perfect for absolute beginner to intermediate painters.
Thanks for Reading!
I appreciate you taking the time to read this post and I hope you found it helpful. Feel free to share it with friends.
Happy painting!
Dan Scott

Draw Paint Academy


This oil painting tutorial was really enjoyable to follow. I love how the overcast tones capture the calm, natural beauty of Bali perfect for beginners to practice subtle lighting and texture. While browsing earlier, I came across a website about local tree service, and it reminded me how both art and nature rely on balance, patience, and care to create something truly lasting.
Muchas gracias! I’m getting ready for my first experience with oil painting. If I end up producing a master piece, the credit will go to you!!!
I found this article to be very helpful in that I was trying to complete sections too quickly. This really clarified the process for me. Thank you!
Happy to hear this Claudette, thank you! Dan
Brilliant many thanks.You showed us exactly you went about the painting and was very helpful. you. Are amazing. Christine
Thanks Christine!
Dan
Beautiful ? thanks for sharing
No problem thanks Dipali!
I enjoyed your step by step technique to the final product. Although I would like more realistic clarity in your composition.
Thanks Paolo! Do you mean you would like for my painting to appear more realistic? Or you would like a clearer explanation of the process?
These are very clearly and very well thought instructions and explanations. I used to paint from tutorials all the time and in my third year of painting I do that less and less but I still read and watch them whenever I can just to see what the process was. You’re such and inspiration Dan. Thank you so much for sharing your wonderful painting and teaching skills with perfect strangers across the globe.
Thanks Jola!