Photoshop is a remarkable tool that can complement the work of traditional artists. I don’t claim to be a
In this post, I will run through some of the ways you can take advantage of
- What Is Photoshop and Are There Alternatives?
- How to Use Photoshop
- Grayscale to See the Values
- Creating a Notan
- Color Checker
- Cropping the Image
- Changing the Color Temperature
- Saving Images for the Web
- Other Uses of Photoshop for Traditional Artists
- Want to Learn More?
- Thanks for Reading!
What Is Photoshop and Are There Alternatives?
Photoshop is essentially photo editing software. It is popular with digital artists and photographers, but it has many uses for us traditional artists as well.
To use
There are free alternatives, such as GIMP, but
How to Use Photoshop
Photoshop is a challenging beast and I have only started to scrape the surface of its potential. My best suggestion for using and navigating
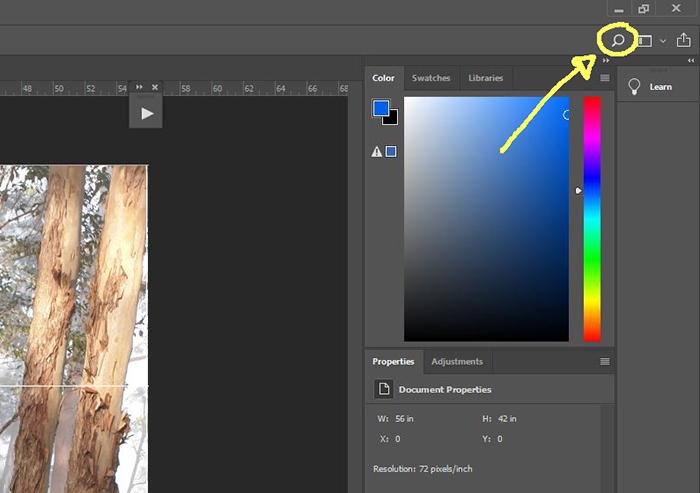
For example, if you search “Grayscale”, it will bring up that function.

Grayscale to See the Values
Grayscaling a painting or reference photo allows you to clearly see all the values (how light or dark everything is). It can be challenging to identify values when color is involved.
Here are some of the ways you can use this:
- You can identify the darkest dark and lightest light.
- You can identify any value groupings or patterns. For example, if you were painting a vivid sunset with all kinds of oranges, yellows, and reds in the sky, a grayscale might reveal that most of the sky is around the same value, despite all the different colors.
- You can use it to compare one value to another value. For example, are the distant mountains lighter in terms of value compared to the light trees in the foreground?
I will show you what I mean using the following reference photo from New Zealand. It is a stunning scene, with rich, Autumn yellows, vibrant greens, and distant blues. The problem is, all this color makes it difficult to narrow down on the values. I have a hard time identifying what is the darkest dark, lightest light, value groupings, and the general value hierarchy.

Below is the reference photo in grayscale. To do this in
The grayscale tells me the following:
- There are several points that seem to be completely lost in darkness (the trees on the left, right, and middle). There does not appear to be a single point that we can say represents the darkest dark. In the painting, it might be a good idea to pick an area as the darkest dark and then make the other areas a touch lighter. For example, you could create a strong contrast by making the darkest point in the painting the tree trunk which is holding the Autumn yellow leaves.
- Some of the lightest points in the painting are the highlights in the foreground (where dappled light is hitting the grass), the far left part of the sky, and some of the distant, white buildings.
- The value groupings are fairly scattered. I go into more detail on this in the notan section below.
- The sky is generally lighter than the mountains, which are generally lighter than the foreground.

Creating a Notan
Notan in art basically refers to the most abstract design of light and dark elements. Many artists create notan studies in preparation for more serious studio artworks.
Photoshop does a fairly good job at creating notan studies. All you need to do is (use the search function for the words in italics):
- Grayscale the image;
- Apply a gaussian blur (you want the image to appear fuzzy); and
- Posterize the image. Select either 2 or 3; this will posterize the image down to either 2 or 3 values.
Below is what I get by posterizing the reference photo with 3 values. This confirms to me some of the value groupings in the reference photo. It also shows me that the general value structure is fairly weak and scattered, so I might want to focus on color rather than value in the painting.

Color Checker
If I am ever unsure about a color, I can use a color checker to confirm my thoughts. It will tell me exactly where a certain color is in terms of hue, saturation, and value. Just search for the “eyedropper” tool in
I often use this tool after I have finished a painting to do an audit on myself in terms of how accurate my use of color was. This kind of self-reflection can be extremely valuable for calibrating and improving your judgment of color.

Cropping the Image
When I take a reference photo, I try my best to frame it in a way that is already aesthetically pleasing in terms of composition. But sometimes cropping is needed, which involves cutting out parts of the scene to change the balance of the composition.
To crop an image in
Then, in the top menu, go Image > Crop.
If I were painting from the reference photo below, I would probably want to draw attention to that beautiful yellow tree around the middle. I could use cropping to get rid of some of the surrounding noise to better focus the tree.

Changing the Color Temperature
I use this task frequently for altering photos of my finished paintings. If you take a photo in RAW (a kind of digital format), you can adjust the color temperature in
For example, if you took the photo under a warm, yellow-ish light, the painting may appear overly warm in terms of color temperature. If you took the photo outside under the cool, blue sky, the painting may appear overly cool.
When you open a RAW image in
Below is a photo of one of my paintings which was taken under a warm light. The colors appear far too warm in this case.
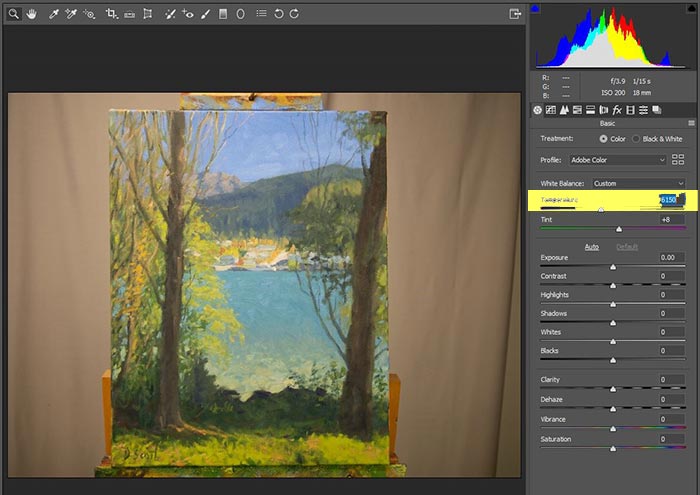
By changing the color temperature in

Saving Images for the Web
If you are uploading photos of your paintings to your website or forum, you should optimize them for the web. This means you compress the file so that it is not unnecessarily large. Unoptimized photos of your paintings will dramatically slow down your website speed.
To do this in
To do this, in the menu at the top go Image > Image Size… > Change the width to between 700 to 2,000 pixels.
Next, you need to select File > Export > Save for Web > Select an appropriate quality (I usually go with 50) > Save… > Select the file location.
The photo below went through this process. It is only a fraction of the size of the original photo, without any noticeable signs of quality loss.

Other Uses of Photoshop for Traditional Artists
Here are some other uses of
- Overlaying multiple images into one.
- Altering the reference photo before you paint. You could change the colors, alter the sharpness, make it lighter or darker, etc.
- Building a composition or color study from scratch.
- Zooming-in on a reference photo to see particular details.
Want to Learn More?
You might be interested in my Painting Academy course. I’ll walk you through the time-tested fundamentals of painting. It’s perfect for absolute beginner to intermediate painters.
Thanks for Reading!
I appreciate you taking the time to read this post and I hope you found it helpful. Feel free to share it with friends.
Happy painting!
Dan Scott
Draw Paint Academy

Greatest thanks Dan! This is really helpful. Photoshop has intimidated me for too long! I can use these simple steps & perhaps explore more.
I agree! Thanks for making this a bit less intimidating, Dan.
Your Information was very helpful; I work with oil and watercolor. Value is so so important to a painting.
Thank you for showing another way of analyzing my work.
I also use Photoshop for
a) getting the cropped image in pro with the canvas being used and
b) laying a grid over a photograph – like the Old Masters used to “square for transfer”. This helps get the drawing correct if you put a similar grid (or dots for the squares) on the canvas.
Also a one-off purchase of Photoshop Elements is cheaper and does everything an artist could need.
Hi Dan,
What an informative and well composed text.
I have learnt so much.
As a retired computer science lecturer I have dipped in and out of informal local art groups. I am STILL learning how to paint. I suffer from detailitis and perfectionism hence never completing a thing. I also don’t want to make naive paintings for anyone but ,yield (and the group). In the aUK since government funding stopped for night school classes and daytime courses populated by many retired (women mostly) women, there is no where to be taught first principles of any art.
I love the demands of watercolour techniques; I’ve become obsessed with colour theory .
I have learnt more from watching an artist paint including my current informal group leader Deirdre Boleyn.
So thank you for this text. And I’m looking forward to your other texts now. Cheers
I fully agree ! I’m a beginner at 71 and can see what is offered here. Thank you so much.
Great intro to Photoshop and important information! I always enjoy reading and utilizing your posts. Thanks for what you do!
Awesome post! Thank you for sharing. I use Photoshop often for digital art and have been thinking about how I could use it for my paintings and then saw this post. Great stuff. 🙂
Very helpful. It’s like having 2 sets of eyes:)
This is fantastic! Great lesson!
Hi,
Thanks so much for this information. Brilliant as usual.
How much gaussian blur do you give the image?…I’m working on a portrait.
Hi Sandy. Just enough to make it fairly blurry. The edges should be nice and soft.
Dan
Hi Dan
Thank you for your informative instructions above. There are plenty of free apps that can easily carry many of the relatively simple tasks that you performed on Adobe.
One such app that I use on my iPad is called Sketch Master (I paid a very small one off fee) which once your photograph is uploaded allows easy viewing in grayscale, black and white, pixelated and many helpful tools.
If you upload a picture of your painting it will easily allow cropping, hue changes and many other simple effects . There are also many easily applied enhancements from hi- def, Landscape, Food, Portrait, Night Etc. I personally find it more user friendly and easier to use for these simple tasks than ‘Photoshop’ which is more about creating complicated digital and photographic artwork with all the many and necessary tools available, many of which you never use or require and for which you must pay a subscription for the pleasure.
Thank you. Very helpful article!
Dan,
Terrific guidances and commentary to a heretofore mysterious “creature” (Photoshop).
Thanks!
David
Living in an area that doesn’t always have great wi-fi, Photoshop CC is useless. I bought Photoshop Elements and loaded it so I could work directly on my computer. It can’t fine tune the way the full version does, but has most features you need to manipulate photos, paintings, color check, etc. And- it’s way less expensive- about US $100 and you own it.
Dan, you have a BRAIN!!!!! Wish I could think of stuff like that. Thanks.
Hi Dan
Thanks for a very informative article. I use GIMP (it’s free!) mainly for scaling and cropping images prior to uploading them to my Etsy shop. I also use it for white balanciing my photos, as you suggest.
I’m going to see how GIMP performs in the value, notan and color tasks you wrote about.
Hi Trevor,
Wondering if you tried GIMP with value, notan and color adjustment. Does GIMP do these things too?
Thanks!
Thanks so very much. I am anxious to try it. Won’t be so intimidating now!!
Thank you for this Dan. It’s very helpful. Photoshop has always intimidated me but this offers an easy way in. I do appreciate your emails. It covers wide range of things & is interesting & educational. So thanks.
Thank you for this Dan. It’s very helpful. Photoshop has always intimidated me but this offers an easy way in. I do appreciate your emails. It covers wide range of things & is interesting & educational. So thanks. I have never responded with a comment before. A bit belated I think.
Thank you Dan. This is a great little review as I
have had life distractions keeping me from working on digital art.
I hope to have time available starting in October to o that.
Have a great weekend.
Thanks so much for this, it is very helpful. And don’t laugh, but I have discovered that you can do a huge amount of photo editing in Microsoft PowerPoint — cropping, grey scale, style etc.
Thanks for some very helpful tips. I’m a total amateur, but on a recent acrylic painting that I created, I was using one of my own photos for inspiration but trying to add elements from someone else’s painting that was in different scale and lighting. Needless to say, it was “challenging”, but I should have considered photo editing to at least get the same scale and tones. Also, trying to photograph your work to share is definitely a challenge. Even taking photos of furniture from indoors is almost impossible to get correct color. So your temperature tips could help there too. ~Rhonda
Thanks for mentioning GIMP my go to image editor (since Fireworks disappeared into the maw of Adobe.)
I have been toying with the idea of combining my love of watercolour with digital art for awhile. What I loved about your little tutorial was that all the techniques are applicable with the software that I have. More importantly they are things that I’m thinking about more and more. Using Grayscale and Gaussian blur for value studies. Invaluable – pardon the pun.
Thanks
Thanks for photo shop details.Nice to understand the notes. Rajan Chattisgarh.
Hi Dan,
Yes, Photoshop does the job. Adobe also has Photoshop Elements [version 12 now] for sale on a DVD, maybe as a download also. It works about the same, it certainly does just what you talked about.
I used Photoshop in my printing career because it has a lot more bells and whistles, and a LONG learning curve.
I used Elements, posterized in six or seven shades of black, making each division a percentage of black starting at 13%, then increasing by 13% each “color” but never getting to 100%. Then, make six or seven boxes and fill each one with the percentages of black used in the posterization. Print both and you have a mixing guide as well.
Sounds complicated but you know what your doing, and you can simplify this if you want to pass it on.
Thanks for all your hints.
Fred
Hi Dan, I don’t think there is anything I can add to all the above comments. It is just in time for me as I was wondering lately how I could use a photoshop program to help me with all the issues you talked about. As I am not a computer whizzard by a long shot, I think I can manage the one you showed . Thanks for the clear directions and pls keep sending stuff in!
Thanks for all this valuable information Dan. I only have Photoshop Elements. Have you had experience using this version of Photo Shop? I have been intimidated by this elementary version. I will check to see if I can get to all these options on this program. Thanks again for sharing all of this.
Thanks Victoria! I have not tried Photoshop Elements but I will take a look into it. Dan
I am a beginning artist searching for clues to improve
I have done some art of various areas and degrees without any formal training
Some of this info was right up my alley
This was so helpful. I have a friend who uses photoshop to make her paintings look as if they have been painted. I have been playing around with that. I would like to recommend this topic for an article.
I am working on a large surrealistic painting. I was stumped on one part but this article freed me and inspired a new way to represent the symbols that I’m using.
I have seen surrealistic/abstractions that make images with false colors and shapes layered onto recognizable shapes. I have searched for articles and tutorials, but have found nothing on this. Can you refer me or shed light on this topic?
Thanks so much for all the helpful information Dan.
Can I ask a silly question please? Without photoshop is there a free way to add a grid over your photo for painting?
Many thanks for your help.
Best Wishes,
Kirsty
Kristy,
I have done overlays using a clear acetate on photos. If you use photos of the same size the overlay can be moved between them. Hope this helps.
Fred