
In this painting tutorial, I will walk you through step-by-step how I created my most recent painting, Queenstown From the Shore.
I used oils for this painting but the general fundamentals are the same across all the painting mediums. This was a challenging scene to paint as there are so many little elements to capture in the town. It would be very easy to get caught up in all these details. Read more below.
- Materials Used
- Reference Photo
- Part 1 – Stain the Canvas and Introduce the General Color Harmony
- Part 2 – Block-in General Shapes and Colors
- Part 3 – Start Detailing
- Part 4 – Create Interest in the Water
- Part 5 – Add People
- Part 6 – Finishing Touches and Sign
- Want to Learn More?
- Thanks for Reading!
Materials Used
The art supplies used for this painting were:
- A Large Filbert Brush
- A Few Medium Sized Filbert Brushes
- A Few Medium Sized Round Brushes
- A Medium Sized Flat Brush
- A Medium Palette Knife With A Straight Edge
- Toned Disposable Palette
- Linseed Oil
- Odorless Solvent
- Raw Umber Oil Paint
- French Ultramarine Blue Oil Paint
- Cobalt Blue Oil Paint
- Spectrum Violet Oil Paint
- Sap Green Oil Paint (I generally use Viridian Green but I ran out for this painting)
- Alizarin Crimson Oil Paint
- Cadmium Red Oil Paint
- Cadmium Orange Oil Paint
- Yellow Ochre Oil Paint
- Cadmium Yellow Oil Paint
- Titanium White Oil Paint
- 20×28 Inches Winsor & Newton Gallery Stretched Canvas (Thin Edge)
What Brands Do I Use?
I have had great experiences with all the top brands and I do not have any real preference. I have used and recommend the artist-quality supplies by Winsor & Newton, Rosemary & Co, Gamblin, Mont Marte, Art Spectrum and Neef.
Where Do I Purchase Art Supplies
I generally purchase all my supplies at my local art store. If you want to support Draw Paint Academy, you can purchase your art supplies at either Dick Blick or Amazon using my affiliate links.
Reference Photo
Here is the reference photo which I took from New Zealand. It was an overcast day, but I love painting on these days due to all the beautiful grays which come out.
However, the reference appears to be lacking a bit of focus. So I will use cropping to enhance the composition.

Here is the cropped version. I had to get rid of the ducks (sorry ducks).
The cropped version has much less clutter and focuses on the town in the distance (which I want to be the focal point).

Part 1 – Stain the Canvas and Introduce the General Color Harmony
The first step is to kill any white on the canvas. I use paint mixed with lots of solvent and apply a thin wash of color using a large filbert brush.
I use this as an opportunity to start building the structure of the painting and establishing the general color harmony.


Part 2 – Block-in General Shapes and Colors
I start establishing the major shapes and colors using a large brush and thick paint.
I try not to get caught up in the tedious details just yet. That will come later.

Part 3 – Start Detailing
Once all the major shapes and colors are in place, I start adding some more detail and emphasize form.
It would be easy here to go overboard with all the detail, as there is a lot going on in the town. I make a conscious effort to keep the painting as loose as possible.

Part 4 – Create Interest in the Water
To illustrate the light glimmering across the water, I grab a large filbert brush and very gently scumble highlights over the water. I want the paint to break over the dark paint underneath. This creates a very interesting depth. I also use a medium-sized round brush to add a few small points of interest in the water.

Part 5 – Add People
I very generally illustrate some people on the shoreline in the distance. I literally use two dabs of color to paint these people. The environment is what gives form to these people. If these dabs of paint were positioned up in the mountains, would you confuse them for people? Probably not.

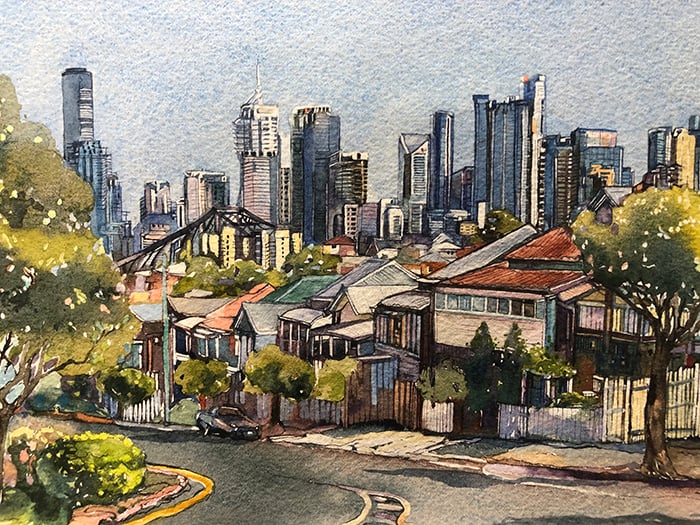
Part 6 – Finishing Touches and Sign
I add a few small finishing touches, sign and it is all finished!
All up this painting took about an hour of painting. I kept it very loose and painterly. I did not want to get caught up in all the tedious details in that town.
I will actually do a separate post using this painting about how I used color saturation to draw attention to the focal point.
Let me know what you think!

Want to Learn More?
You might be interested in my Painting Academy course. I’ll walk you through the time-tested fundamentals of painting. It’s perfect for absolute beginner to intermediate painters.
Thanks for Reading!
I appreciate you taking the time to read this post and I hope you found it helpful. Feel free to share it with friends.
Happy painting!
Dan Scott

Draw Paint Academy


When you say medium and large filberts and rounds, exactly what sizes would those be?
Unfortunately, there seems to be no standard sizing across different brands. When I say medium / large, I mean relative to the rest of the other brushes in that brand. The large filbert I was using was a size 10 Princeton. I hope this helps.
Dan