
Want to learn how to paint but not sure where to start? Here is a step-by-step oil painting lesson using one of my favorite oil paintings, Noosa At Sunset. I will walk you through the entire process, from selecting a scene to paint to applying the finishing details.
I was inspired by Vincent van Gogh’s brushwork for this painting, with bold strokes and strong colors.
- Step 1 – Planning and Selecting The Composition
- Step 2 – Sketch Out Your Composition
- Step 3 – Paint In The Darkest Darks
- Step 4 – Start Working Through The Middle Tones
- Step 5 – Work Towards The Light
- Step 6 – Loosen Here and Tighten There
- What You Can Learn From This Oil Painting Lesson
- Thanks For Reading!
I’ll walk you through the entire process using one of my recent paintings. You’ll see how I go from idea all the way through to reflecting on the finished painting.

Step 1 – Planning and Selecting The Composition
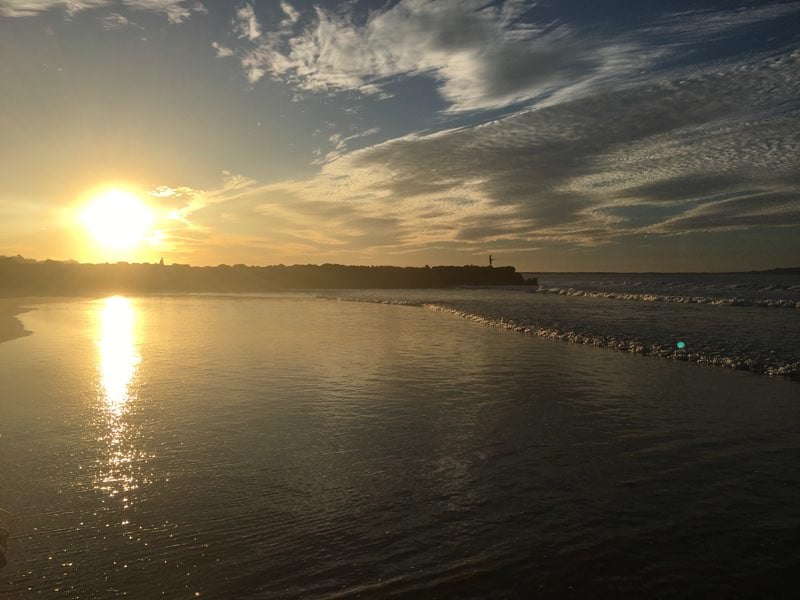
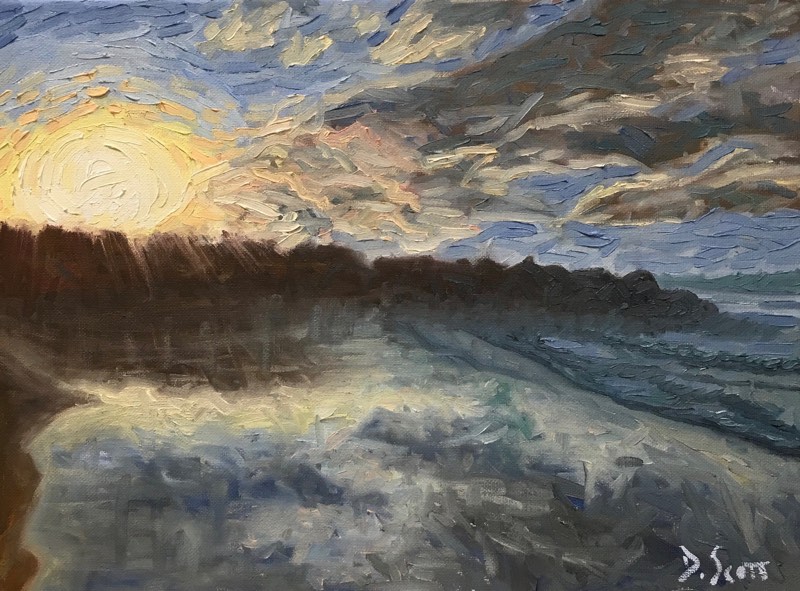
I painted this from a photo I took of Noosa whilst I was on holiday. During the planning phase, I briefly analyze the colors and decide on my general strategy, including my focal point and color harmony.
In this painting, the obvious focal point is the exploding sun in the background. The color harmony I decided on was bright yellows for the sun contrasted with various blues and grays in the sky and water. I also wanted to use my brushwork to really direct the viewer around the painting.
I should also note that whilst I start painting from a photo, towards the end of the painting I barely look at the photo at all. Instead, I use the painting to give me further inspiration. I am not trying to replicate the photo. It is just there as a rough guide as I try and create my own interpretation of the scene.
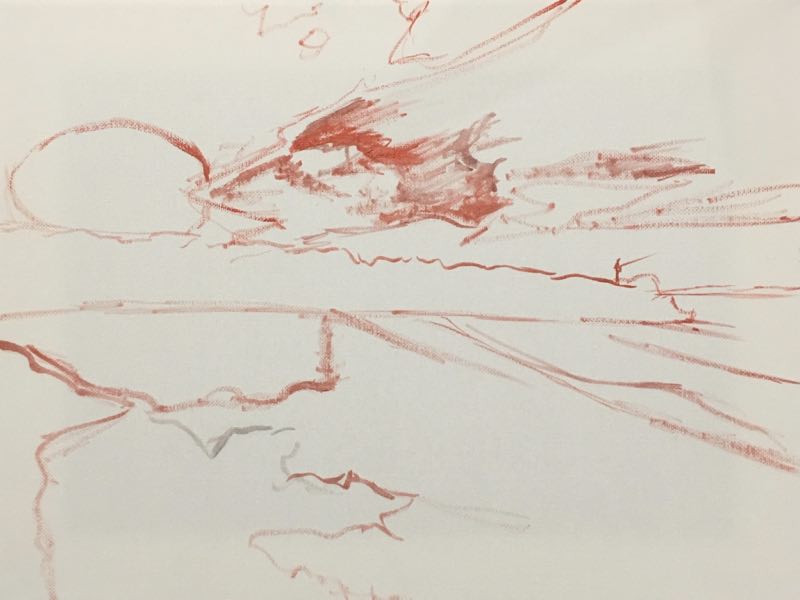
Step 2 – Sketch Out Your Composition
Here I do a quick sketch of the composition using a toned red. The sketch is very fast and loose and only really serves as a rough guide.
What I am trying to capture with the sketch is all the major shapes and lines in the composition. It does not need to be perfectly accurate, but you should take care with the initial sketch as errors here may be near impossible to fix later in the painting.
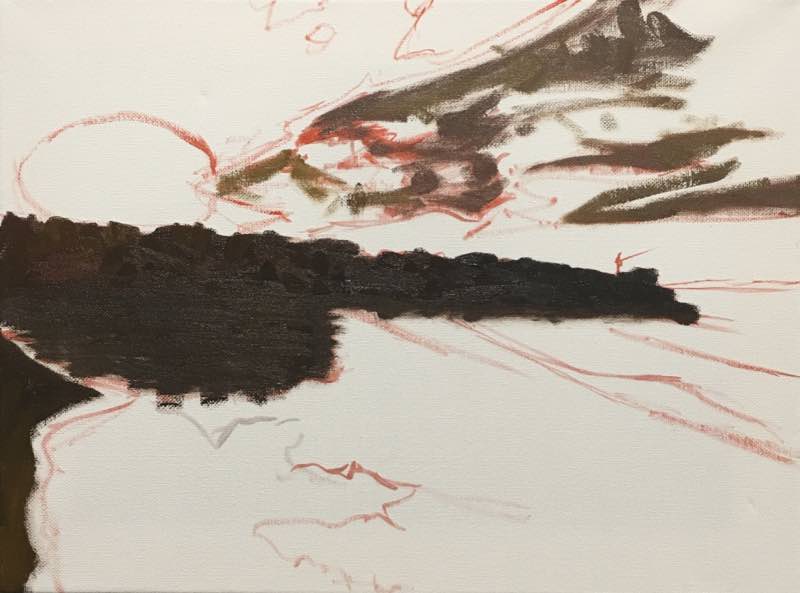
Step 3 – Paint In The Darkest Darks
The darkest darks in this painting are the rocks in the middle. I use a very dark and toned shade of orange for the rocks. The reason I chose orange instead of a dark blue was that I wanted some more contrast against the blue in the rest of the painting.
The purpose of painting in the darkest darks is to place a boundary for me to work within and it narrows down the range of colors I need to choose from.
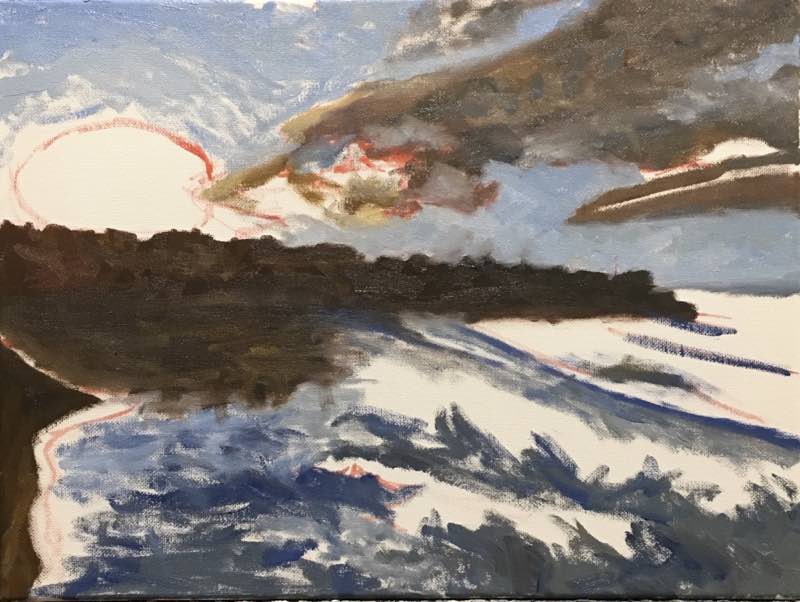
Step 4 – Start Working Through The Middle Tones
I basically continue working from the darkest darks and just progress around the painting. I use very loose and directional brushwork.
Remember, it is much easier to ‘tighten’ up a painting later on than it is to loosen it up. So it is better to start off fast and loose and then tighten it up at the later stages as needed.
For oil painting, the general practice is to paint from dark to light, however, some artists start with the middle tones and then work from there. By starting in the middle tones, you may reduce the risk of false accents (i.e making the darks too dark or the lights too light).
My only recommendation in this regard would be to leave the lights until last for oil painting, as it is difficult to your lights pure if you apply them earlier.

Step 5 – Work Towards The Light
Now it is time to start painting in the vibrant sun. In the center, I use pure titanium white and some pure naples yellow. Then as I go towards the outside of the sun I add more vibrant cardinal yellow.
In this area, I really try to build up the paint in a thick, impasto fashion. This helps the bright areas stand out from the more subtle, shaded areas.
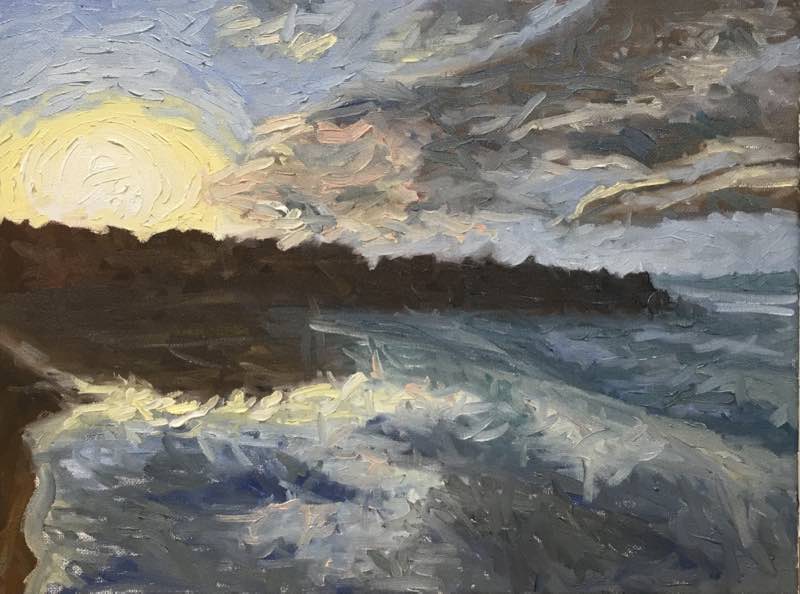
Step 6 – Loosen Here and Tighten There
This step is where I basically take a step back, have a look at where I am at, and make adjustments from there. Some areas I want to tighten up and refine, whilst other areas I want make more rough and loosen up.
I also make some slight adjustments to the color harmony of the painting, darkening the sky slightly and adding some more orange tones to the sun area.
Below is the finished painting.
What You Can Learn From This Oil Painting Lesson
Here is what you can learn from this oil painting lesson:
- It is important to paint with confidence.
- Do not be afraid to use bold colors and brushwork.
- Brushwork can be a great way of directing the viewer around the painting.
- Start the painting as fast and loose as possible. You can refine and tighten it up later.
Thanks For Reading!
Thanks for taking the time to read this post. I appreciate it! Feel free to share with friends. If you want more painting tips, check out my Painting Academy course.
Happy painting!
Dan Scott
Draw Paint Academy

Thanks for explaining all that Dan, you are quite a teacher, and I am sure that you are on the right track with your style!Its good to see someone else giving oils a go, I get so tired of insipid aclylics and watercolours with no vibrant colour and no brushwork.
So, keep up the good work, and I hope that you find satisfaction in sharing your thoughts. I for one appreciate it.
Thanks for the kind words Norm. Whilst I found acrylics great to start with, I found them very limiting. Oils are just so much more versatile.
I do get much satisfaction out of sharing my thoughts. It is also a great way of documenting my own progress as an artist.
Regards
Dan
Thanks for that. Always interesting to see how something evolves.
I would have liked to see the original photo also.
How long did it take you?
Thanks Sabina. I will post the original photo later today. This one probably took around 2 hours of painting over a few days.
Beatiful, good guidelines. Thank you