
- Materials Used
- Step 1: Establish Initial Colors in Eyes, Nose, Head and Neck
- Step 2: Darks of Eyes, Underpainting for Nose and Fur Markings
- Step 3: Nose, Mouth and Ear
- Step 4: Deeper Browns in Ear
- Step 5: Glaze the Ear
- Step 6: Reinforce Shapes in Head and Neck
- Step 7: Hair Markings
- Step 8: Darks of Eyes, Nose and Mouth
- Step 9: Mouth and Neck
- Step 10: Mid Tones, Texture and Glazes
- Step 11: Final Adjustments to Ear
- Step 12: Final Details
- Summary
- Want to Learn More?
- Thanks for Reading!
I’ll walk you through the entire process using one of my recent paintings. You’ll see how I go from idea all the way through to reflecting on the finished painting.

Materials Used
- Arches Cold Press Paper 8×10 Inches
- Winsor & Newton Paints: Yellow Ochre, Winsor Lemon, Permanent Rose, Burnt Sienna, Ultramarine (greys and blacks are a mix of the Ultramarine Blue and Burnt Sienna).
- The reference photo is from Pixabay.
Most of these applications are wet on dry, unless otherwise specified.
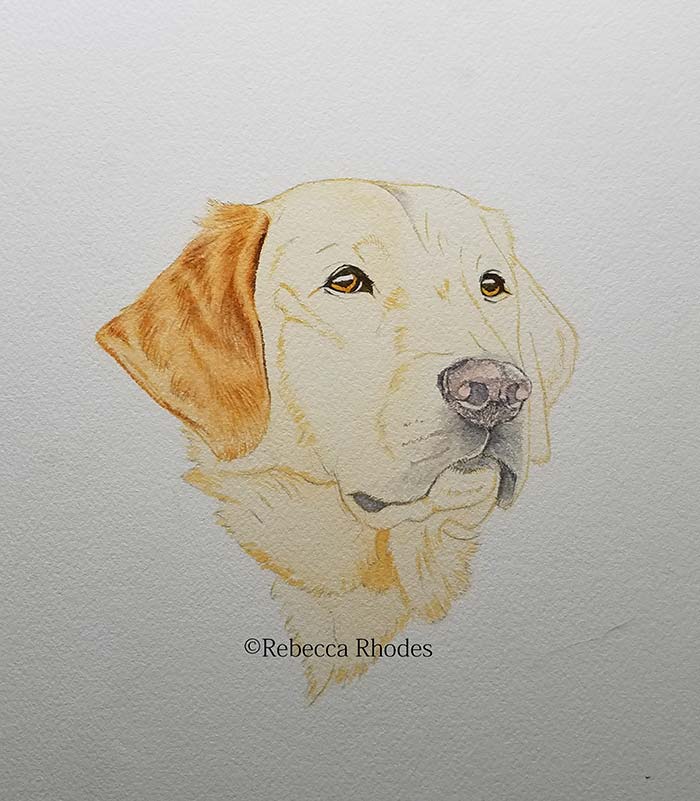
Step 1: Establish Initial Colors in Eyes, Nose, Head and Neck
- Outline the main features of the eyes with a pale, watery grey mix of Ultramarine Blue and Burnt Sienna, creating a map that will serve as a guide in future applications.
- Apply the underpainting in the iris using Winsor Lemon, a milky consistency. Place the yellow wherever brown or black will eventually appear. The yellow will shine through the browns to come, creating richness and depth.
- When the yellow has dried, apply Burnt Sienna, a watery consistency, to the parts of the eye that will be brown or black.
- As the eyes dry you can create the rest of the underpainting using the lightest color that can be seen in the head and neck using Yellow Ochre, a pale, watery consistency. Apply everywhere except for the eyes.

Step 2: Darks of Eyes, Underpainting for Nose and Fur Markings
Establish the darkest parts of the eyes.
- Create a black with a mix of Ultramarine Blue and Burnt Sienna, a watery to milky consistency. Apply to the darkest parts of the eye.
Create the underpainting for the nose.
- Create a watery pink with a mix of Permanent Rose and Yellow Ochre. This is the color I see underneath the blacks of the nose.
- Apply the pale pink everywhere in the nose, except for the upper right, where there is a highlight, and the two curved shapes underneath the nostrils.
Establish shapes with fur markings.
- Apply fur markings around the edge of the head and neck, and around the prominent shapes using Yellow Ochre, a watery consistency.
- Be aware of the length and contour of the hairs.
- These markings will map out the important shapes, serving as a guide in future applications.

Step 3: Nose, Mouth and Ear
Establish the prominent shapes and darkest parts of the nose.
- Use the black, a watery to milky consistency, to outline and then fill in the nostrils. This is one of the darkest parts of the dog, and we’ll gradually deepen the value with thin applications of color.
- Continue to outline the prominent shapes with the black.
- Next, establish the darkest parts of the nose with the black, a watery to milky consistency.
Next, create a map of the important shapes in the mouth.
- Use the same black, a watery consistency, to outline the prominent shapes in the mouth.
- Establish the darkest parts of the mouth with the black, a watery to milky consistency.
A map of the nose and mouth has been established. Next, move to the left ear, creating the prominent fur shapes.
- Use Yellow Ochre, a watery consistency, to create a pale map of the prominent shapes in this ear, in the form of fur markings.

Step 4: Deeper Browns in Ear
A map of the prominent shapes has been created in the ear. Next, deepen the browns, starting with the darkest.
- Create a dark brown with a mix of Burnt Sienna with a touch of Ultramarine Blue, a milky consistency.
- Apply to the darkest parts, emulating hair markings.
- Move to the next-darkest brown, a mix of Burnt Sienna with just a touch of Ultramarine Blue.
- Apply this brown, a watery consistency, everywhere except for the lightest parts.
- Allow to dry completely.

Step 5: Glaze the Ear
- Glazing occurs when you place a transparent layer of color (or water) over an area that has dried. It will smooth the texture and unify values.
- Apply a glaze of Burnt Sienna, a pale, watery consistency over the entire ear.
Step 6: Reinforce Shapes in Head and Neck
- Reinforce the prominent shapes in the head and neck using Yellow Ochre, a watery consistency.
- Everything is very pale right now. The goal is to create a map of the shapes. The values will be deepened in future steps.

Step 7: Hair Markings
- Apply pale hair markings using Yellow Ochre, a watery consistency.
- Be aware of the length and contour of the hairs.
- These are the lightest textures that can be seen and the color will be deepened in future steps.

Step 8: Darks of Eyes, Nose and Mouth
Deepen the darks around the eyes.
- Use the grey, a watery consistency, around the eye.
- While wet, touch in thicker grey, a milky consistency to the darker parts.
- Create a black with a mix of Ultramarine Blue and Burnt Sienna, the consistency of cream in coffee or tea.
- Touch the black into the darkest parts around the eye.
- When dry, create tiny hairs with watery grey.
- Pick up a bit of Burnt Sienna and touch in some color along the edge of each iris.
- Pick up some Ultramarine Blue, a milky consistency, and touch into the white shapes in the iris to represent the reflection of a blue sky.
Next, move to the nose, gradually building the dark and mid-tone values with thin applications of color and working around the lightest shapes.
- Use the black, a watery to milky consistency, to reinforce the darkest parts of the nose – the nostrils and the lower part of the nose.
- Work upward, deepening the mid-tones, those next-darkest blacks, creating texture and working around the lightest parts.
- Create minute hairs around the nose with grey, a watery to milky consistency.
Deepen the darks in the mouth.
- Use the black, a milky consistency, to reinforce the darkest shapes of the mouth.
- Create hair markings along the edges of shapes.
Moving lower, create a deep, rich brown in the vertical shape below the mouth.
- Begin with Burnt Sienna, a watery to milky consistency.
- When dry, apply a darker brown – a mix of Burnt Sienna with a bit of Ultramarine Blue.
Use the Burnt Sienna, a milky consistency, to deepen fur markings in the prominent shapes of the head and neck.

Step 9: Mouth and Neck
Create texture and hair markings around the mouth with a grey mix of Ultramarine Blue and Burnt Sienna, a watery to milky consistency.
Deepen the browns around the mouth and in the neck with thin applications of color, allowing drying time in between.
- Begin with Burnt Sienna, a watery consistency.
- When dry, apply a darker brown in areas that need to go deeper in value.

Step 10: Mid Tones, Texture and Glazes
The darks and lights are in place, but appear disjointed. Mid-tones – the in-between values – are needed to create a transition between darks and lights.
- Apply textures and fur markings with the Burnt Sienna, a milky consistency, to bridge the dark and light values.
- Use the darker brown where needed, to deepen values.
- Apply texture and hair markings to the darks of the mouth with black, a watery consistency.
Reinforce the fur markings in the neck using Yellow Ochre in the areas that are more pale and Burnt Sienna for darker parts, both a watery consistency.
- Deepen that vertical shape below the mouth with Ultramarine Blue, a watery consistency.
- It looks blue on the palette, but dark brown on the paper due to the previous color.
Apply thin, pale glazes to smooth the fur and unify the values.
- Use watery Yellow Ochre where the value should be deeper overall and plain water where it’s more pale.
- Use a pale, watery grey over the entire nose and the lower mouth.
- All of this needs to dry completely.

Step 11: Final Adjustments to Ear
- Deepen the darks and reinforce fur markings with dark brown, a watery to milky consistency.
- Apply a glaze of watery Yellow Ochre to smooth the textures and deepen the overall value of the ear.
- Allow the ear to dry completely.

Step 12: Final Details
Refine areas that need to go deeper in value or need additional texture or fur markings using Yellow Ochre, Burnt Sienna, grey, and black, a watery to milky consistency.
If you wish, apply another glaze of water over the head and neck to smooth the fur.
Create the whiskers with a watery grey.
Sign your masterpiece and this golden retriever is finished!
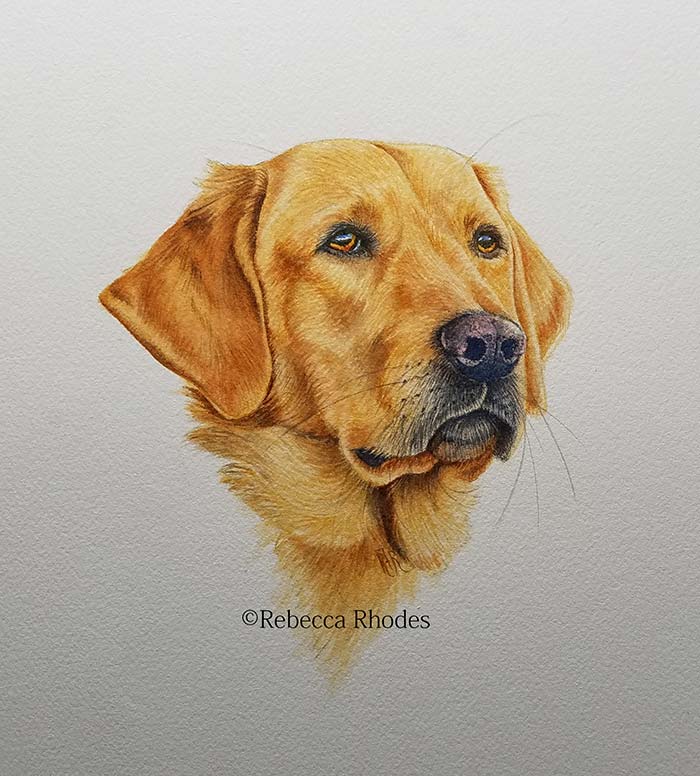
Summary
I hope you enjoyed this tutorial on how to paint a golden retriever and that the techniques used in this lesson will help you in creating your own paintings of animals.
This full video is available at my online school, along with an outline drawing, the reference photo and a list of materials.
The lessons are in real time – from the very beginning to the end of the painting and I’ll talk through each step, demonstrating how to mix colors on the palette and fix errors that are a natural part of any painting.
Want to Learn More?
You might be interested in my Painting Academy course. I’ll walk you through the time-tested fundamentals of painting. It’s perfect for absolute beginner to intermediate painters.
Thanks for Reading!
I appreciate you taking the time to read this post and I hope you found it helpful. Feel free to share it with friends.
Happy painting!
Dan Scott

Draw Paint Academy


You are a great teacher! I really appreciate that you gave the color mixes. Wow!
I am 82 yrs. and learning how to paint. I wanted to learn watercolor and paint a Golden Retriever. I only did part but it helped me so much. I want to paint watercolor cards for our children and grandchildren. My Golden is going to a very special daughter-in-law. I need lots of practice as it took more than one try but so happy. Thanks
I have difficulty in color management. Thank you for providing paint shades needed for my palette.
I have started painting statues.i have one with golden retriver. Thank you for showing me the colors.yourvlesson is very useful