This is a rather detailed guide to the concept of foreshortening as it relates to art. I cover:
- What Is Foreshortening?
- Effects of Foreshortening
- The Mathematics Behind Foreshortening
- Foreshortening in Landscape Painting
- Foreshortening Exercises
- Other Examples
- Key Takeaways
- Thanks for Reading!
(Before diving into this post, make sure to pick up a copy of my free Landscape Painting Starter Kit.)
What Is Foreshortening?
Foreshortening in art refers to the way we perceive an object as it recedes in space. It is perhaps best explained visually. Take a moment to do the following:
- Place your arm in front of your body, bent at the elbow so that your forearm aligns with your chest (refer to the photo below on the left). Observe the length of your arm, from elbow to fingertips. This is an example of limited foreshortening.
- Now, extend your arm straight out in front. Notice how, from this perspective, your arm appears compressed. The perceived distance from the bottom of your elbow to your top finger does not reflect the actual length of your arm. This is an example of extreme foreshortening.
The photos below are examples of what you should see, modeled by yours truly. On the left: limited foreshortening; on the right: extreme foreshortening.

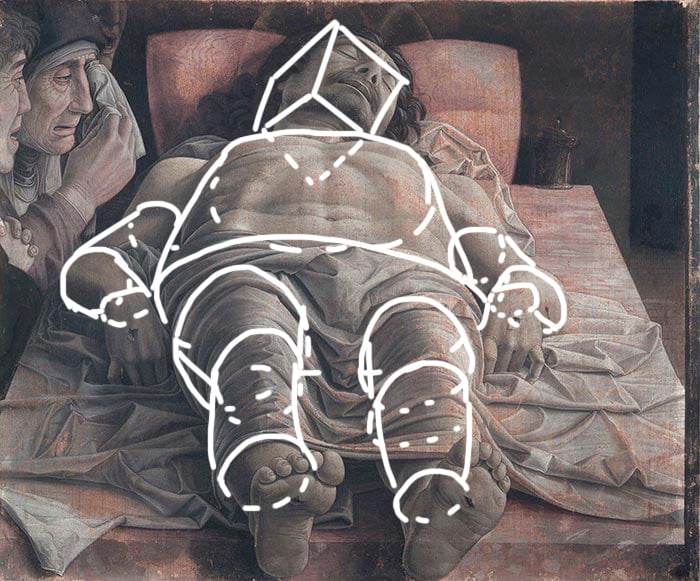
You will be dealing with some extent of foreshortening whenever you paint a three-dimensional object in space. In that sense, it is a rather general term. But it is typically only used to describe more extreme cases, such as the painting below:

You can see the effects of foreshortening in my draw-over below, including overlapping and compressed shapes. But more on that in the next section.
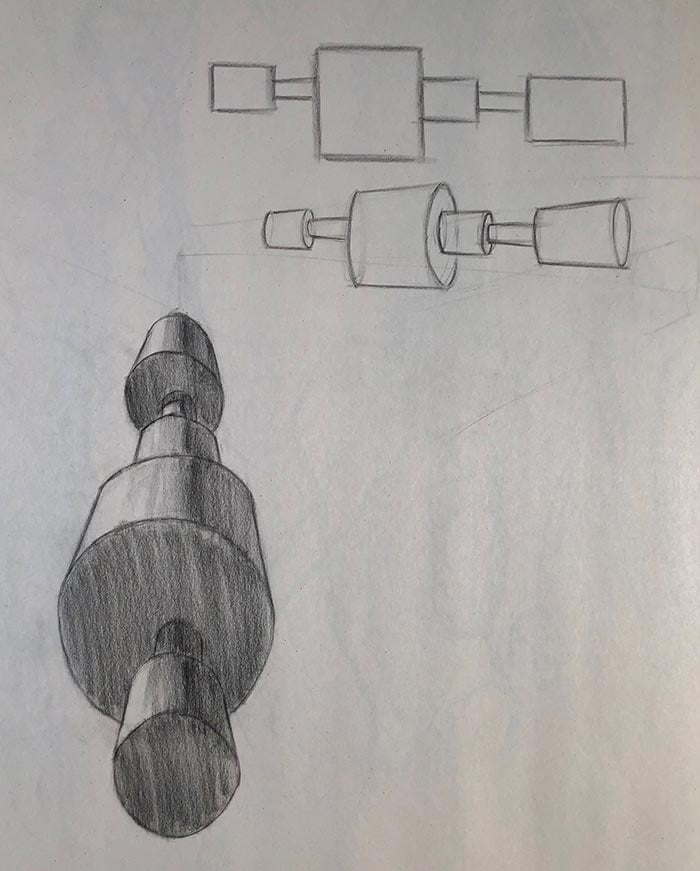
Below is another example from my sketchbook. It depicts a shape arrangement at varying degrees of foreshortening. The shape in question is a series of connected cylinders.
At the top is the shape without any perspective; it is two-dimensional or flat. In the middle is the shape at a slight angle with slight foreshortening. At the bottom is a rendered version of the shape with extreme foreshortening. Remember, the three individual drawings depict the same shape from different perspectives.
Effects of Foreshortening
Here are the main effects of foreshortening:
- Objects appear to get smaller as they recede into the distance.
- Objects appear to be shorter or more compressed than they actually are.
- Objects at the front will overlap objects behind.
The extent of these effects will vary based on the extent of the foreshortening.
Going back to my drawing example (below), notice how:
- The shapes get smaller as they recede into the distance. If the shape continued, it would eventually converge at a single point on the horizon line (vanishing point).
- The shape appears shorter than it actually is.
- The sections at the front overlap the sections at the back.

The Mathematics Behind Foreshortening
Foreshortening Tips
Here are some tips for rendering a foreshortened object:
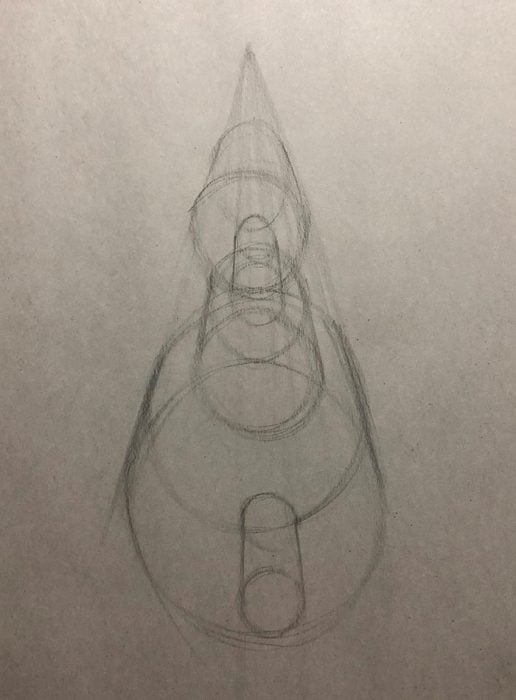
Use perspective lines (lines that extend from a single point on the horizon line). You can use these lines to determine the relative size of objects as they recede into the distance. You can see the rough perspective lines I used for my shape drawing below:
Look for basic, overlapping shapes. Foreshortening is easier to comprehend if you break the object down into basic shapes. Steve Huston refers to it as “box logic”. Seeing the object in this way will help you understand how the shapes overlap and are positioned in space.
Draw through the object. Imagine the object is transparent. Allow your pencil to draw through the object, following the contours over, under, and around. This will help you better understand the form of the object and how it is positioned in space.
Edges and contours. What are the important edges and contours? Some edges are more important than others. It can be effective to narrow down on those important edges and accentuate them.
Continuity. Foreshortening typically comes with many overlapping shapes and therefore many broken edges. This can interrupt the sense of continuity throughout the object as a whole. You can see what I mean in white below:

To add a sense of continuity throughout the arm, you could pick up some of the long, sweeping lines that follow the gesture of the arm (indicated in yellow below). These lines help connect the dots so to speak.

Below is another example by Leonardo da Vinci. Look at the bottom hand: notice how the overlap between the hand and forearm breaks up the inside edge. The other side of the arm, however, has a continuous edge that connects the forearm, hand, and fingers.

Exaggerate or understate. You could push the drama and distortion by exaggerating the effects of foreshortening. Or you could go the other way and understate the effects, giving your artwork a flat and cartoonish feel.
Foreshortening in Landscape Painting
Foreshortening is typically associated with portrait and still life painting, where the effects tend to be more noticeable. But you also need to understand it for landscape painting.
Below are some examples, starting with Silent Abode by Isaac Levitan. Take a look at the bridge over the river: notice how it appears compressed? This is an example of foreshortening. The far shoreline on the other hand has no foreshortening; it reflects the actual length of the shoreline. If you were to place the bridge and shoreline side-by-side, they would probably be similar in length.

Here is another example by Levitan. Take note of the various paths receding into the distance. The main path around the middle covers the most actual distance, even though it appears compressed in the painting. Now, look at the small path that zig-zags horizontally across the painting: it is longer in the painting than the main path, but it covers much less actual distance.

Some other examples of when you might encounter strong foreshortening in landscape painting are:
- A fallen tree (refer to Ivan Shishkin’s Logging below);
- A river winding into the distance;
- A tree branch extending forward or back in perspective; or
- A crashing wave from a sharp angle.

Foreshortening Exercises
The best way to learn and understand foreshortening is to sketch it out. Theory will only take you so far. You need to train your hand and eyes to see objects in perspective. Here are some basic exercises you can do:
- Draw simple shapes in extreme foreshortening.
- Draw multiple overlapping shapes in extreme foreshortening.
- Draw the same shape at varying degrees of foreshortening (like my drawing at the start of this post).
- Draw over master artworks that demonstrate foreshortening.
- Practice using perspective lines and one-point perspective to draw shapes at a relative scale.
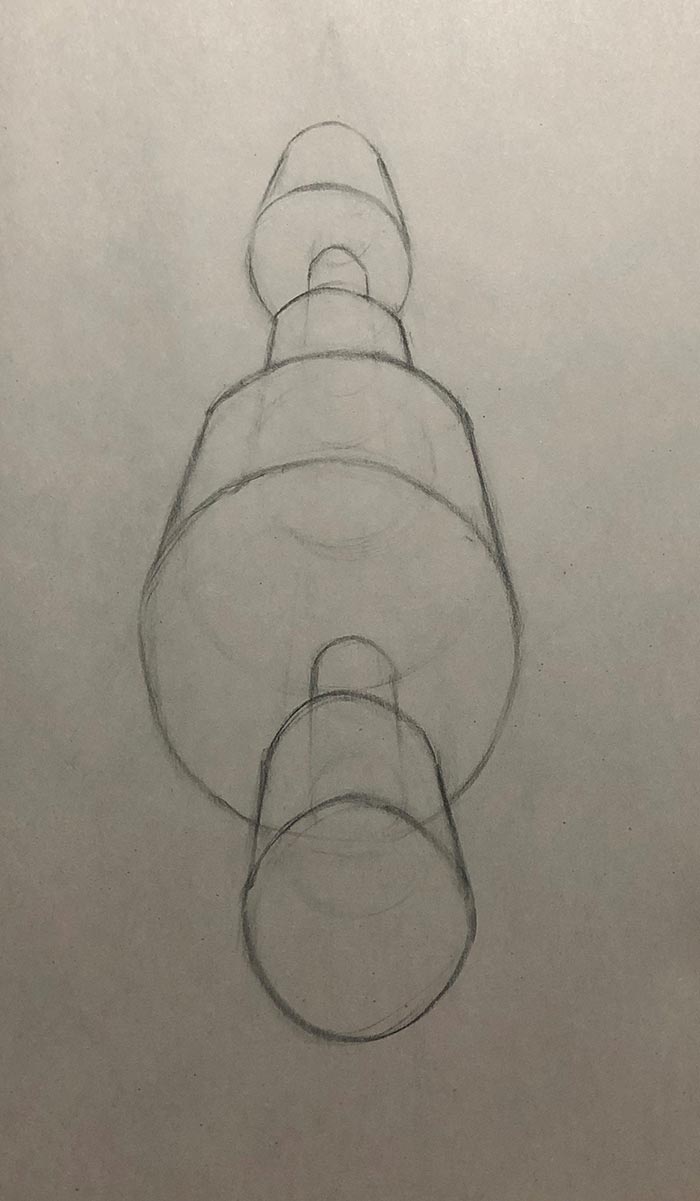
You do not need to be perfect with these exercises. Rough sketches are fine. Below are some examples from my sketchbook:


Other Examples
I will run through some more examples, but first, here is an example without foreshortening (or hardly any): John Singer Sargent’s Portrait of Madame X. She stands upright with her arms hanging down. Nothing is coming back at us or receding away. The depth of field is extremely narrow.

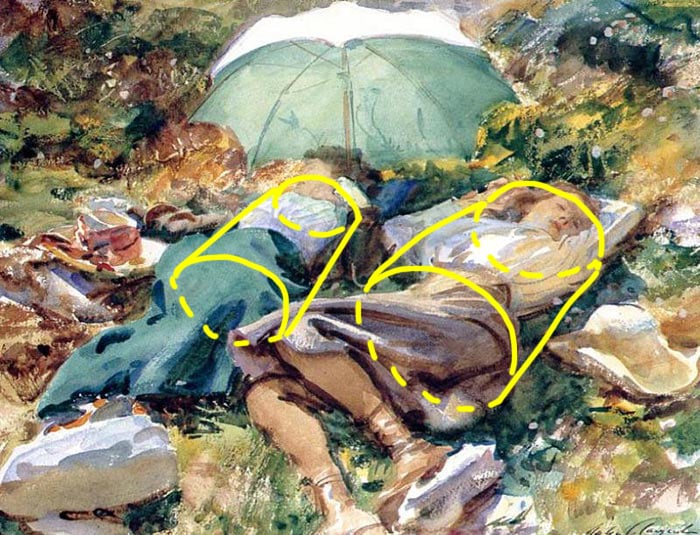
Sargent’s Siesta, on the other hand, is a great demonstration of foreshortening. Imagine for a second that the two ladies are basic shapes in perspective. What do you see?
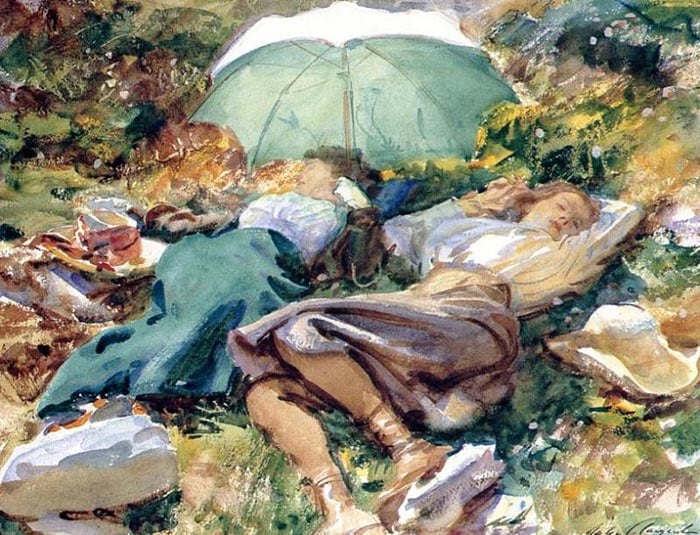
Say the two ladies are represented by cylinders (in yellow below). Notice how the cylinders get narrower as they recede into the distance and how the ellipses closer to us are larger than the ones at the back.
Here is a beautiful portrait by Joaquín Sorolla. Try to see her body as basic shapes in perspective. Notice how her back arches upward; her legs extend away then come back at the knees; her head is tilted back; her left arm comes forward then back at the elbow.

Her leg above the knee has the highest degree of foreshortening. Her torso, by comparison, has hardly any. I have also drawn what her leg would look like without (much) foreshortening (see the arrow below).

Here is a basic sketch by William Turner and a great example of overlapping shapes.


In Édouard Manet’s The Plum, the subject’s arms demonstrate varying degrees of foreshortening, with her left forearm resting on the table and her right hand leaning against her face showing the most extreme foreshortening.


Here is a painting by Mary Cassatt featuring a girl reclining in a blue armchair. Notice the varying levels of foreshortening between different parts of her body, particularly her legs.


Key Takeaways
- Foreshortening in art is much more a case of how extreme the effects are rather than if it exists or not.
- A foreshortened object will appear to get smaller as it recedes into the distance, will appear compressed, and will overlap.
- The effects of foreshortening could be determined with absolute certainty through mathematics, but where is the fun in that? Artists do not need to be perfect, we just need to be convincing.
- To capture the effects of foreshortening, try to draw through the object. Let your pencil follow over, under, and around. Imagine the object is made up of basic shapes and is transparent.
- The best way to learn foreshortening is to sketch it out. Practice by arranging simple shapes at varying degrees of foreshortening.
Thanks for Reading!
Thanks for taking the time to read this post. I appreciate it! Feel free to share with friends. If you want more painting tips, check out my Painting Academy course.
Happy painting!
Dan Scott
Draw Paint Academy




Excellent article. Very informative and helpful
Thanks! Very interesting subject and your explanation makes easy to understand the technique.
Very useful info well explained. Thank you
Excellent information. I shall store this away for future reference
Thank you very clearly described and understood.
Thank you for this very informative tutorial on a difficult subject.
Thanks so much for this! Very clear!
Thanks so much! Excellent explanation and direction. I’m grateful for this.
Fabulous information. Thank you.
Beste Dan, ik vind het geweldig hoe je stap voor stap de uitwerking laat zien van verkorting. En, niet alleen verkorting maar ook de aktieve teksten (links) die je dan verder en ander effecten laat ontdekken.
Thank you for explaining such a complicated process in an understandable way. It has always been one of the most difficult effects to achieve. At least now I know how to practice! Inspired me to start a new painting.
Thank you. So very helpful.
Very well written and brilliant examples. Thank you for sharing.
8yrs back I lost my right arm in a terrible motorcar accident. I was completely right-handed. Painting was something I always wanted to do and it was a very good practise for my rehabilitation proses. Thank you Dan Scott I don’t think you will be able to realize how much not only physically but also mentally your emails meant to me over the last 4 -5 yrs. I am fully recovered after the accident and I think I am painting better with my left hand that I would ever have been painted with my right hand. Painting takes me out of a world of pain and delivers me into a word of dreams. If I may I would be honoured to sent you some pics on some of my paintings so you can see what your student has done in the meantime. Thank you Dan for open n door to a new life for me. Regards, Willeboer.
Very good lesson. One I really need to practice. Thank you so much.
Thankyou so much, really informative and well explained about a really difficult part of drawing!
Thank you for taking the time and energy to explain something that we beginning painters overlook and wonder why the finished paint doesn’t look just right
Thankyou Dan. Thankyou for explaining the difficult perspective in art. I always thought art was easy but I must say, it is not. Thanks to you I will never give up!
Thank you so much.This is easy to understand..
Thank you On your example in forshortening very easy to understand !!now I will put into practice what I have learned from you xx
Thank u
Very good read…well written. So much of art is applying the knowledge learned… Which takes practice. Thank you, Dan.
Wonderful explanation. I am inspired to study these ideas more throughly and put them into practice. I am going to devote a sketchbook to this subject.
Thanks for this helpful text. Dan. Love your choice of art.
Happy Easter weekend. Viv
Excelente,
Thank you
Very helpful Dan. You are a master! Now it is practice, practice…practice! Thank you for sharing your knowledge.
Confinement in Mauritius island.
All the best, Deanna
Thanks a lot Dan. Learning a lot from you. Happy Easter to you and your family from the sunny island of Curaçao in the Caribbean.
Well done and so helpful!
Thanks, Dan, for the clear explanation of this troublesome area of drawing and painting. Your info helps me I feel better about experimenting with shapes from different perspectives.
This is Extremely helpful to me. I do many architectural and underwater pastel works so rarely work from photos ..
Very exciting to see this process explained. Thank you, as always.
Thanks again for an excellent article more please?
Very good information.
Thank you. This is very enjoyable and easy to understand and practice. Stay safe and well, Bob T.
Thank you, Dan! All your writings are excellent and informative, and enjoyable to read!
Excellent article!! As a novice I struggle with perspective…this is most helpful!!
So helpful. I have a long way to go. Bits of it seem obvious and other bits are like a jigsaw. Thanks you so much for a lot of work to study. As I don’t do oil or acrylic, these kind of exercises are extremely helpful reference the mathematics of putting something you are looking at onto paper and being pleased!!
Hi Dan, thank you for the very helpful and useful article. It has motivated me to work on my perspective and I am going to practice as well as look at old master drawings too. I appreciate your clear and concise teaching and explanation of the subject matter.
Thanks Dan. I definitely need to get my sketch book and practice this. At least now I know where to start.
Thanks for this, Dan. An excellent, to-the-point review.
I learned how to draw a room scale in design school based on this principle. Sounds so dumb, but I never thought about it in relation to bodies. Landscapes, yes, but bodies no. silly me. thanks so much
Thank You very much, dear Dan, lots to digest in this blog post. Thanks for the interesting and clear topic, I must a lot to training here, but it inspire me 🙂
Dan,
Once again you have described an important, complex topic with easy to understand explanations using superb paintings to illustrate. I am certainly happy you chose this technique rater than mathematical formulas. Much appreciation for all you do!
Cheers,
This is very helpful. I struggle with tree limbs pointed at you. The problem is taking what I know in my head and having my hand act accordingly.
Very weĺl explained. Thank you.. will start practicing.
Thanks for sharing this Dan. I take notes on all you send me and the studies have increased my confidence in painting. 🙏Blessings
Thank you for your description of foreshortening. I try to draw exactly what I see (how my eyes see it). Your description of foreshortening will help me in composing my drawing and a method of designing my emphasis in a picture. Vincent
Hi Dan, great article on perspective in general.
I really enjoyed the read.
When things are explained in a simple way it makes things easy to understand.
Well done.
I hope you and yours are coping ok with this bloody virus.
Thanks, Dave M (Australia ).
Monet is lovely; Sorolla is exquisite, for content and execution give me Levitan! The guy was somethin’ else, man.
Mantegna made Christ’s head and chest too big. For real, correct perspective his legs should be widening as they come closer with his feet about twice the size he made them.
Thank you ,Dan. Such a simple explanation with beautiful examples and exactly what i needed to correct my amateurish painting
Morning on Easter Weekend. Many thanks for your vulnerability shown in your work. This isn’t an easy concept to put into practice. Artistic perfectionism gets in the way of simplicity. Your note brings me more confidence to ‘do’ again m again. Stay healthy!
Love it. Simply explained and easy to understand. Thank you!
Thank you Dan. Your explanations are on point to me. You have definately added a notch to what I now know. A very useful concept and great teaching!
Stay safe
Wadzi from Zimbabwe
Of course! Using perspective to get the foreshortening right makes perfect sense! Why didn’t I think of that myself? I’m so glad I found your site; it’s make a huge difference in my ‘seeing’ things in art. You are a wonderful teacher. Thank you, Dan. Painting or drawing is one thing, being able to write about it effectively is a whole other thing! You do it well.
Thank you so much, Dan .i’m really appreciated with u and like I don’t know how to say ..coz u gave me this as understand and explain then I took ur advantage.
Dan, thank you, it is so helpful for all the reasons folks have mentioned. I’m trying to do something daily on art so the drawing exercises will help me with that. Take care.
Thank you SOOoo much I find this subject the most challenging to accomplish I shall have to read and re read your blog my trouble is not enough practice. Always looking forward to more
This was an extremely important lesson for me. Thank you! I have struggled with this concept many times.
This was a very helpful article, clearly written with great examples. Thank you!
A great and informative discussion on this topic. Thank you.
I have already sent a comment but it must have been lost. This is one of the most useful lessons ever ,I have been grappling with this concept for a very long time I shall start doing more practice with this information Thank you
Right on time. Thanks Sir
Thanks Dan, for this article. And you motivated me to practice it myself!
Your explanation and examples are so helpful.
Thank you Dan.
Thanks for explaining foreshortening, I had never heard of the same before.Pl do explain and teach how the colour scheme reacts as in perspective .I am new student of watercolor painting at the age of 60+, hopeful your simplified way of teaching will definitely help better my skills.Thanks for spreading knowledge I am obliged.Wish we all stay safe and win over the pandemic!
This is the best time to practice a concept as deceptive as this–while on lockdown in Alfonso, in the Philippines. I appreciate how you have broken down a process from the complex to the simple way of doing it–not that am saying it will be easy. I just never thought of (or saw ) it as overlapping until now.. Yes, getting smaller as you go farther, plus getting compressed but the overlapping part should really help us. I also love the work of Levitan and the examples you gave. You make us open our eyes even more to see the beauty of the world especially at this time. Thank you and stay safe!
Thank you very much… very informative indeed .. hope I can manage to apply 🌺
thanks a milolllllllllion. very helpful and informative.