
Edges in art refer to the transition between two shapes of color. Most people do not fully appreciate the importance of edges; color and composition usually get all the spotlight.
In this post, you will learn everything you need to know about edges. I’ll cover:
- What Creates Edges?
- Hard, Soft and Lost Edges
- Other Factors Which Influence the Edges We See
- How to Identify Edges
- What Edges Can Tell You About a Subject
- Different Ways to Paint Edges
- Positioning Your Hard Edges
- Key Takeaways
- Want to Learn More?
- Thanks for Reading!

What Creates Edges?
We see edges every time there is a change in:
Object: Marks the transition from one object to another. For example, if you place a coffee mug in front of you, edges will mark the transition from the mug to the surrounding desk or wall.
Plane: Marks the transition from one plane or face of an object to another face. For example, from the side of a box to the top of a box; or from the side of a cliff to the top of a cliff.
Color: Marks the transition from one color to another. For example, the shadow cast on an object creates an edge that separates light and dark. This type of edge is interesting because it does not physically exist; we cannot touch an edge created mainly by a change in color. This means in painting, we are dealing with many more edges than what is physically there. So it is important that we understand how to use them!
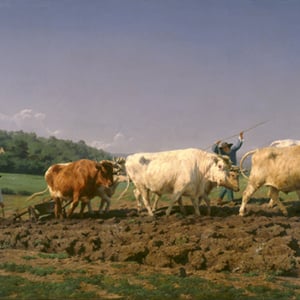
In the painting below, the edge which separates the land from the sky is created by a change in object. The edge between the side and top of the cliff is created by a change in plane. The edge at the bottom between shadow and light is a change in color.

Many errors in painting occur as a result of providing the wrong information through inappropriate edges. For example, placing a hard edge in the distant, foggy mountains where clarity is low. Or using a soft edge to mark what should be a sharp transition.
That is why it is important to have a general understanding of why and how we see edges. This knowledge will raise your alarm bells whenever you paint an edge which just does not make sense in the context of the painting.
Exercise: Take a look around right now and identify edges created by changes in object, plane or color.
Hard, Soft and Lost Edges
Identifying and capturing edges is only half the battle; you also need to capture the nature of the edges. The most common terms artists use to describe the nature of edges are hard, soft and lost.
Hard edges indicate an abrupt or sharp transition from one color shape to another.
Soft edges indicate a gradual or smooth transition.
Lost edges are so soft you cannot actually see them (but you know an edge is there based on other elements).
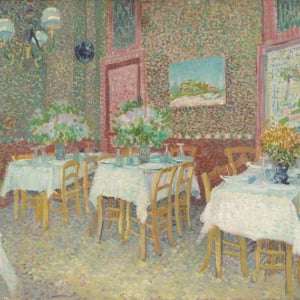
In the calm painting below, the two figures are painted with relatively hard edges. The shoreline and distant mountains are painted with soft edges. The horizon line which separates the ocean and the sky is a lost edge (you know it is there but you cannot see it).

Other Factors Which Influence the Edges We See
Earlier in this post, I discussed how edges are created by a change in object, plane or color. The following factors influence how we see those edges:
Light: A strong, direct light source tends to make edges appear harder or sharper. On the other hand, a weak, diffused light source tends to soften the edges we see.
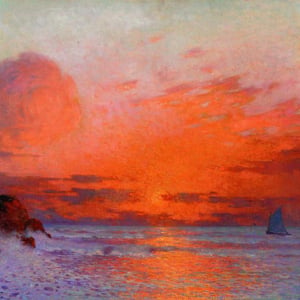
Atmosphere/Environment: You will see harder edges under the clear, midday sun than on a foggy morning (like the painting below by Claude Monet).
Movement: When an object is moving fast, the edges we see are softened.
Focus: We struggle to see hard edges on objects which are out of our focus.

How to Identify Edges
One of the best ways to identify edges in your subject is to use comparison. That usually involves identifying the hardest edge and working your way towards the softest edge. Just remember that the hardest edge is much easier to identify than the softest edge.
The hardest edge on your subject may not actually be that hard in absolute terms. It may just look hard compared to all the other edges. As with most aspects of painting, you should think about edges in relative terms rather than absolute terms. Think about how hard or soft is one edge compared to the edges surrounding.
Below is a photo from the Routeburn Track in New Zealand. Before you keep reading, take a moment to rank the three hardest edges.

The hardest edge is the one which separates the mountain on the right from the sky.

From there, I would say the second hardest edges are the ones which separate the land from the stream (2). Then the edge between the far mountain and the sky (3). There are many soft edges so it is difficult to pinpoint the softest edge.
What Edges Can Tell You About a Subject

Edges can provide an incredible amount of information about a subject. They can tell you how strong a light source is and where it is coming from; how clear the weather is; how important the object is in the composition; if the object is in focus or in the background; or how far away the object is.
I will show you what I mean using Fishermen from Valencia by Joaquín Sorolla. In the following numbers and my corresponding notes, I walk you through what the edges in this painting tell me about the subject.

- The relatively hard edge used for the horizon line suggests the clarity of a clear day under the midday sun.
- There is a hard edge which separates the boat in shadow from the water which is being hit by light. Notice how that same edge appears softer when the water is also in shadow.
- Although this area is not a main focal point in the painting, it still demonstrates a beautiful interplay between different edges. The hardest edge in this area separates the man from the high-key water in the background. The softest edge separates the sail from the sky. Then there are all kinds of intermediate edges in between.
- Edges are created on the subject’s shirt by the change in plane. The relatively hard edge which separates light and shadow suggests the light source is strong and direct (as you would expect on a clear, sunny day). I draw your attention to the subject’s feet: notice how the edge gets lost in the water.
- The edge which separates the fishing net and the subject’s leg is very soft. If you look closely, there is a hint of color which follows the edge of the net. Also, some interesting shapes are created with the negative space (look at the area of water peering through the subject’s arm).
- There are no hard edges in this area, only soft edges. However, if you look closely, it does not appear as if Sorolla used much blending in this area. The edges appear soft because they are all within a very tight value range. But, if you were to change all those light blues and purples with a much darker color, then the edges would appear hard.
Note: Analyzing a painting is easier than analyzing a subject in life. That is because the artist has always done much of the hard work in simplifying the subject down to what is actually important. When we look at things in life, we need to simplify things down ourselves.
Different Ways to Paint Edges
The most common way of painting edges is by blending two color shapes together. This generally involves using a dry brush to gently work one color into the other. This is easier to do in oil painting than it is in acrylics or watercolors. The “smoother” the blend between two colors, the softer the edge.
But blending is not the only way to paint edges. Here are some other ways:
Broken color: The Impressionists painted edges with varying arrangements of broken color, rather than blending two color shapes together. The more “broken” the color, the smoother the edge. Of course, there is a limit to how hard you can make your edges using this technique.

Palette knife painting: Palette knives are known for creating bold and sharp edges. But you can also use palette knives with a more delicate touch to create a complex variety of soft and hard edges. Nicolai Fechin (whose painting is featured at the start of this post) was known for his dexterity with a knife and remarkable edge work.
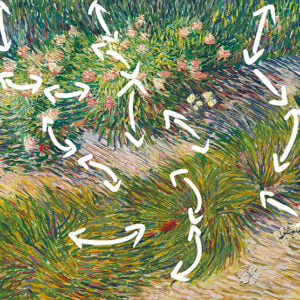
Intermediate colors: Instead of blending two color shapes together, you could place an intermediate color between the two color shapes. For example, if you have a light shape next to a dark shape, you could soften the transition by adding an intermediate midtone between the two colors. This is similar to the broken color technique, but it tends to be more organized. In the painting below, Claude Monet painted the left edges between the trees and the sky with a line of blue; he did not blend or use broken color. This blue line also represents a shadow.

Positioning Your Hard Edges
Our eyes tend to be drawn towards hard edges, so it makes sense to position your hardest edges close to your focal point. This mimics the way we see in life: we see hard edges on things we are focusing, but everything else gets soft and blurry.

Key Takeaways
- We see edges whenever there is a change in object, plane or color.
- We describe edges using terms like hard, soft and lost. But, be aware that these terms are limited in describing all the intricacies of edges.
- The environment, among other factors, can have a powerful influence on the edges we see. Edges on a subject will seem much harder under the clear, midday sun than on a foggy morning.
- Comparison is an effective tool for ranking edges in terms of hardness.
- Edges provide an incredible amount of information about the subject, so make sure you are providing the right information.
- Blending is the most common way of painting edges, but you could also use broken color, palette knives or intermediate colors.
- In most cases, you should place your hardest edges around the focal point.
Want to Learn More?
You might be interested in my Painting Academy course. I’ll walk you through the time-tested fundamentals of painting. It’s perfect for absolute beginner to intermediate painters.
Thanks for Reading!
I appreciate you taking the time to read this post and I hope you found it helpful. Feel free to share it with friends.
Happy painting!
Dan Scott

Draw Paint Academy

This was very useful! I’m completely self-taught and it’s amazing to find explanation for both the things I did right and the things I’ve been doing wrong. Thanks! 🙂
Thank you. Enjoy your topics.
Thank you for this insightful write-up. Cheers.
Great article and hugely important as my instructor is frequently calling my attention to my edges.
Thank you for this detailed information – definitely a learning curve!
Thank you so much for all the helpful articles you produce. I am 78 years old (following you from England), very much new to painting but completely in love with watercolour and your very well thought-out and clearly explained articles have proved invaluable in my journey. Now that I finally have ‘me’ time to spare I am trying to make every moment count and cannot begin to explain the joy painting has brought me. I so appreciate the opportunity of learning you so generously provide.
I understand the importance of creating various edges, but I am completely taken with the edge work that artist Laura Rob uses in her floral still life paintings! I believe she uses broken edges to create movement through out the painting! Have you seen her work? Thank you for a most interesting article.
Hi Dee. Agreed – Laura Rob’s paintings are stunning and her use of edges is great. Thanks!
Dan
EDGES: What about “outlining”? You don’t mention that as an option. Many artists actually put a dark LINE around all or parts of the objects in their paintings. What would you say are some “rules” for the use of outlines?
Hi Thomas
Yes you are right. Outlining is probably something that needs a separate post. I will add it to the list!
Dan
Another clear explanation, always insightful!
Thank you for your insight.
This is very helpful…so much to learn.
These are very valuable advice. I am very grateful for your work. I will use it in practice while painting. All the best.
Great article. I overdo hard edges, so will work on using my discrimination.
I’ve just seen the Sorolla exhibition at the National Gallery in London. Gob-smacking to put it mildly.
Thanks for your fine assistance.
You are so kind to share your expertise.
Thankyou so much for your generosity in information……sometimes I just can’t sleep because
” I just want to paint ”
so this is a good second best , in bed at night, to read about painting lol
thanks again , my sleeplessness is well used.
Another important topic explained so simply…thank you!
Dan your explanations are so easy to understand and I have learnt heaps from your blog. Thank you
Thank you so much! This is very instructional! I loved the paintings and the way they served as very clear examples of your points. I learned a great deal from this article!
Excellent article. Like the English lady above I’m a late comer to painting but learning all the time. Most of your articles usually result in revisiting recent paintings…and of course improving them.
Very informative article. Enjoyed the clarity of the examples used. Enjoy your blogs.
Thank you for the tips and instruction. I look forward to learning anything that will help with my late in life hobby. Every time I start a new painting, I feel as though I have reconnected with a long lost friend.
Thank you. Your article answered many questions I have when painting. Your information is always so concise and clear. I really appreciate the examples and explanations using paintings.
Hello,
The best explanation on edges I’ve read up to now. Thank you very much for this invaluable information.
Thanks so for the interesting advice in your letters.
I have not painted in quite a while. Your instructions are helping me to get back
.
Thank you for explaining everything in detail we can understand.
So insightful, and useful.
Thank you! This is helpful!
Great read again! Thank you.
This was a wonderful article on edges. I teach portraiture and the figure and have been for 30 years so appreciated the concise explanation on edges that I can relate to my students. Looking forward to your 7 days of painting tips. Thank you.
This article was full of insights for me as a photographer. I’ve found that observing paintings has done much to train my eye. As a photographer, I don’t paint compositions, I have to recognize and frame them when I see them. I’m always on the look out for the drama in contrasts, and now your comments have made me keenly aware of the edge that occurs in the transition between contrasts. Many thanks!
Thank you so much for these all information.
It is extremely helpful.
I am just wandering if we have any right way of practicing edge work in painting still life or portrait. Could you please help me with this?
I understood the concept but now want to practice on it with proper example
Thank you again
Simi
Thanks so much , I’m so happy to get this.