
Welcome to another painting tutorial! Today I painted a beautiful landscape scene from I photo I took in Queenstown, New Zealand.
I took the photo whilst walking along the lake just before sunset. I loved the way the pathway framed the glimmering mountains in the distance. I don’t usually paint portrait landscapes so I thought I would mix it up this time.
The challenges of painting this scene were:
- Ensuring there was enough differentiation between the foreground, middle ground, and background.
- Painting the dark tree branches on top of the bright background. I paint wet-on-wet, so I needed to be careful not to let the dark colors mix too much with the brighter colors of the background. To avoid the colors mixing, you can paint with a loaded brush and a very loose hand to drag the paint on top of the wet layer below.
- Creating enough variance in the dark area on our left. It can be challenging to paint within a very limited value range to create enough variance.
So let’s get into it.

- It All Starts With A Blank Canvas
- Materials Used
- Step 1 – Brief Sketch
- Step 2 – General Block-In
- Step 3 – Lay Down The Darks
- Step 4 – Start Detailing Form
- Step 5 – Create Impact Using A Sharp Contrast In Value And Saturation
- Step 6 – A Quick Check To See If I Am On Track
- Step 7 – Consolidate Color Harmony
- Step 8 – Use The Palette Knife To Bring It All Together
- Thanks For Reading!
I’ll walk you through the entire process using one of my recent paintings. You’ll see how I go from idea all the way through to reflecting on the finished painting.

It All Starts With A Blank Canvas
I often stain my canvas with a toned background, but this time I just painted straight onto the white canvas.
For beginners, I recommend you stain your canvas with burnt umber or raw umber. This will make it easier for you to judge your tones and values (as you will be working on more of a middle ground).

Materials Used
You can support this website by purchasing your art supplies through Amazon or Blick Art Supplies. I am an affiliate so if you decide to purchase through my links then I will receive a small commission at no additional cost to you.
- Large Sized Filbert Brush (Winsor & Newton)
- Medium Sized Filbert Brush (Winsor & Newton)
- Medium Sized Flat Brush (Winsor & Newton)
- Medium Sized Round Brush (Winsor & Newton)
- Small Sized Round Brush (Winsor & Newton)
- Palette Knife
- Toned Disposable Palette
- Linseed Oil
- Odorless Solvent
- Alizarin Crimson
- Yellow Ochre
- Cadmium Yellow
- Naples Yellow
- French Ultra Marine Blue
- Viridian Green
- Cadmium Orange
- Spectrum Voilet
- Raw Umber
- Titanium White
Below is the palette I started with. I added more colors as I went through the painting, such as naples yellow in the later stages for the bright yellow part of the sky.

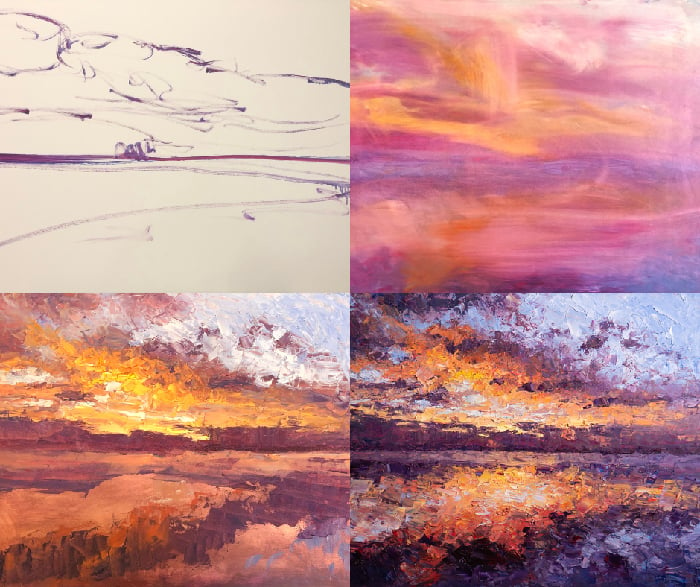
Step 1 – Brief Sketch
Not much to see here. I just plotted in the very general shapes and lines using a round brush and raw umber.

Step 2 – General Block-In
I then started to block in the general shapes and colors using a very large brush and thinned paint.
The colors I am using are slightly darker and more toned than what is actually there. Once I have blocked everything in, I will use more saturated and lighter colors (it is much easier to start with a dark and dull base of colors).

Step 3 – Lay Down The Darks
I then laid down the darkest darks in the painting.
It is common practice in oil and acrylic painting to start with the darkest darks in your painting, but another option is to start with all your mid-tones, then lay down your darks then your highlights. This way you can avoid any false accents (going too dark or too light). John Singer Sargent often painted like this.


Step 4 – Start Detailing Form
Here is where it all started to come together. Most of the structure was already in place from the previous steps, so I could continue working and refining the painting.

Step 5 – Create Impact Using A Sharp Contrast In Value And Saturation
One of the main reasons I wanted to paint this scene was the stunning contrast between the dark foreground and the bright background. To achieve this contrast in my painting, I needed to ensure the darks were dark enough and the lights were vibrant and bold enough.
To do this I used a number of techniques:
- I used a thick, impasto style for painting the highlights, compared to a much softer approach for the darks. This helps the highlights really ‘pop’.
- I used lots of white for the highlights.


Step 6 – A Quick Check To See If I Am On Track
If I have a break during the painting, I sometimes check how I am going by comparing parts of the reference photo to the painting. I am generally satisfied so far, but notice how I did not perfectly capture the perspective of the scene. The foreground is also slightly warmer in the reference photo. But I am not overly worried about this, as I am trying to create artworks, not recreate photos.

Step 7 – Consolidate Color Harmony
At this step, I wanted to really consolidate the color harmony in the painting and emphasize the contrast between the dark foreground and the bright background.
You can see I added a streak of rich blue to the town in the distance. I scumbled this color across the canvas, exposing some areas of the underpainting. This gives the illusion of a distant town, without needing to individually render each building.
I also added some lighter and more saturated oranges and yellows. I really wanted that mountain range in the distance to ‘pop’.


Step 8 – Use The Palette Knife To Bring It All Together
I pulled out the palette knife and a medium-sized round brush and started to bring everything together. This process involved:
- Breaking up edges that appeared unnatural and refined (for example, the bushes on the side of the path). To do this, I just grabbed a small amount of paint on the knife and dragged it gently over my brushwork. This creates a very interesting effect that you cannot achieve with a brush alone.
- Consolidating any hard edges which gives structure and form to the painting. Some of those edges are the thick tree branches on our right, the edge of the mountain on our left, and the outline of the pathway.
- Adding snow to the mountains in the background.
- Breaking up monotonous areas with palette knife strokes.
Below is the finished painting.

Thanks For Reading!
Thanks for taking the time to read this post. I appreciate it! Feel free to share with friends. If you want more painting tips, check out my Painting Academy course.
Happy painting!
Dan Scott
Draw Paint Academy


I really enjoy watching your landscape paintings. I have taken about 6 five week courses over the year and a half. i am just amazed how some painters lay certain colors down first then add different colors later. That I am learning. I need to look through my vacations pictures and try a landscape from there. Thanks for the lessons too.
Bonnie
Hi Bonnie
Glad you enjoy them! How did you find the five week courses? Which artists did you go with?
Yes I love the feel of layering colors. It is truely and amazing part of painting.
There should be lots of painting inspiration sitting on your photo reel 🙂
Dan
The city I live in has an Art Council. When I looked online they had oil, acrylics and watercolor. I took a beginning course and ended up the only student. I was a hairdresser so I knew the color wheel. She taught me first black and white to get shadows and value of objects. I have taken four more classes with her. I go once a week for 2 1/2 hours and we have different subjects to paint. Since there are only four other people in my class we really get a hands on feel in the class. I painted about 30 years ago, just from books. I always said this was my retirement project. I drew a lot when I was in high school and a friend talked me into painting, but I never took any formal training till now.
Bonnie