It has been some time since I worked on this painting. We have been busy moving to a new home. The layout and stairs of our old home didn’t play well with two children and an old golden retriever. I’m in the process of converting the garage into a new studio for me to work. I’ll do a separate write-up on this, as it’s an interesting process. I forgot how many strange systems I have set up over the years.
Anyway, back to it. In Part 1, I started on the background and got all the rough colors and shapes in place. Before we moved, I brought the background up to a more complete finish. Here’s a summary of what I did.
Smooth Out the Paint
First, I smoothed out the paint from the prior session using a palette knife. The idea was to flatten the surface and cover most of the gaps in the paint. At these early stages of the painting, I prefer to keep the paint thin and manageable on the surface. This also gives me the option to use a few thick strokes to reiterate key areas later in the painting (texture contrast).
The palette knife is an efficient tool for this, especially when painting on a hard surface like Ampersand Gessobord. If painting on stretched canvas, you must be careful not to dent and damage the surface with the palette knife (a more careful touch is necessary).

Subtle Gradation
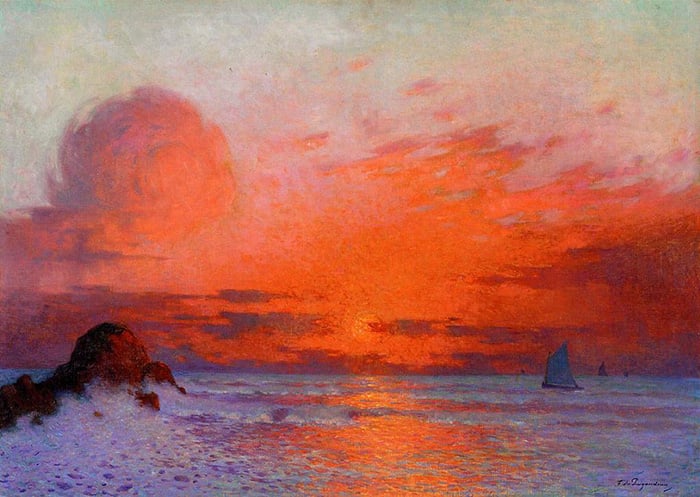
One of the key things I’m trying to pick up with the background is the subtle gradation in value and color temperature. In the reference photo, notice how the sand gets lighter and warmer as we move away from the shoreline. That’s because the sand closer to the water is wetter and more reflective.

Adding a Sense of Realism
I refined the colors and shapes to add more realism, especially around the top area. I also cleaned up the brushwork to make it appear a bit more sophisticated. I want the background to appear vague and out of focus, but still realistic. It should look like sand, shore, water, sky, and distant buildings in the corner of your eye. This is not easy to do. It’s a careful balance between underdoing it (too abstract) and overdoing it (too tight). My strategy was to lean on the relaxed brushwork from Part 1 and simply refine it a bit.

The sky and distant buildings were tricky. I used mostly a palette knife to loosely suggest them whilst retaining an impressionistic style.


Interesting Little Details
I sometimes like to add a few energetic strokes and bursts of color, particularly with background areas. I think of these as interesting little details that don’t necessarily make sense in terms of realism, but they feel right (at least to me). In the close-ups below, notice the splashes of thick, off-white paint.


And in this one, notice the vivid cadmium yellow deep and magenta.

Dabs of Blue
I added dabs of a clean blue color (cobalt blue plus titanium white) around the sand to suggest puddles of water from holes left by fish, stingrays, and wandering fishos. As soon as I added a few of these marks, it made a serious improvement. This is where it pays to understand the subject. If I were not familiar with the beach and what happens at low tide, I might have overlooked all the puddles on the sand.

Cast Shadow on the Sand
The cast shadow on the sand is dark and sharp, due to the strong sunlight overhead. I used a mix of ultramarine blue and magenta to create a dark purple color. I applied it with a palette knife, scraping downwards and keeping the paint thin on the surface. This does an interesting thing. It makes the paint slightly transparent, revealing part of the underlying white surface. This makes the color appear lighter, yet still rich in saturation. I’m unsure whether I could achieve the same result with thicker paint and a touch of titanium white to lighten it.
I’ll leave the cast shadow at that. I want to keep it simple and reserve the clarity and detail for the light areas.

Pausing the Painting at a Sensible Spot
I had planned to finish the painting before moving home. But life always gets in the way! So I had to pause the painting at a sensible spot and pick it up again at the new home and studio. Pausing it at the end of the background seemed logical. If I had made any progress on Elora, it would have been difficult to pause without losing a sense of continuity.
That’s enough writing for now. It’s time to get back to work and start painting in Elora. Wish me luck!
To be continued…
If you ever want to learn more, start with our fundamentals course.
Regards

Dan Scott
Draw Paint Academy