
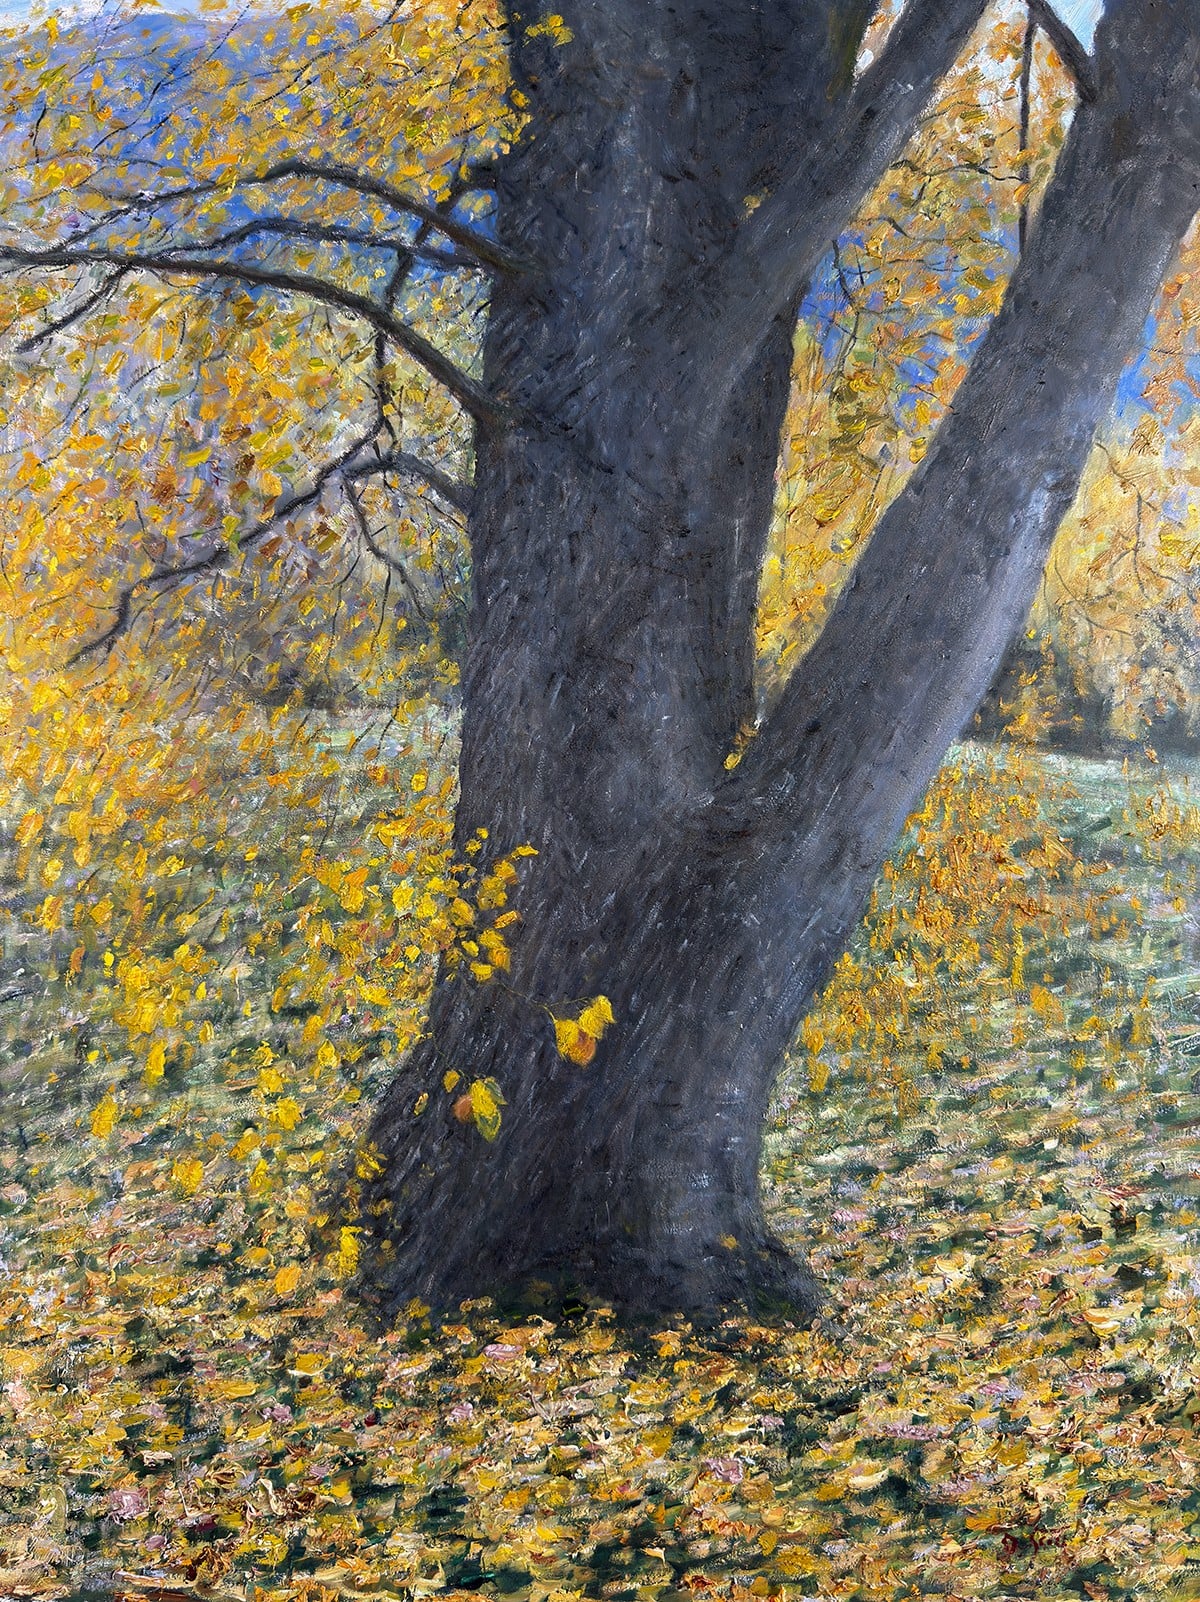
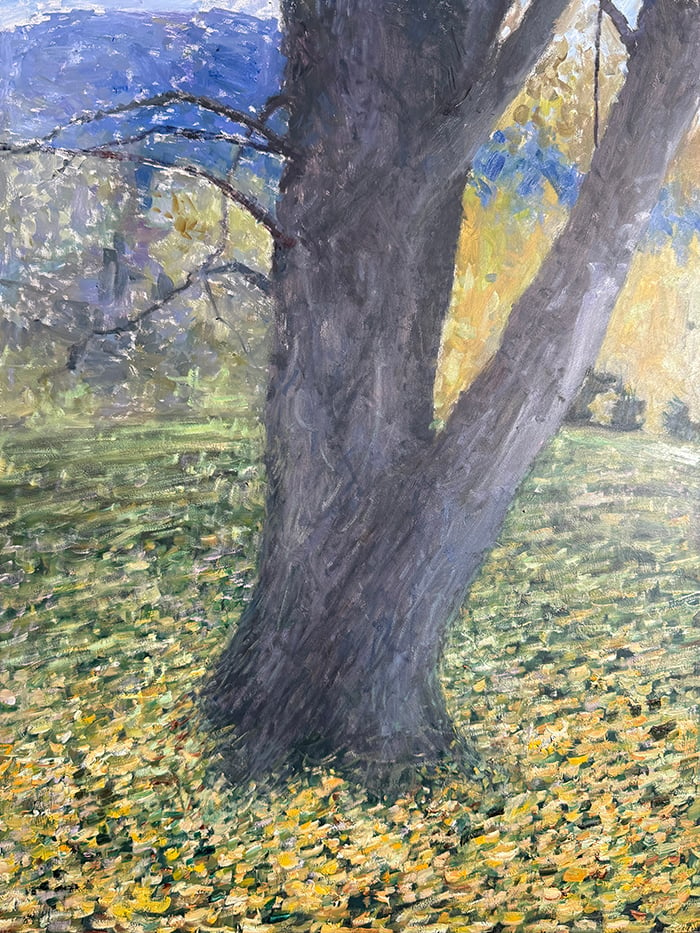
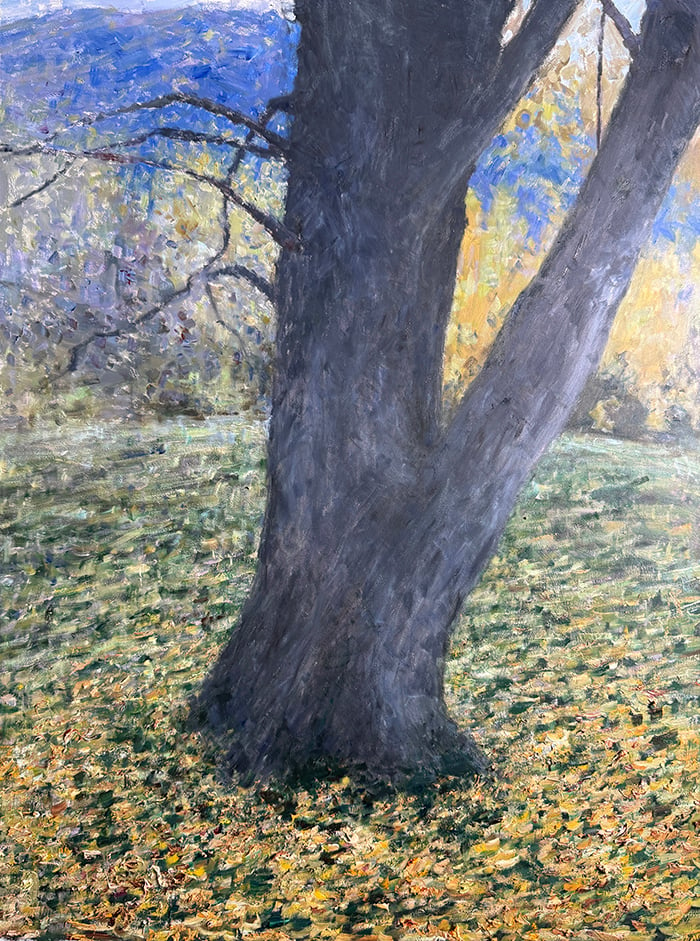
Below is one of my recent paintings featuring a magnificent autumn tree in New Zealand. This was a tricky one. It’s a busy subject with many overlapping parts and intricate details. All up, it took me about 10 hours to complete over several sessions. I’ll walk you through how I painted it and the lessons learned.
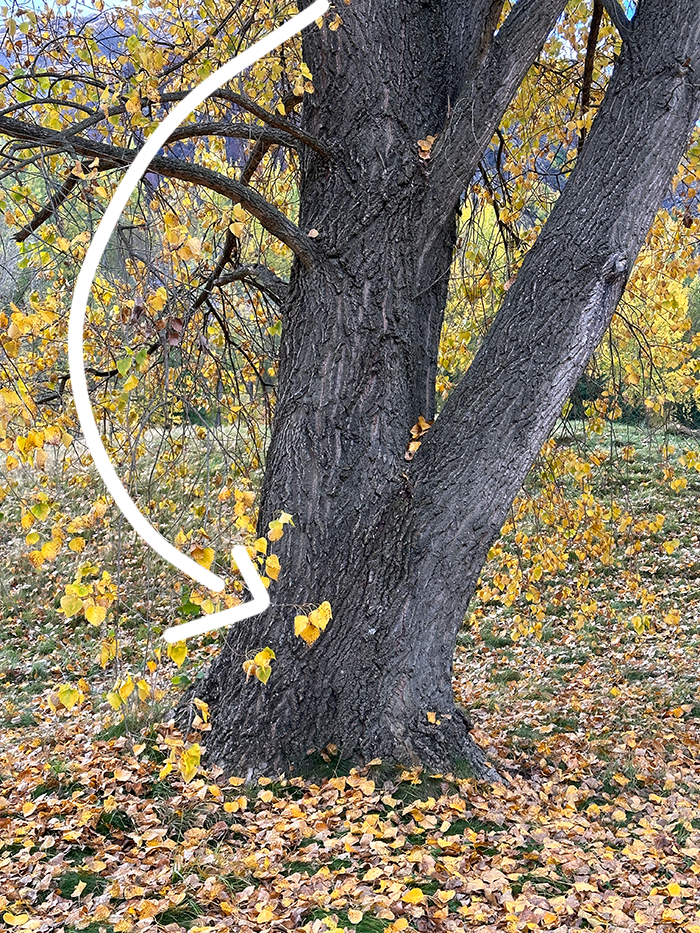
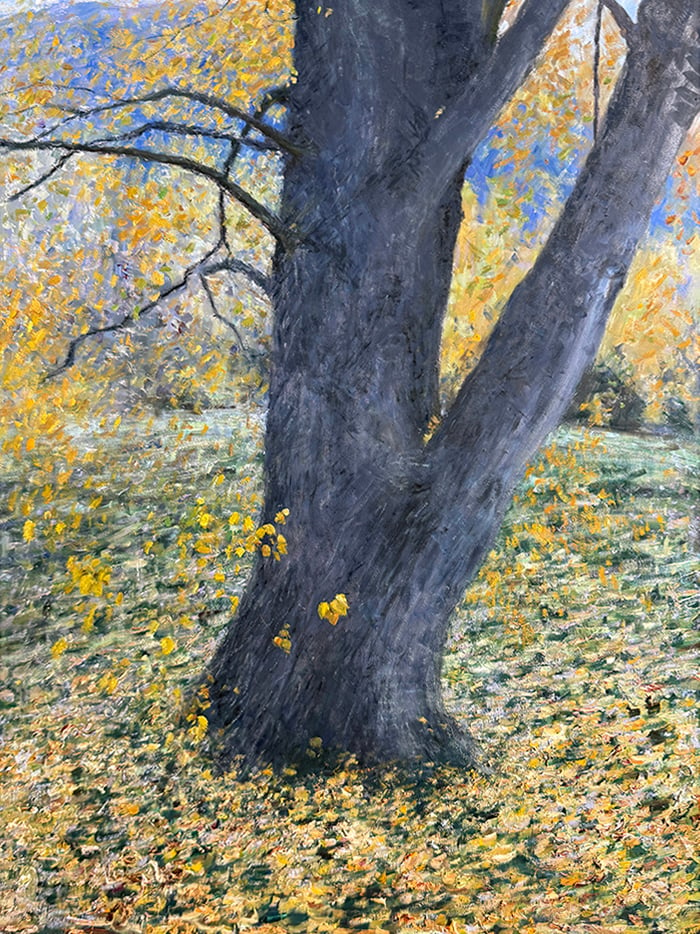
Reference Photo
Here’s the reference photo I painted from:
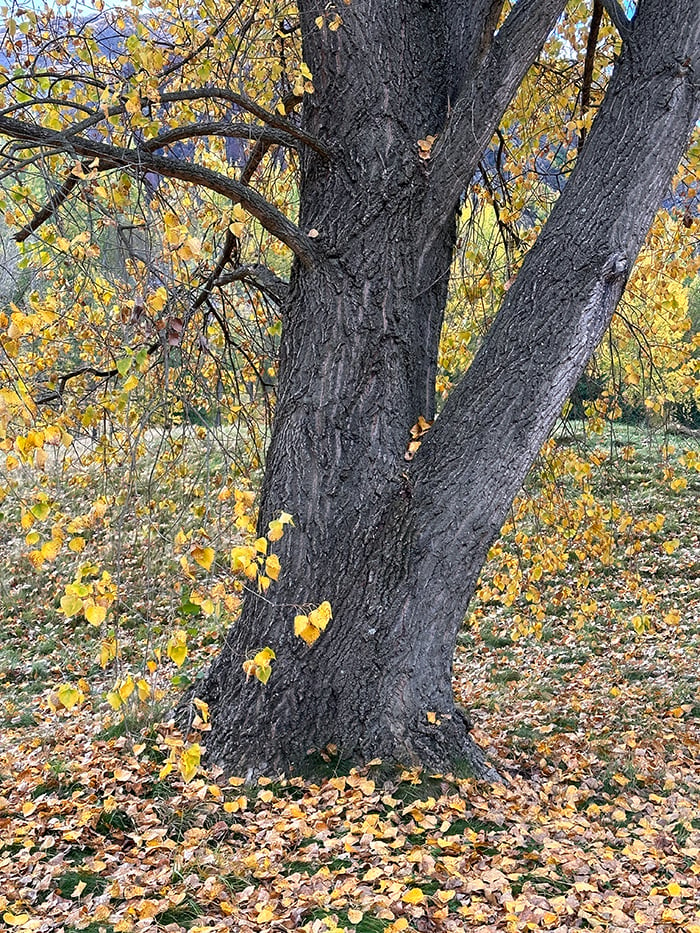
Feel free to paint it yourself. You can download a high-resolution version here. If you need more reference photos to paint from, check out the Reference Photo Library.
Supplies
Here’s what I used:
- Oil on Ampersand Gessobord, 18 by 24 inches.
- Main colors: Ultramarine blue, cobalt blue, cadmium red, magenta, cadmium orange, cadmium yellow, cadmium yellow deep, cadmium yellow light, yellow ochre, viridian green, ivory black, raw umber, transparent red oxide, and titanium white.
- Rosemary and Co brushes and palette knives.
Refer to my supplies list for more details.
Step 1: Map Out the Major Shapes
I often start my paintings by staining the surface. But for this one, I decide to jump straight into it. I map out the major shapes and get a general feel for the composition. I ignore the yellow leaves for now. I’ll add them in later, once I have a good foundation in place.
For the ground, I go with a dark green color. The idea is to convey the grass below the fallen leaves and to provide a dark point of contrast for the lighter colors.
A key feature of this painting is the play between the rich blues of the distant mountain and the bright yellows of the leaves. I paint in the blues now, but I’ll need to make sure I maintain them throughout the rest of the painting (I don’t want to paint over them too much).
Step 2: Establish the Fallen Leaves
For the fallen leaves and ground, I use a broken color/pointillism approach. This involves making all kinds of dots and dabs of distinct color. I want to create the illusion of all the fallen leaves and ground matter.
As I work my way through the painting, I constantly tinker and add to the fallen leaves. It gradually evolves until I am happy with what I see.
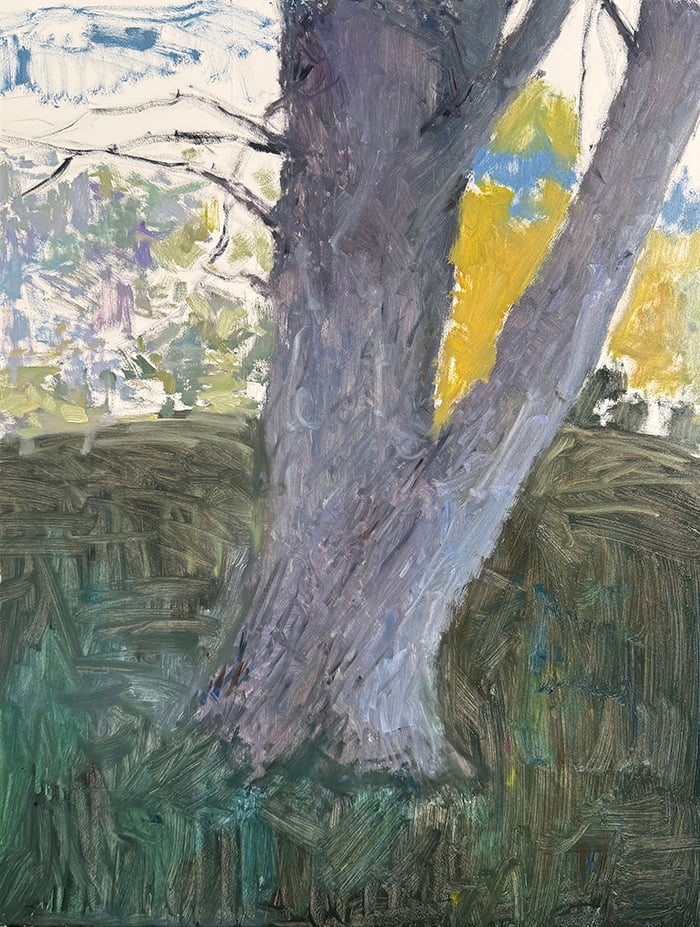
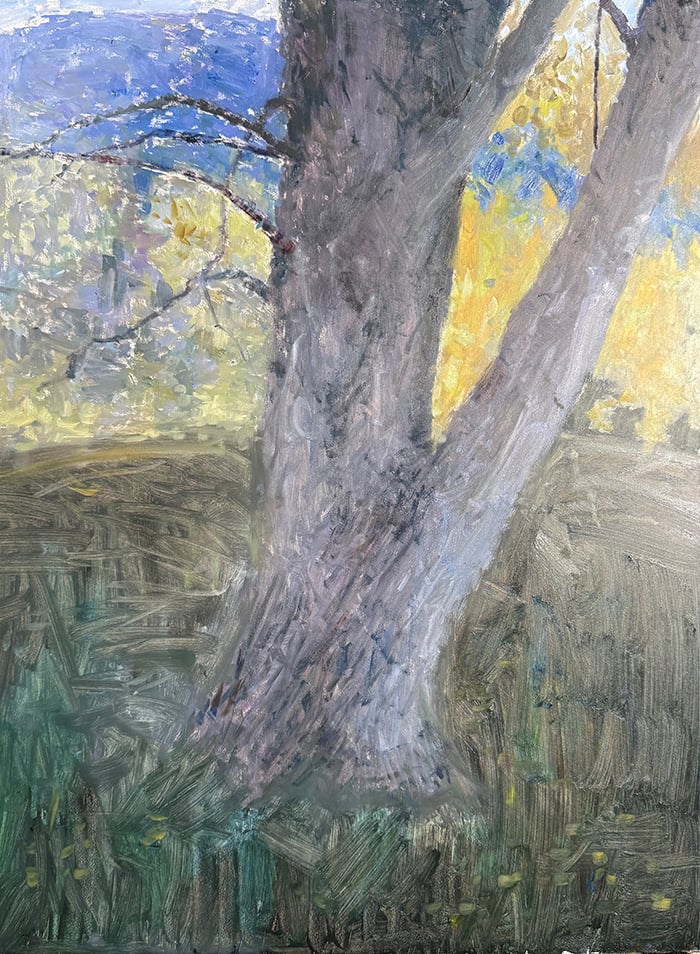
Step 3: Add Structure and Form to the Tree Trunk
I reiterate the darks to give the tree trunk more structure and form. I need the tree trunk and branches to be dark enough so that the yellow leaves will really “pop”.
As I work on the tree, I constantly think about the sense of form and structure. Is the tree leaning toward or away from me? Is it tilting left or right? Where are the major curves and pivots? Where is it bulging? Where are the contour lines?
Step 4: Start on the Yellow Leaves and Consolidate Key Branches
The yellow leaves are really the focal point of the painting. They are the reason I wanted to paint this subject. So I need to get them right! I start timidly, then commit more and more as I gain confidence. The yellow is slightly warm, leaning towards orange on the color wheel (not towards green). I mostly go with cadmium yellow with a touch of transparent red oxide to make it warmer and reduce the saturation.
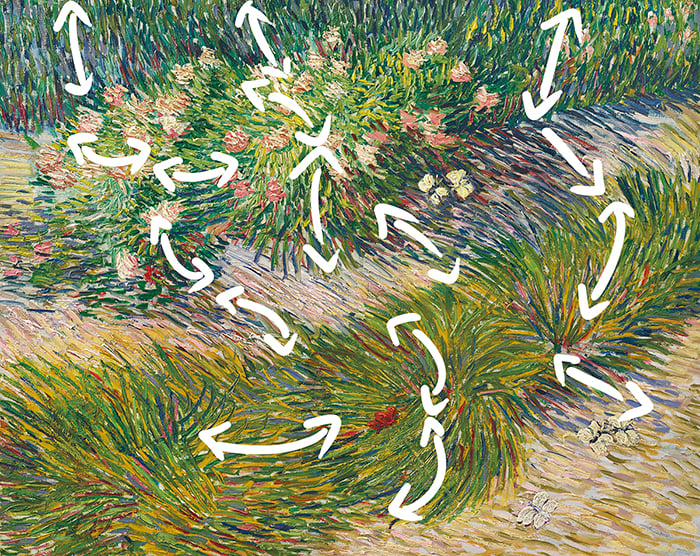
The leaves look fairly chaotic in the reference photo, but there is a strong sense of flow and structure.
See below. This is the broad sweeping motion I’m trying to convey in the painting.
Step 5: Add the Feature Leaves (Mistake)
I add in the feature leaves which overlap the tree trunk around the bottom. This is a strong point of contrast in the painting (light yellows against dark grays). It will naturally draw people’s attention. Unfortunately, I make the leaves too small in my initial attempt and have to redo them. I should have leaned towards going too big with the leaves rather than too small. This would have played into the idea of lucious, impressive leaves hanging from the tree, which is how I remember them.
Step 6: Redo The Feature Leaves
Redoing the leaves is tricky. I have to scrape away whatever paint I can, apply some dark gray color for the tree trunk, then start again. This time, I’m more careful and draw the leaf shapes in the appropriate colors.
I actually preferred the sharpness of the colors I had in my initial attempt, but you can’t always have it all! This is good enough.
Step 7: Add Finishing Touches
For the finishing touches, I add a heap of intricate twigs weaving through the leaves. These twigs bind the painting together and give it that finished appearance. I use a mix of ultramarine blue and raw umber for the color and apply the paint with a fine liner brush.
Tip: When doing fine linework like this, gradually twist the brush as you make the stroke. This will ensure the paint comes off evenly onto the surface.
Step 8: Sign the Finished Painting
I sign the painting in the bottom right-hand corner with magenta. This is my preferred color for signing these days. The right-hand corner balances well against the increased activity on the other side of the painting.
Overall Thoughts
I think the painting turned out great. It takes me back to that day in New Zealand.
What I like:
- The overall color theme works well.
- Those yellow leaves and the blue mountains at the back really sing.
- I did an efficient job painting the fallen leaves and the ground.
What could be improved:
- The tree trunk is a little stiff and I was a bit off with the drawing.
- I tried to be more intricate with the bark details, but it didn’t feel right.
- The prominent leaves in front of the trunk could be a bit sharper.
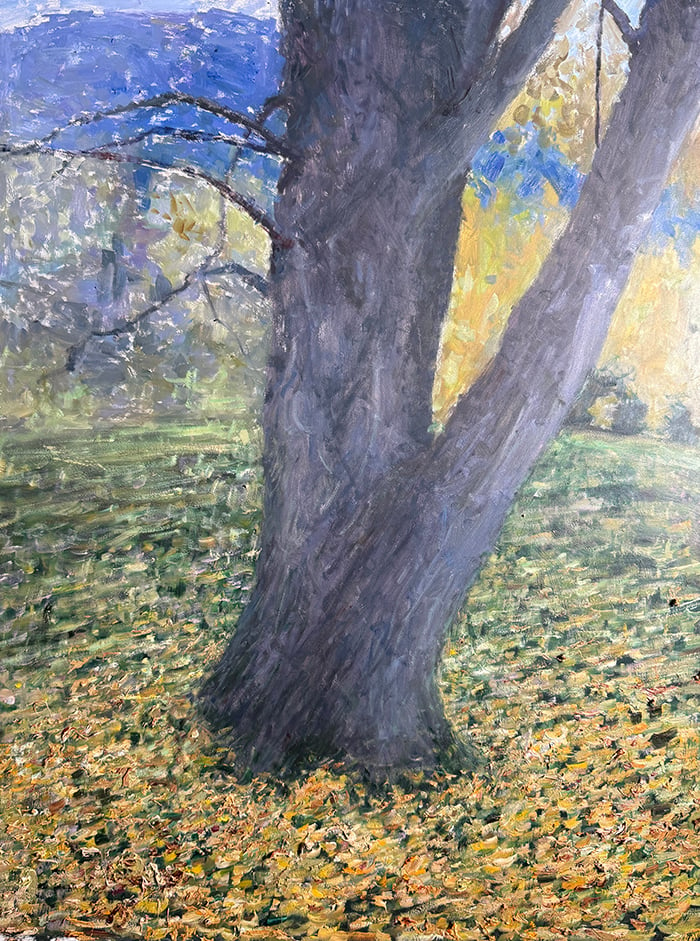
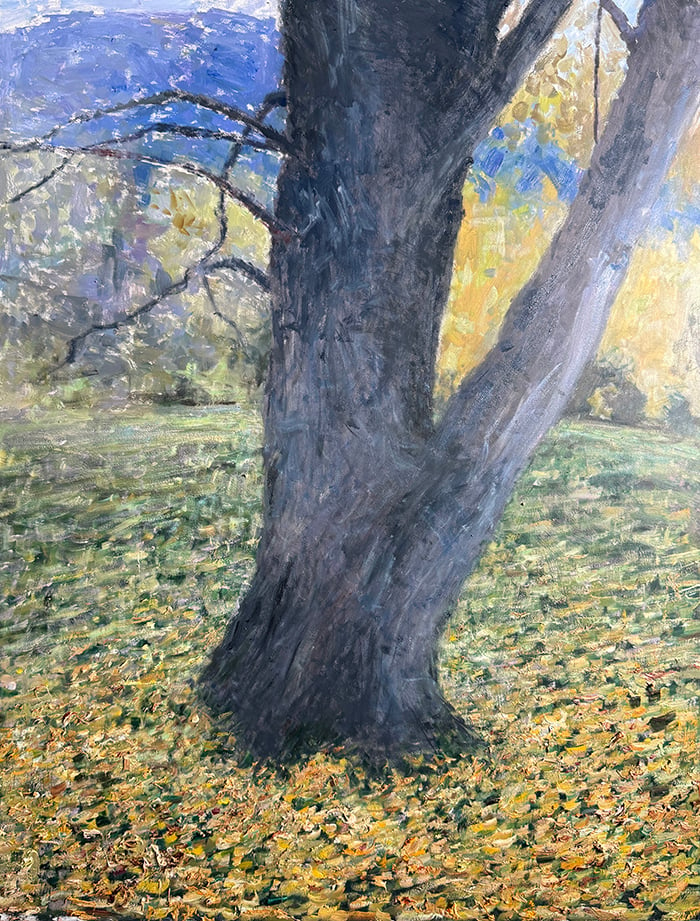
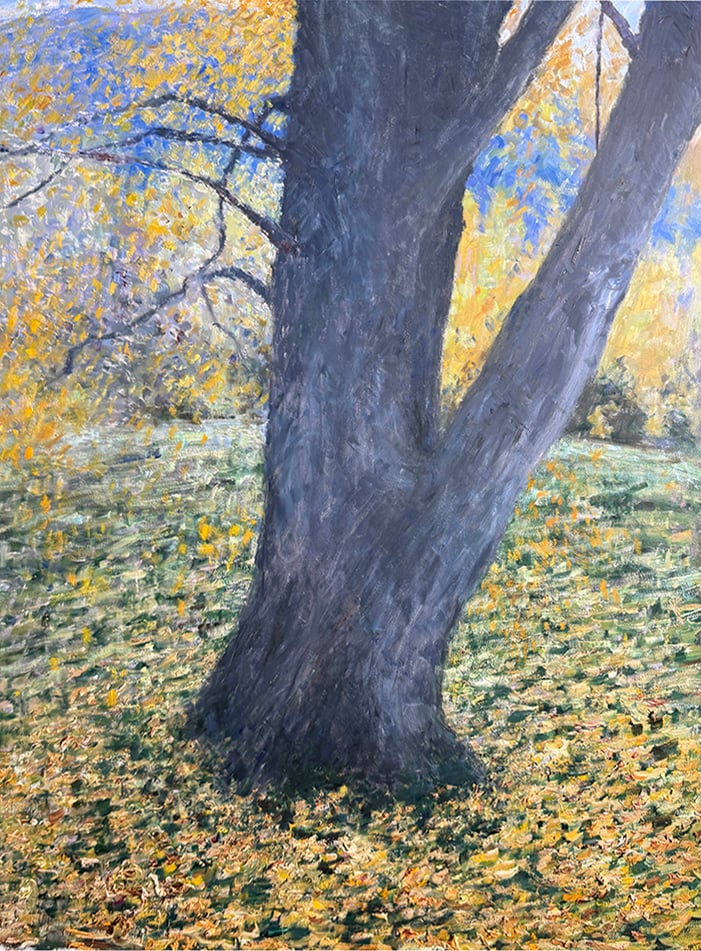
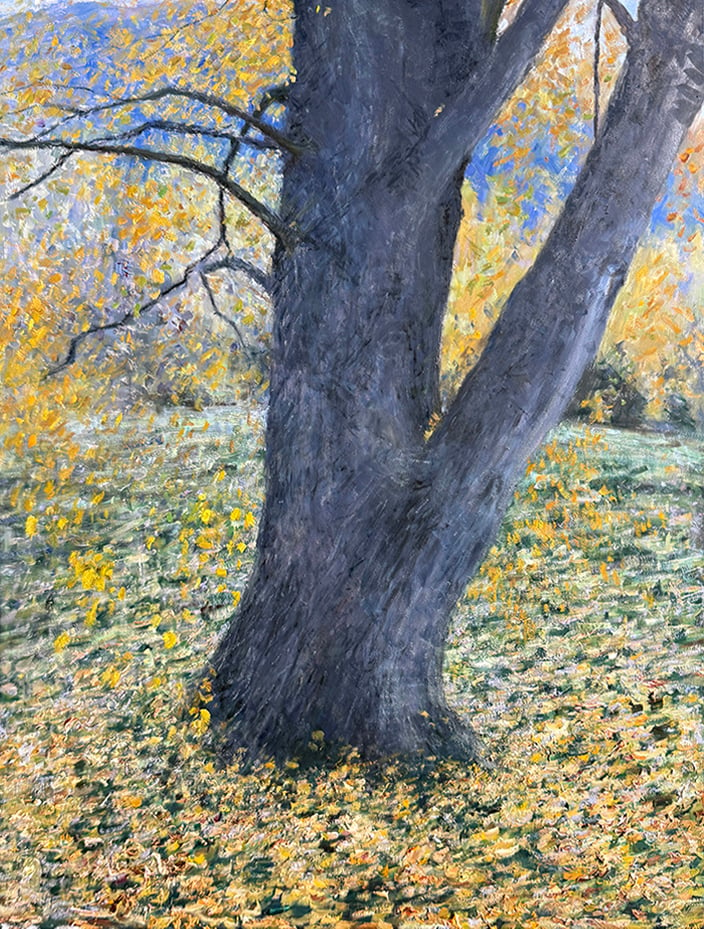
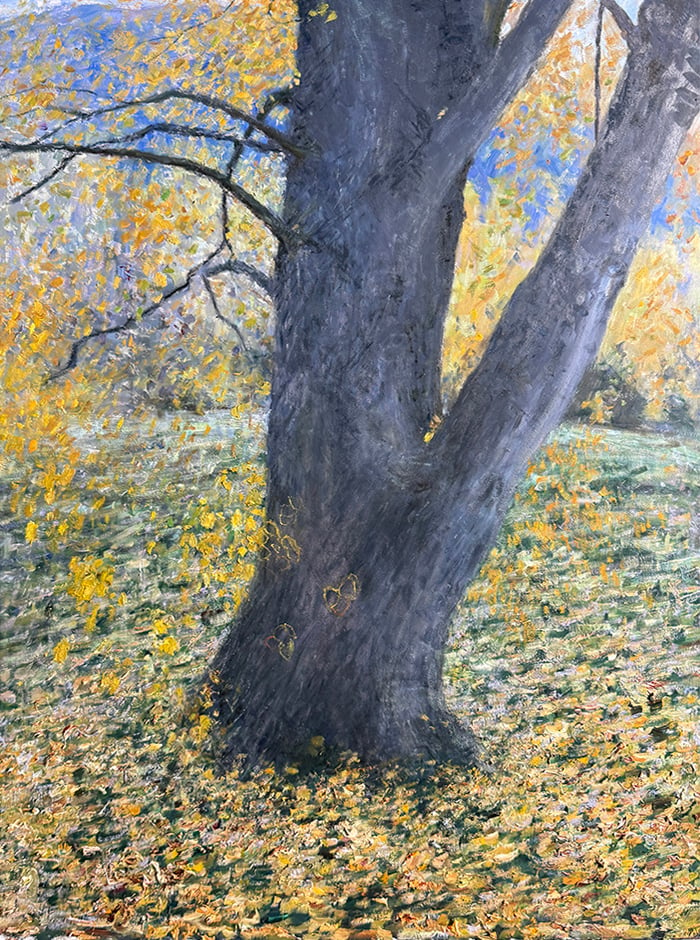
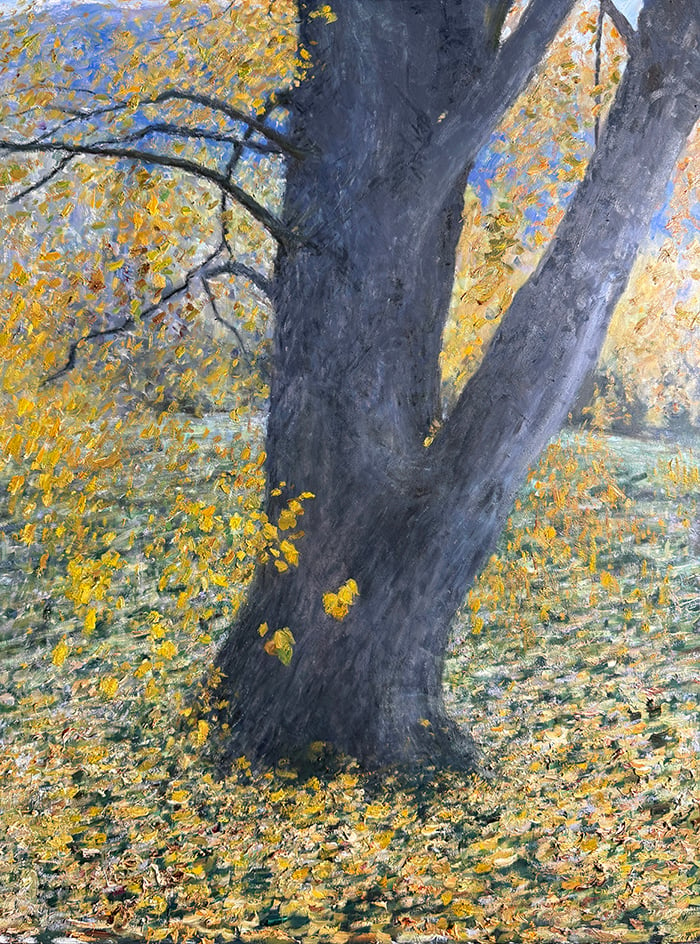
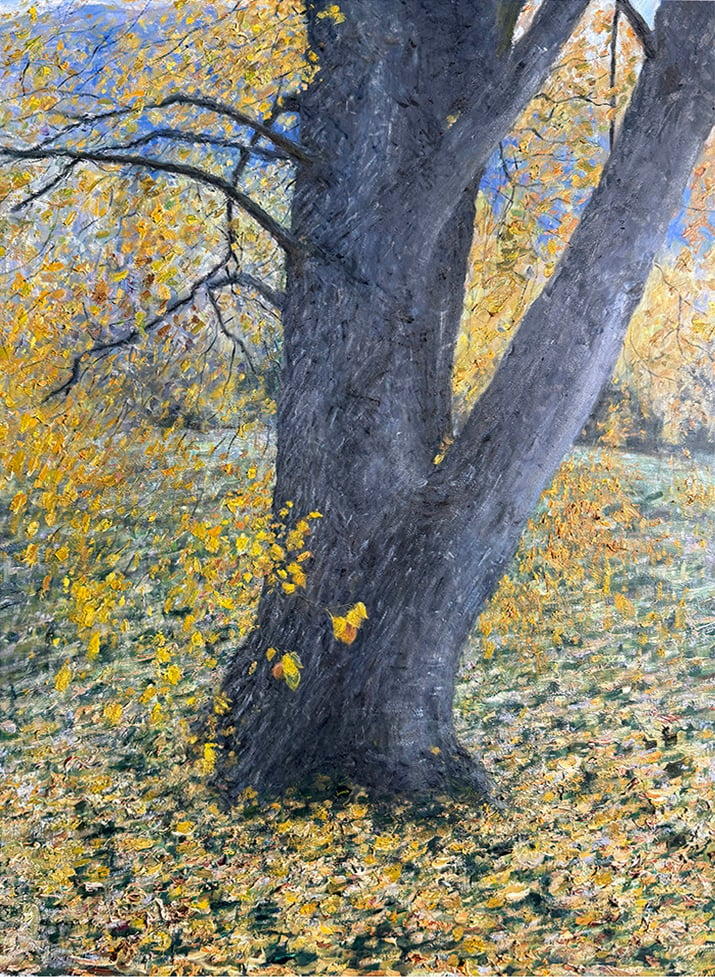
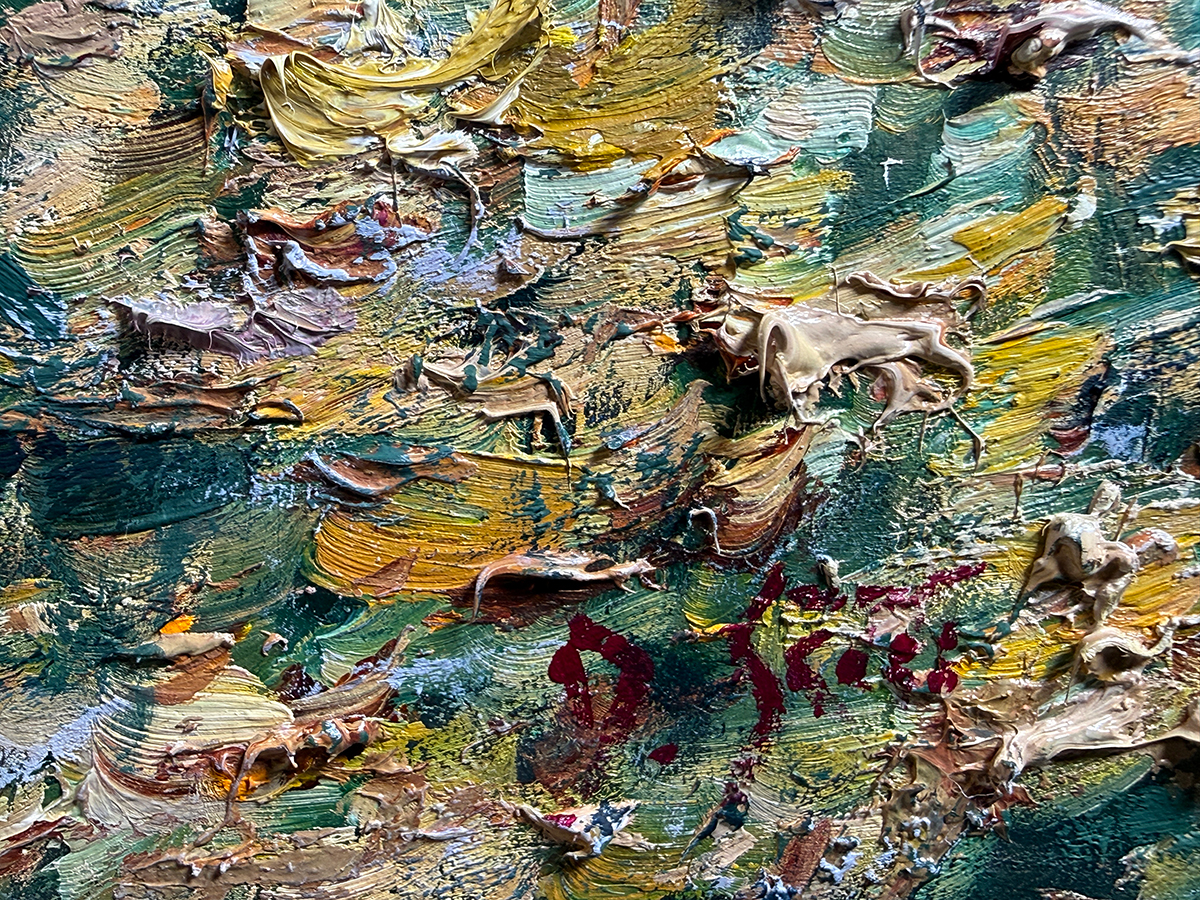
Here are a few close-ups:


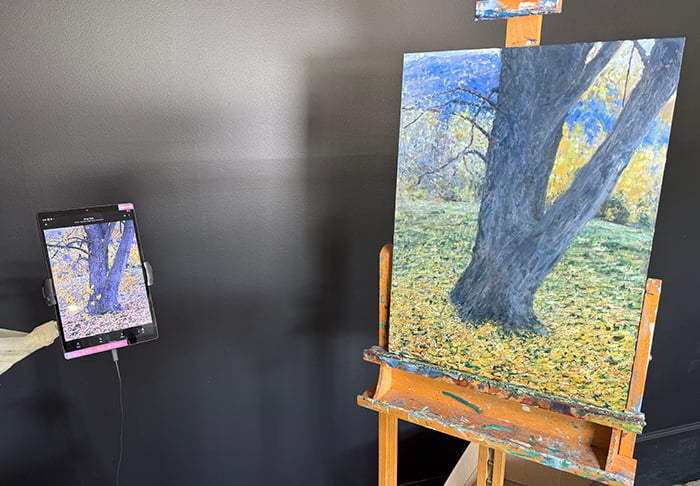
And here’s a slideshow of the different stages showing how it all came together. (The dimensions of the photos change slightly due to perspective cropping.)
Thanks for reading. Let me know your thoughts in the comments.
If you ever want to learn more, check out our Landscape Painting Masterclass or our Tree Workshop.
Regards

Dan Scott
Draw Paint Academy


Thank you all for taking the time to read this and posting your kind words. Appreciate it.
Dan
All of your paintings are great, but the Autumn Tree is so magnificent, I just get the chills when I look at it. It could win a contest if it hasn’t already. It is a lot prettier than the photo. The composition is better for sure.
Fallen leaves are so difficult, and you have really done these well. Foliage is where I can get bogged down and make the painting look stiff. I enjoy your teaching.
Thanks for sharing your process. I always learn something new with you. At the present I am painting a tree ( I enrolled in your tree workshop last year) and finally I am in the process of painting my tree.
Thanks again.
Thank you Dan for all the information on how you managed to paint a truly magnificent tree. Your leaves are wonderful and the colours perfect. Gorgeous!
Many thanks, it was so helpful seeing the stages in your painting. The result is beautiful.
Beautiful.
Beautiful. I love looking at it.
Whew! I just stared at the brushwork you put into the whole painting.
Mm!
I will start again with a painting and try and not spit the dummy in frustration.
Any way I will start again and do my best to produce a painting as I did years ago.
Thank you.
Always such a detailed and delightful lesson. I very much enjoyed the sequential slides at the end. Many thanks!!
That was so good . I am learning so much . Thankyou
Gracias Dan, es una clase detallada y perfecta. El cuadro es muy bonito.
This is an absolutely beautiful piece. Thank you for sharing your thoughts and the process. Learning and improving all the time is the goal for many of us.
This is so beautiful. I am tempted to give it a try is that is okay. Thanks for sharing the details of the process.
I really enjoyed seeing your process and hearing your thoughts. It’s a beautiful painting
This is really beautiful! Thank you for sharing the step by step process, which is both instructional and inspirational!
Hi Dan, this is lovely! I think one of my favorites of yours so far. Well done. Thnx always for sharing.
A great lesson. Thank you. I have a question on composition – about running an obstacle ( or tree branch in this case) out the exact corner of the picture. Would it be better to move the whole tree to the left, so the right branch doesn’t go out the exact right corner of the picture?
Thank you for any advice.
I liked the painting with it’s mark making, texture, and leaf colours, but agree with Arthur that the trunk looks awkward and unconvincing. I thought the earlier stages of it were more subtle and believable. I can see why you pushed it the way you did, but l think it needs tiny gentle hints of warmth here and there, as living things have, or even some reflected light from the leaves and ground. I like the way you zoned in on only a part of the tree, but the placing of the trunk on the canvas feels a little uncomfortable to me. Maybe some reflected light on it would help it live in it’s landscape.
Dear Dan,
As I live in The Netherlands ( Europe), I was looking forward to the summer.
After looking at your painting I’m longing for autumn and I love this work of art.
Thank you for showing us the making of the painting, your decisions and your technics!!
Beautiful…and thanks for your helpful tips….
Nice work Dan
Thanks for the details re colours used, etc. Can you suggest what size and type of brushes you use and where please.
Love the photo sequence of your progression.
Hey Judith
Thanks for your comment! If you take a look at my supplies list, I generally stick with the same brushes.
I also used a palette knife for this painting (and most) too.
https://drawpaintacademy.com/supplies/
Dan
Dan, this is truly an awesome painting. I love it. Thank you for sharing both the good and the ‘bad’, as it is actually encouraging us amateurs to see that even the pros can slip up here and there now and then.
Thank you so much. You inspire me to try painting this in acrylics. I have a large canvas the size you used, and I’ve been wondering what to fill it with.
Blessings,
Jean
Very well described and documented painting process.
Personally, I’m finding the tree trunks as an awkward element of this composition.
Best regards,
Arthur
As a watercolor artist I appreciated your step by step layering demonstration
in this landscape. It really helped me to see how to achieve the contours & texture
on the surface of the tree.
Thank you Dan for sharing your painting process. I love how you achieved the leaves on the ground ( and tree)….. and the trunk also. I miss NZ and its autumn colours.
Yes, the trunk sits in the middle , but it leans to the right and out of the painting, so seems fine to me. A wonderful painting. I love it!
Brilliant
Dan I love yr autumn tree. The clarity and richness of the colours works really well. Bright yellow against dark trunk! A gorgeous painting!!
Excellent painting! You really captured the way autumn trees glow. It’s also a great tree portrait. If I knew New Zealand trees I could identify the species from your painting. And you did this without making the leaves look “fussy”.
Hi greetings from South Africa.
Thank you so much Dan for so generously sharing your step by step process . I learned so much from it. Also close ups are very informative.
This was a great lesson in reminding oneself (me) of keeping the big picture in mind. Details are important, but only so far as they support the whole. The yellow flowers against the dark of the trunk are superb! Thank you so much for sharing your journey and technique tips with us.
Looks great! I especially like the slender branches off to the side and the fallen leaves! You really captured the feeling of walking on fallen leaves!
Thanks Dan. Its a beautiful painting and I learnt some useful tips too. Thanks for your generosity in sharing them.
Thankyou for being so generous in sharing your process. I learnt a lot from this!
Beautiful painting with vibrant colors and the tree looks real! Excellent work and as always I appreciate you sharing the process. Knowing even when you are satisfied with a painting there is room for improvement is a valuable lesson we never stop learning. Thank you for sharing this valuable lesson.
Looks wonderful. I do love the autumnal tone and the strength of the tree speaks to me.
New Zealand is a wow at every turn and visually inspiring.
Absolutely beautiful painting. The brights against the darks really draw the eye in
Than you for your painting tutorial lovely colours and gave me your break down of colours
DAN,
That was AWESOME!
Both the detailed description and the final painting itself.
I will save this for referance.
THANKS!!
Linda
This was a splendid lesson en painting. I was delighted. Thank you very match. Bravo.
I always learn a lot from your explanations and paintings. Superb.
Michael Majlin.
Thanks so much for sharing your experience
Thank you!
Chavi
Love the slide show-I take photos along the way in some of my paintings!
Always interesting to look back at the progression…
Very interesting, Dan. I liked the looseness of the painting and color choices and textures to show the falling leaves. The only thing that bothers me is that the tree is almost dead-center on the canvas. It clearly is the centerpiece…
Thanks, as always, for sharing with us!
A very huggable tree!!! Thank you for sharing!
Really nice painting, Dan!
I like your 12 progressive slides.
At a time of much instability and chaos here in the US, your tree, in its stateliness and well-grounded mass stands in contrast to our country today. The beautiful leaves lie around it peacefully.
Excellent summary of your process. Final product is extremely well done.
I loved that you shared the close ups of your brushwork. I can imagine the finished painting sings and vibrates with life. Well done!
Stunning. So love your brush work. Learned a lot from your process. Thank you.
Beautiful work!
Very inspiring.
I especially like the time lapse sequence and the texture of your leaves.
Absolutely stunning….what talent
Thank you for this tutorial! I love oils, but haven’t painted much for many years. I’ve tried with different media over the years but oils is the right fit for me. I was an art major in college. My main challenges are; I can’t draw, and I lack confidence to try. I’ve done many workshops but haven’t done a complete painting since 1983. That one I gave to my father-in-law for his birthday. I only have one painting left that was the very first one in a series of 4 different classes each 4 classes long. My very favorite teacher was Al Romero, a local junior high art teacher here in Idaho Falls Idaho. He told me that several of his students had sold their artwork and I had more talent than some. I should sell mine. I never did, I gifted a few. Each one was like giving birth, they were my babies. I have taken several years and replaced my oils and brushes. I have several oils from college in 1966 that are still good! I have the desire and the time (retired), I just am scared to get started. I’m afraid I’ve forgotten how. I’ve digested all your information in this tutorial. It makes me want to get started. Landscapes are my favorite. I think because I can create the components from my mind and from nature for reference and it can look any way I want it to! Drawing and perpetrate my weaknesses. Thank you so much! 👍
Go for IT, Linda!!! Nothing to lose. Do it for FUN—Awaken your INNER ARTIST and explore what you enjoy. I dare you to just start and see where you go. Art is a journey—take the next first step!!! Do it TODAY! –Marion in Ohio
This is a wonderful painting. I loved how you showed each step in photos rather than a video. I was able to linger on each step.
I love reading your columns and I have learned so much from them. Even though I am a watercolorist and have never touched oils, the major concepts are basically the same.
Thank you for your posts!
This is one of my favorite paintings of yours. Having completed the tree course, I can really appreciate what went into this painting. I love how you captured the texture of the tree, the reality of the leaves, and the pure joy of what you were seeing. I learn so much from your columns. You are a master who I will continue to follow as I’m now approaching my 80s.
Leslie
Thank you. What was your initial objective to capture in paint?