In this post, I provide you with some guidance on how to paint mist, fog, smoke, and other transient effects. These effects are typically challenging to capture on a flat surface due to their elusive and fleeting nature. Many artists seem to be either too timid with their approach or too bold.
I cover the following areas:
- Shape, Form, and Movement
- Observe and Identify Colors
- Technique Selection
- Other Master Painting Examples
- Key Takeaways
- Thanks for Reading!
I use my recent painting, New Zealand Reflections (shown below) along with several others by the masters to demonstrate key points.

(Before diving into this post, make sure to pick up a copy of my free Landscape Painting Starter Kit.)
Shape, Form, and Movement
You should approach transient effects just like you would any other subject-look for basic shapes, forms, and movements. This is the main challenge of painting transient effects due to their fleeting and elusive nature. The shapes, forms, and movements will usually be hazy and indistinct, but they are there!
Ask yourself:
- If you had to draw an outline around the transient effect, what would that shape look like?
- Can you make out any geometric shapes (circles, triangles, squares)? These tend to be easier to measure and draw compared to irregular organic shapes.
- Is there a sense of three-dimensionality to the effect, or does it appear flat? Sometimes, the effect will have enough substance for you to make out different light and dark planes.
- What is the general sense of movement? It is going upward? Downward? To the right? To the left? Swirling? Still?
I will show you what I mean using my New Zealand Reflections as an example. Below is the reference photo I painted from and a close-up of the mist sitting on the calm water:


The mist forms an organic shape which I have outlined below:

I can break this organic shape down into smaller, circular shapes that represent clusters of the mist. These shapes are weak and hardly distinguishable, but they are important to keep in mind as they help determine the kind of brushwork I use.

In terms of movement, the environment is very still. So much so that the water appears almost like a mirror reflection of the grand mountains in the distance. To capture that stillness in the painting, I avoided the use of any strong, directional brushwork.
I will run through another example using the stunning painting by Abram Arkhipov below named Laundress:

Here are some key observations regarding the steam which fills the room:
- His use of painterly brushwork, thick paint, and solid color gives substance to the hot steam.
- The edges of the steam are soft, but you can still make out the general shape of it.
- Notice how the steam forms a rough, diagonal line. This gives a feel of upward movement. By way of comparison, think about what the sense of movement would look like if the steam formed a horizontal line.
Observe and Identify Colors
Mistakes in terms of color tend to stand out when painting transient effects. My best recommendation is to think in terms of color relationships rather than absolute colors. By color relationships, I mean how light, dark, saturated, weak, blue, red or yellow the color is compared to its surroundings.
So, going back to the New Zealand reference photo, I can see the following color relationships between the mist and the surrounding colors:
- The mist is much lighter than the surrounding colors.
- The mist is much less saturated than the surrounding colors.
- The mist is a touch warmer in color temperature than the surrounding colors.
When I was mixing the color for the mist, I was thinking about these relationships.
The alternative would be to look at the color in the reference photo, determine exactly what color it is, and replicate that color in my painting. The problem with this approach is that it assumes the surrounding colors are the same in my painting. If they are not, then even if I mix the color exactly as it is in the reference photo, it will look wrong in the context of my painting.
The color I ended up using in the painting was a very light and slightly warm gray. However, looking back now the color seems to be too cool, which is a slight mistake.

A color pitfall you need to be aware of is overusing white. We tend to associate mist, fog, and smoke as having a white appearance and this can interfere with our perception of color. Most of the time, you will find that light grays and other weak tones should be used for transient effects and pure white should be left for only the brightest of highlights, if at all.
In John Singer Sargent’s Yoho Falls, the hazy spray of water is depicted with varying warm and cool grays. Even the lightest parts seem to have a touch of color in there.

Technique Selection
Your technique selection and implementation is critical. Get it wrong, and your transient effect will appear out of place.
When I was painting New Zealand Reflections, I waited until the very end of the painting before I laid down the mist on the glassy water. Below is a progress shot of the painting before starting the mist. Notice how I blocked in the general colors as if the mist did not exist, rather than just leaving the area blank. This gave me the option to leave some of these colors exposed to capture the translucent nature of the mist.

Painting the mist this way presented a few challenges:
- If I painted the mist wrong, it would stand out and probably ruin the painting. The prominent position and lightness of the mist make it a key point of interest in the painting.
- Mistakes would be very difficult to fix at this late stage of the painting. I could not simply wipe it down and start again. I either needed to get it mostly right the first time, or it was bust.
- The painting was 95% complete by the time I went to paint the mist. There was a risk I would play it too safe and paint timid in order to preserve the work I had already done. But remember, most of the great paintings we admire were not the result of playing it safe.
- The colors in my painting are slightly lighter and less saturated than the reference photo (I do not care for reproducing the photo exactly). That means, if I painted the color of the mist exactly as it is in the reference photo, it would look out of place in my painting. Instead, I needed to capture the color relationships, which I discussed earlier in this post (under Observe and Identify Colors).
To paint the mist, I first let the painting dry for a day. Then I used a dry brush to gently scumble color across the surface. Doing this allows some of the base colors underneath to remain exposed and give a sense of the mist’s translucent nature.
I started by applying a few test strokes of light gray to see how well it fitted with the rest of the painting without committing to anything serious on the canvas. Once I was satisfied with the direction, I gradually committed to it.
I worked slowly through this process, as overdoing it would be a critical mistake. Too much color and paint would make the mist appear solid and lacking that transient feel.
Other Master Painting Examples
Below are some other master painting examples of how to paint transient effects, starting with the appropriately named Fog, Voisins, by Alfred Sisley. It is not the most cheerful painting, but it certainly gives a sense of dense fog that fills the air.

In Wanderer Above the Sea of Fog, there is a powerful contrast between the dark, rigid, and imposing rocks in the foreground and the soft sea of fog.
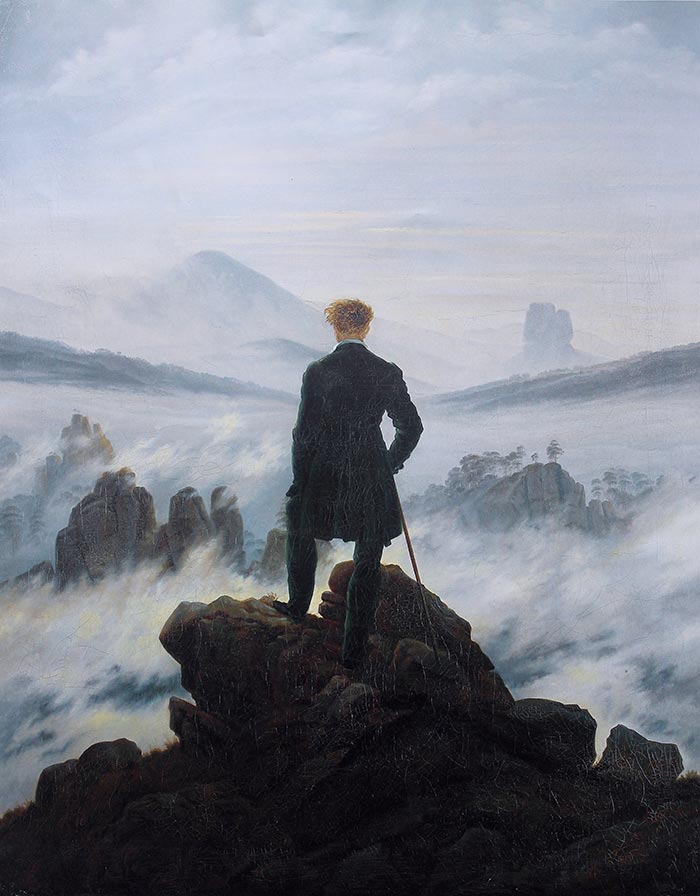
Below is more of an ambient display of fog. The edges are soft, the colors are muted, and there is a general haze across the whole painting.

Frederic Church depicts not only the soft haze of water spray from Niagara Falls, but also a fleeting rainbow in the bottom right-hand corner. Notice how Church’s brushwork follows a rough, circular pattern, creating a sense of movement and drama. The rainbow is subtle and if I had to guess, I would say he used thin glazes of color over a dry foundation.
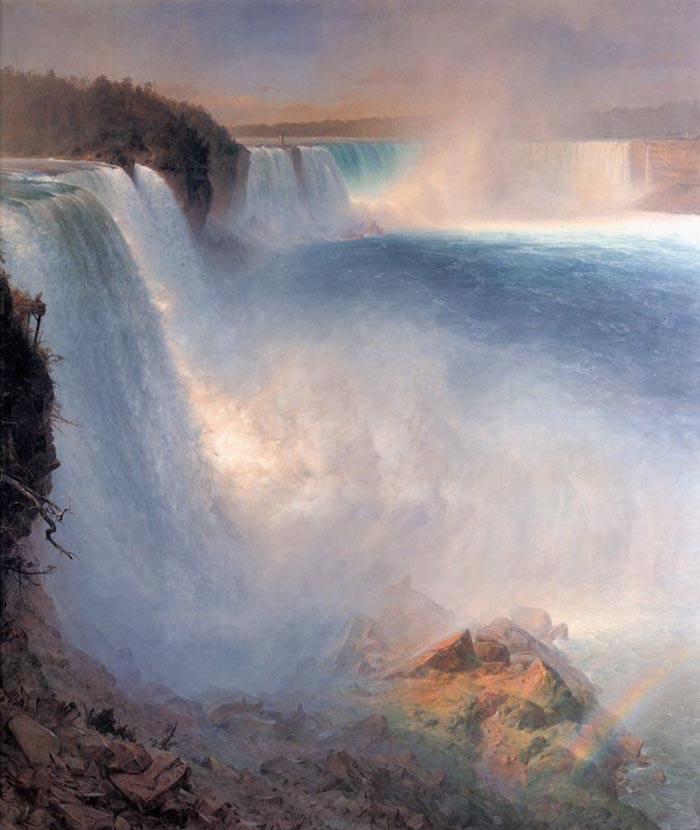
I could write a whole separate post about all the different studies of fog, mist, and transient effects by Claude Monet. He frequently painted the same subject over and over again under varying conditions to examine the changing of light and atmosphere. Below are just some of his paintings which feature misty and foggy conditions, starting with Homes in Falaise in the Fog. Without the vague depiction of the house, this would look more like a modern-day abstract piece.

In his painting below of the Seine, Monet depicts the strong, warm light from the sunrise coming through the hazy mist on the water. The warm light appears diffused by the mist, but you still get a sense of its intensity.

In Monet’s painting below, you can only just make out the Palace of Westminster through the thick fog. Notice the subtle lights and use of saturated blue around the bottom of the Palace.

Waterloo Bridge was a popular subject for Monet. In his painting below, he used varying blue and purple tones to depict the boats going under the bridge. There is also just a hint of the buildings in the distance, adding a sense of depth and perspective to the painting.

Key Takeaways
Here are some of the key takeaways from this post for painting transient effects:
- Approach transient effects like you would any other subject-break it down into basic shapes, forms, and movements.
- Transient effects are often made up of translucent, reflected, and local colors. So make sure you vary your use of color as needed.
- Transient effects need to appear transient, not rigid and solid.
- Be careful not to overuse white. We tend to associate mist, fog, and smoke with the color white and this can interfere with our color perception. Try to see color objectively.
- Think about color relationships, not absolute colors.
- Develop a strategy before you start painting the transient effects. It is not something you should guess your way through.

Thanks for Reading!
Thanks for taking the time to read this post. I appreciate it! Feel free to share with friends. If you want more painting tips, check out my Painting Academy course.
Happy painting!

Dan Scott
Draw Paint Academy

Thanks,very good article with examples that I’ll remember.Thanks a lot it improves my understanding the painting process.
Thanks for making this page, I found it very helpful and I will try to remember if I paint steam, fog or water.
Wow I love the samples from art history…I’m doing a series of landscapes and like your lesson to get me past some stumbling blocks
Excellent post, lots of food fo thought. Also daunting in the application of techniques which are new!
Dan Scott, what a Wonderful tutor you are.
Love all your informative information so interestingly explained,
Thank you so much.
Thank you so very much for this article! Did you thin your paint for the fog at all? Fog in paintings always looks like a thin “wash” to me. Does it matter how far away the fog is? Farther away it looks more dense, up close it seems thinner. Adjust paint accordingly?And thank you the Paint Academy. I am truly enjoying it!
Hi Marti! Thanks for the kind words. I did not thin the paint at all. It was straight from the tube with no added medium. I used a dry but and hardly any paint to scumble it on top. It would matter how far away the fog it, but the best thing to do is rely on your observation to give you the answer.
Hope this helps.
Thanks! Dan
Wonderful article, as usual. It’s much appreciated.
Really good explanation. Requires a good amount of knowledge to break down something translucent. Thanks
Thank you for this post. It has given me a much better perspective on how to break it down. I have found that it has been very much hit and miss with mine. At least now I know where to start to find what went wrong with the ‘misses’.
Thanks for writing! Your instructions and example paintings help illuminate, simplify, and organize daunting tasks. Have a good November!
Thanks so much. I was having trouble getting my mist from waterfalls to look right. You helped me get a better effect that I was looking for!
Wow! This is truly informative; so much wonderful instruction. I’ve struggled with getting these effects before, but hitting the studios this morning to try everything. Thank you!
Very interesting ! It has given me a lot to think about for future work and the post has caused me to examine paintings I’ve done in the past.
loving your instruction Dan
Another thorough, well-researched clear article, that really helps!
Thanks for posting this article. I’ve been wanting to paint a lighthouse enveloped by fog but have hesitated because I wasn’t sure of how to pull it off. This article has given me the confidence to get started. Thanks,
Great tutorial – best I have ever read. Thank you for so unselfishly sharing your obviously considerable knowledge and experience. Please keep them coming!
Thank you very much for sharing.
Dan I love your comments in general, as well as the illustrations you send. Your emails are wonderful!
Frances
Dan I love your comments in general, as well as the illustrations you send. Your emails are wonderful!
Frances
Thank you so much for your insightfulness. I will remember the points you’ve made for future paintings involving fog etc. Just one question, in Mr. Church’s painting of Niagara Falls, I was unable to see a hint of a rainbow in the bottom left of the painting, but there is one on the right. Is this the one that you are referring to?
Thanks again!
Hi Lil. Thanks for pointing that out—was a silly error! Fixed now. Appreciate the kind words. Dan
Thank you for very interesting comments regarding painting mist and fog. In the actual process of painting the mist what type of brush was used and what were the kinds of brush strokes used that gave the mist its light and airy feel?
Hi Sandy. I used a medium filbert brush from Rosemary and Co. The brushwork was kind of a back-and-forth scumble. The idea is to build layers of broken color to give that airy feel.
Thanks! Dan
Very enlightening article thank you …never tried painting mist, I will have a go now!
I appreciate all the tips you offer.
Thanks so much for this lesson on transient effects. It gave me a great in-site into painting these phenomena, as I have been avoiding this. I just couldn’t find anything in the many books with an understandable technique for doing it. So now I can pull out those beautiful reference photos I have tucked away and use them. Also, I was hoping you could do a lesson on painting sunlight glowing through trees in a Forrest. I suppose this would be backlighting of the trees with the rays of sunlight streaming through the foliage and tree trunks and dancing off the forrest floor. I really need help with this. Thanks for all you do. S. Burger
Hi Sonnie. No problem I can add that to the list of topics to write about. You might also find my post on dappled light interesting:
https://drawpaintacademy.com/dappled-light/
Thanks!
Dan
Hi Dan, I am new to your blog. This article and the historical painting are all so helpful. *Your personal work is lovely as well.
I do plan to join you in the Academy in the near future.
Thank you!
Taylor
I am so grateful for all the information I have acquired from your. articles, I read them and learn by applying it to my paintings. plus I experiment a lot more. Thank you Dan.
Dan thank you so much for this post. Very interesting study of various artists creating this technique within their painting. I suppose the actual technique would alter a bit based on the type of paint being used. I exclusively use Acrylic paint and have at times created this affect on water and waterfall paintings I used a watered down white mixed with greys and blue tones and areas that catch sunlight I mix in some yellow and swirl it in upwards motion then dry brush and this then allows for the vapors to be more transparent in nature, I enjoyed seeing master artists works here and on one last note your artwork is very beautiful ! 🎨♥️
Dan thank you so much for this post.
I’m so grateful for all the infoI have acquired from your articles.
This article has given me the confidence to get started.
Your work is lovely as well.
Thanks.
Thanks Dan! Strangely I was thinking just the other day about transience in my work and find it difficult to depict but your post gives me more insight into my future approach.
Thank you so much for this post. I have often wondered how to get that misty effect. My question would be the same as Marti above.
I just want to add my admiration for your work like so many other commenters have written.
Also to thank you for your unstinting generosity of time and effort to freely give such informative texts about other art work as well as how you approach your own.
It helps me to go to galleries and perceive these famous works with more intelligent intent! Thank you, thank you.
Thank you Dan for sending all of these teachable moments! I save each one.
i have often wanted to paint fog/mist but didn’t know how to. Thank you so much for sharing this Dan! I’m definitely going to give it a go fairly soon!!
Thanks, Scott. This is something I’ve always wanted to try but didn’t know where to begin. Your lesson was helpful and inspiring.
Hi Dan, Living where I do, rain is scarce so mist and fog are relatively unknown to me except in pictures. Thanks for showing this to us, I will try to paint mist through imagination more than actually seeing it.
Thanks Dan enjoyed the mist, alway wondered. How to do it wow tx
Hi Dan
Iam a beginner in watercolour. The technique you mentioned is for oils and acrylic?
Thanks for the all the painting tips and explanations which I find very useful.
Hi Doro, the techniques are mostly for oils and acrylics, but the general fundamentals can be applied to watercolors. Things like color theory, composition, value, etc.
If you are watercolor painting, then you will also be working dark to light.
Thanks!
Dan
Hi Dan
Iam a beginner in watercolour. The technique you mentioned is for oils and acrylic?
Thanks for the all the painting tips and explanations which I find very useful.
thank you for sharing your talent. i have only just begun to paint this past summer so i could use all the help i can get. my problem is having limited access to internet . i hope one day i can produce such beautiful works of art.
I so appreciate the explanations and examples you share. Thank you
Thank you for the hints its a subject im going to be tackling , ill get some practice in first
Cheers
Dan, great examples and advice for creating these effects. Thank you for sharing your knowledge and being an inspiration!
These are some of the things I have not been able to learn by practice…change…practice. Thank you.
Thank you a lot ,
You give a tiny , specific , gorgeous and helpful recommendation .. 👏👏🌹
Great post!
Thanks alot.
Thanks Dan, I’ve always had problems with smoke/ fog.
This post will be a big help for me.
Keep ’em coming.
Dave M ( Australia ) 😎🇦🇺
Your instructions and example paintings help illuminate, simplify, and organize daunting tasks. Have a good November!
Thank you for your explanations and very clear instructions Dan. If I get back to NZ I will certainly look for
transient effect at Wanaka.
However as I live in sunny Perth WA fog is an extremely rare occurrence. In the mean time I will wait for rain and hopefully be able to apply what I have learnt from you.
Happy Painting
Dan, your teachings are very helpful to me, an intermediate level watercolorist. Largely from you I have finally learned to paint shapes, not exact images, and this has greatly improved my painting. Thank you for your generous advice. I also subscribe to your courses and images.
Am starting with acrylics. Appreciate your sense of simplicity. Ready to start. Please limit emails to 1x weekly.
Thank you so much. Think I can
make it now!!
Susie
Your work is amazing , soft and draws you in , as if you are actually their, wonderful . I’m self taught in arylics , and have had my work diisplayed . Thank you for sharing your techniques, very helpful and will use it graciously ! Continue in your sharing , it’s quite helpful and saves alot of time in approaching some questions on applying it. Thank you again Dan .