
Welcome to lesson 3 of the Painting the Landscape workshop.
As a recap, in lesson 1, I chose a reference photo to paint. In lesson 2, I analyzed that reference photo and came up with a strategy to paint it. Now, it’s time to paint!
Painting the subject is all about bringing your ideas to life. It’s not about copying.
Copying is fine for learning about technique. For example, if you want to learn about the techniques I use, one of the best ways to do that is to copy my approach. But, to truly challenge yourself, focus on painting your ideas and the way you see and experience the world. This is what makes art so interesting! It’s why several artists could paint the same subject but come up with completely different artworks.
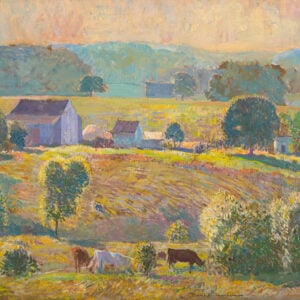
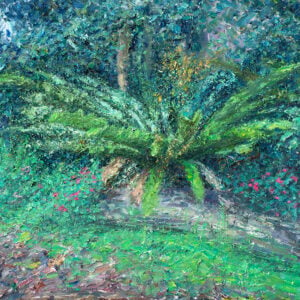
Anyway, here’s how the painting turned out:

(You can download a high-resolution photo of the painting here.)
I painted this over several sessions and I estimate it took two to three painting hours, not including time spent pondering in front of the easel. However, this is just a wild guess as I lose any reasonable sense of time when I’m “in the zone”. (On a separate note, that’s how you know you’ve got something worth doing: if time ceases to have meaning as you do it.)
There were three key steps to this painting: sketch, color block-in, and refine. I use these steps to simplify and communicate my process, but in practice, it’s much more fluid. I look at the reference photo, I look at the painting, and I make decisions on what the painting needs. I do this over and over again until the painting is finished. This is an important point. Being able to follow broad steps won’t get you very far. Being able to make good decisions based on what’s in front of you will. I like to think of a painting as being the sum of many small decisions. The better those decisions, the better the painting.
The following is a more detailed explanation of how I went about this painting.
Step 1: Rough Sketch
I start with a rough sketch to map out major shapes and contours and to get a feel for the overall composition. I also use diagonal lines to indicate the dark shapes. All up, this only took a few minutes.
Even with a rough sketch like this, it’s important to be accurate. Small mistakes made at the start of a painting can compound into critical mistakes later.
Pay no significance to the color I use for the sketch. I typically grab whatever is convenient. However, I do avoid vivid colors, such as cadmium red, as they can be problematic to paint over.

Step 2: Color Block-in
With the sketch in place, I start blocking in the general colors. I work fast and focus on the big, simple color shapes. This is all about setting the foundation for the rest of the painting. What I want is an honest representation of the subject with no frills or nuances. It’s also essential that the foundation is right before I proceed to the next step.
I work fast so that I can get as much of the painting done wet on wet as possible. Wet on wet gives a natural and effortless appearance if done well. I also like to be driven by intuition and my first impressions of the subject at the start of a painting, when it’s easier to change direction and recover from mistakes. I tend to be more calculated towards the end of a painting.


If all goes well, the color block-in doesn’t take long for a simple subject like this. I believe this took 20 to 30 minutes. For future workshops, I’ll film the painting to show you what I mean. You can also see footage from other paintings here.
Step 3: Refine
For the third and final step, I refine the painting and add the subtle nuances and details. This step takes the most time. I typically spend around 80% of my time on the final 20% of the painting.
The goal of this step is to give the painting a finished appearance and to make all the parts work together as a whole. In practice, I narrow in on a particular section and work on it until near finish, then I move on to the next section. I work around the painting until I see no more work to be done. However, it’s not as simple as it sounds. The main challenge is that, when I change one section, I also change the relationships it has with all the other sections. For example, if I change the background, I also change the relationship between the background and the focal point. This means I must constantly jump around the different sections until I’m satisfied with the parts and the relationships between the parts. This really is the most challenging aspect of painting in my opinion.
For this reason, it’s difficult to walk you through the specifics of this step. There’s just so much tinkering and back and forth between the sections. But I’ll show you some notable points.
I start with the flowers and greenery in the foreground and on the feature plant. The flowers are the big idea of this painting, so it’s important that I get them right. I use impasto brushwork and broken color to suggest detail and activity without having to painstakingly render every detail.

For the trees in the background, I add detail and interest without drawing too much attention. This is surprisingly difficult to do. As you paint a certain area, there’s always a natural urge to hone in on the detail. But this can be counterproductive for background areas that are there to provide context, atmosphere, and contrast for the focal point.


Finally, I add intricate branches at the top. I left this until the end as it’s easier to paint intricate details wet on dry. I also wanted to be completely satisfied with the sky and trees before painting the branches over the top, as it would be finicky to make changes to these areas after.
Tip: When coming up with a strategy for a painting, you should consider the order in which you will paint the different sections. Take into account any overlap between the sections and challenges you might encounter in terms of brushwork and color.

When Is the Painting Finished?
One of the most challenging decisions to make during the painting process is deciding when to put the brush down and call it finished.
I call a painting finished when it looks right and I see no more ways to improve it. I might also leave the painting on the easel or somewhere in plain sight for a few days. If I don’t see anything in the painting that annoys me, that’s usually a good sign it’s done.
I rarely return to a painting once I have deemed it finished. I might spot mistakes or ways to improve the painting later down the track, but I prefer to move on to the next painting than constantly rework the old.
Sign and Photograph
Once I finish a painting, I sign and photograph it.
I vary the color and position of my signature based on the painting. I want the signature to be distinct, but not overstated. In terms of the position, I consider the overall balance of the painting. If the painting is heavy or more active on one side, I might sign on the other side to balance it out. I also prefer to sign on “quiet” areas without impasto texture.
For this painting, I sign using magenta (a dark, cool red) in the bottom right-hand corner. It’s distinct, but not overstated. And it doesn’t look out of place in the painting.

Photographing the painting warrants a separate lesson, but here’s a brief overview of my process:
- I photograph the painting in my studio as this allows me to produce consistent results. Photographing outside on an overcast day is also an option, but the results vary day by day.
- The light is the most important factor to get right. I use Neewer studio lights (Amazon link). They are adjustable in both brightness and temperature. They are also surprisingly affordable for what you get.
- I take photos in RAW format. This gives me more options in post-processing.
- I transfer the photos to my computer and edit them in
Photoshop . I focus mostly on getting the exposure and temperature right. The goal is for the photo to be an honest representation of the real thing.
Here’s the finished painting again. Keep in mind, the camera I use for photographing the finished painting is different from the one I use to take progress shots. That explains the slight differences in color.

Exercise (Optional):
Paint the reference photo. You can either use the strategy you came up with in lesson 2 or follow my approach. I’d love to see how you go. You can send a photo of the finished painting to admin@drawpaintacademy.com.
(For future workshops, I’ll get you to paint the subject before I reveal my own painting. This way, you’ll be able to paint without my ideas tarnishing yours.)
Thanks for reading! The next lesson will be about self-reflection. Most people skip this part, but it’s essential for improving over the long term.
Happy painting!

Dan Scott
Draw Paint Academy
PS. If you want to invite any friends to the workshop, copy and paste the following link:
https://drawpaintacademy.com/free-art-tools/painting-the-landscape/

Thanks Dan really interesting. I’ve lost my mojo a bit for painting recently & this is sparking my enthusiasm to get back to it… really appreciate your lessons
Hels
Cascais, Portugal
Wonderful! Your painting catches my eye much more strongly than the reference photo did. Thank you for showing us how you accomplished that!
Thank you so much for this lesson, Dan. I really enjoyed it! I am looking forward to the next lesson.
Love your paintings.
So always nice to see what the greats do!
Beautiful! I love the color choices of this painting. And thank you for sharing.
This is extremely helpful. However, I need help in which colour to choose & colour mixing. Would it be possible to include your palette.
Thank you
Looking forward to painting again.
Rita C
Love your painting and thanks for the insights you gave in your painting process. I am inspired to give it a try!
I love all your lessons and the way you break down each stage of a painting. This is very helpful, especially when “I get in a rut”. Please keep them coming.
I love your interpretation of the photo which, like many outdoor shots, seemed a confused jumble of midrange tones. You filled your painting with arm and cool greens, subtle and dominant shadows and just the right amount of dark and light lavender. You created an expressive and personal statement about a humble bush in a sea of green. Very inspiring.
Your comment really grabbed my attention. It is a very thoughtful critique. It sounds like you are really into painting and I wonder if you could share some images? It would be fun to compare notes. Painting is essential in my life.
Dan, I love your lessons. Can you tell me what “impasto” means. Thank you.
I read and reread every word of your description. I will save this for reference because it is the best lesson of so many points.
I LOVE THE PAINTING! I keep going back to the strongly-effective, highlighted floral bush and area. It is mesmerizing! With those colors it is so Monet-like.
I’m wondering if it is one of your favorites to date?
Dan, I enjoy & appreciate learning from your techniques and admiring your paintings and the others you include. But please could you include/state what type of paint is used in these paintings (oil, acrylic, water etc) – it’s an obvious “need to know” for many.
Thank you once again for this lesson, I have enjoyed all your wisdom and encouragement and motivation. I hope to paint this lesson to show you.
You mentioned that you are doing a wet on wet painting. Does that mean we are to use a Liquid White on our canvas first before starting our painting..??
This style of painting is so opposite of what I do that my mind doesn’t know which way to go. And this is exactly why I am taking these classes, to move out of a detailed, controlled mind.. I hope I can do it justice… Thank you…
Wow! Love the finished painting and your process. I struggle with painting wet on wet and instead tend to paint in layers. This can be effective sometimes, but doesn’t give the impressionistic technique that I visualize for the painting. This landscape lesson is very helpful in tips to get more fluid with my painting. Thank you!
Thanks, Dan. I am a very seasoned painter but still learn with an open mind to new approaches. One thing I found is never photograph your work while wet. We are so anxious to document our achievement that often we forget it’s fresh sheen! Especially if painting in oils…this is true. Your step by step lessons are easy to follow. Your end result is beautiful, better than the photo reference for sure! And that’s the whole point…we aren’t painting to copy a photo but express emotions.
Thanks Dan I’ll give you a laugh when I pop my painting through. 🤣
I am looking forward to ‘just’ getting stuck into the painting 👏🏻, in the past it has been a slower process for me due to too much detail 🙄.
Happy New Year to you and yours 🙌🏻🎉🥳🎈🎊
This was a good exercise, hope we do more. I sent you my painting. Forgot to sign it!!
Thank you for motivating and inspiring us.
Great lesson, I am going to work on this one over the next few days. Hope to send it right after. Looking forward to see how mine and everyone else’s comes out.
Next time allow us to paint ours before we see yours is a great idea.
I so enjoy watching your processes and I learn so much from them. I am really only viewing your posts, for now, but will pick up brushes and paint soon and feel so ready to go. Thank you, Dan. Happy New Year!
Thank you so much for such a helpful Worksop. I was so surprised to see the absolutely beautiful painting that came out of the reference photo (which I didn’t particularly like) and how to go about it. I am so inspired to get painting now! Thanks again!!!
This exercise is very helpful, Dan. Your painting is wonderful.
I have the canvas covered but am definitely still working on the many greens! I have not started on the flowers and those and the foreground are my biggest challenge to come! I am enjoying it! Please do more if you have the time!
Happy New Year to you and your family.☺️
Thank u for a very inspirational and such a detailed workshop!
Question. Did you paint on a white surface or did you use an undercoat of say burnt umber to cover the surface before you started sketching and then painting? I hope I haven’t missed that step in your description.
I have been devouring yr emails for years but these lessons I found absolutely amazing. Thank you so much for sharing yr brilliance.
I absolutely LOVE the painting but also the advice. This is exactly the kind of teaching which most painting courses fail to provide. You can’t ‘copy’ a painter and hope to produce the same, as you rightly say, but understanding one artist’s way of approaching such a complex process is so valuable to me. I particularly like the fact that you state it is impossible to detail your whole, intuitive painting process, but provide enough information to convey the principles of your strategic thinking and the dangers of going down a rabbit hole! For me, the key take always are: 1) try to think ahead so you know (and can explain it to yourself) exactly why you are choosing to paint the subject this particular way, 2) employ all your technical expertise (and references) to SELECT (and reject) certain ways of working according to your original intention, 3) paint decisively, with the confidence that you have an outcome in mind which may (or may not) turn out to be the one you originally intended. This is open ended teaching of art at its best. Thanks, Dan.
After reading and trying to concentrate on your process and explanations, I will really
try to follow through your suggestions on some of the photos I have recently taken. I usually take a quick look at the photo and work out where I will place the focus of the
painting and decide on some colors, but that is all I do. Too little planning with too many challenges later in the painting and frustration setting in. Your advice reminds me to slow down and give more thought before barreling ahead. Thanks so much for these lessons!
I so look forward to your emails:). Happy New Year and all the best in health and happiness in 2023!
Hi Dan,
Happy 2023!
I loved your entire process and the way you elucidated the steps in the 4 part lesson series. I am a watercolorist, but I find your tips helpful. I will try and implement them on my next painting.
Your paintings are so adorable and full of life and color.
Thanks a lot. Best wishes.
Dan, I have just read through these lessons and really appreciate the way you teach and share your process! It makes perfect sense.
Your painting is so lovely! I am always amazed at the colors, brush strokes and effects that you paint from the reference photos!!! That’s where your artistic talent shines through! ✨️
I hope to be able to emulate your style and process. It reminds me of Monet’s paintings.
Thank you so much for this course! I need to get back to painting, and this will give me inspiration:)
Thank you for this. I love everything about this painting, the levels of interest, the depth, really beautiful.
The finished painting has so much more life and interest than the reference photo, and I love the impressionistic style which here really does echo Monet and Pissarro. I would like to know more about how exactly you painted the wet-on-wet impasto bits – a video of this would be great.
Love this painting but can you share your palette with us
Hi Dan. Thank you for sharing your insights on painting techniques in Lesson 3. I found your tips on creating texture and depth particularly helpful, and I can’t wait to try them out in my own paintings. I have a couple of related questions that I hope you can shed some light on. Firstly, what do you recommend for artists who struggle with creating smooth and even brushstrokes? And secondly, do you have any advice on how to effectively blend colors together without creating mud?