
Grid drawing is a technique that will help improve your accuracy without compromising the development of your freehand drawing in the long-term. It basically involves placing a grid over your reference photo and canvas, then using that grid to assist with the placement of your drawing.
The grid provides you with common reference points between the photo and your canvas. It also allows you to break the reference down into smaller and more manageable segments.
In this post, I walk you through the grid drawing process using a painting I recently completed named New Zealand Reflections as an example. I cover:
Grid Drawing Process
Step 1. Place a grid over your reference photo.
You can do this using editing software like Photoshop, or you can physically draw the grid on a printed version of the reference photo. I like to use a three-by-three grid, as I find it provides enough guidance without being overly tedious.
(Update: I created a simple tool that will apply a grid and grayscale to your reference photo. No confusing software is required. Try it here.)
Below is the reference photo which I used to paint New Zealand Reflections, along with a grid over the top placed using

Step 2. Place a grid with the same dimensions on your canvas.
If you placed a three-by-three grid on your reference photo, then place a three-by-three grid on your canvas.
I start by measuring the length and width of the canvas and calculating where each line of the grid will need to go (if you are placing a three-by-three grid, then divide the length and width by three to get your key measurements).
I then place a mark where the lines need to go. Make sure they are evenly spaced across the sides.
Finally, once all the marks are in place, I complete the lines using a ruler or anything with a long, straight edge. You might need another person to help with this if you are painting on a large canvas (one person to hold the ruler in place and another to draw the lines).
I use a charcoal pencil to draw the grid, but the medium does not matter as long as it does not interfere with your finished artwork.
Tip: Make sure the grid is accurate! Your entire artwork will be based on the grid. If it is wrong, your drawing will be wrong. The dimensions of the canvas also need to be roughly the same as the dimensions of the reference photo for this to work properly.
Below is the grid on my canvas at the start of the painting (the lines are hard to see because the canvas is stained with raw umber):

Step 3. Use the grid to help with the placement of your drawing.
The grid on your canvas will correspond to the grid on the reference photo. That means you can use the grid to judge the relative distance and position of your subject.
For example, if you can see the horizon line is just above one of the grid lines in the reference photo, then you will know where to place the horizon line in your painting (it would go just above the corresponding grid line on the canvas).
The beauty of this technique is that, as you start to build out the drawing, you will have more reference points to judge and measure from. So if you draw the horizon line in your painting, then you will be able to use that horizon line to help position other elements of the drawing.
Start by placing in the most critical aspects of the drawing, such as the horizon line, major edges, shapes, and lines. Then add more detail as needed.
Tip: Many artists tend to use the grid drawing technique to meticulously copy the reference photo segment by segment. I do not like to take this approach-I think it takes the fun out of painting. I prefer to use the grid to merely assist with the initial drawing.
In New Zealand Reflections, I started with the horizon line, the edges of the water, the mountains in the distance, and the major trees.
Below are some of my observations to give you an idea of how I used the grid:
- The most distant part of the water is just above the half-way point in the painting. The grid helps me narrow down on this half-way point.
- The distant mountain starts in the top right-hand corner, then takes a bumpy ride down. I look for points where the top of the mountain cross the lines of the grid.
- The large rock in the foreground is positioned around the bottom left-hand intersection. I can use the grid to help determine the general size of the rock by taking note of how far into each segment the rock goes.
- The mist is most prominent around the left-hand side of the middle segment, just below the waterline.
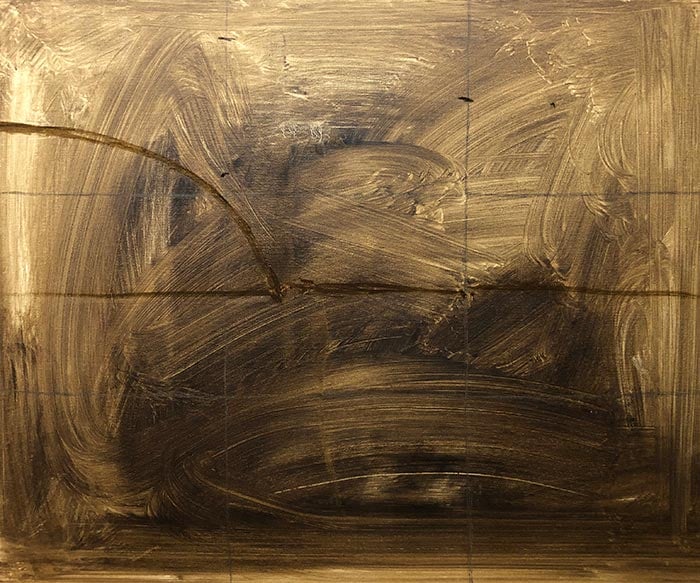
With the initial drawing complete, I start painting in the general color shapes and establishing the foundation of the painting. I paint over the drawing and the grid eventually, so their usefulness is limited to the early stages of the painting.

Here is the finished painting for those interested:

Key Takeaways
Here are some of the key takeaways from this post:
- Grid drawing allows you to improve your accuracy without compromising your freehand drawing in the long-term.
- The idea is that the grid provides common reference points between the reference photo and your canvas. You can use this to judge the relative position of your subject.
- Start by drawing in the most critical reference points, then add more detail to the drawing as needed.
- Some artists like to use the grid drawing technique to meticulously copy the reference photo segment by segment. But I prefer to take a more general approach-I use it to help with the initial drawing but that is about it.
Want to Learn More?
You might be interested in my Painting Academy course. I’ll walk you through the time-tested fundamentals of painting. It’s perfect for absolute beginner to intermediate painters.
Thanks for Reading!
I appreciate you taking the time to read this post and I hope you found it helpful. Feel free to share it with friends.
Happy painting!
Dan Scott
Draw Paint Academy

One of the first things my art instructor taught me. I have used many times.
Anything on composition coming up?
This is the easiest explanation of using a grid I have seen. This is manageable. Thanks you very much.
Joyce
thank you I really enjoy and find your advice very helpful
Really good explanation. I know about the grid and dividing into three sections. What I’ve just learned from YOU is how to place the main elements in the composition without being a slave to the grid. That allows a bit more freedom without losing accuracy. Thank you very much, Dan! 👍👏🎨
Hi Dan,
You do a great job.I really enjoy this.
Thanks for all your efforts .
Anura
Sri Lanka
Hi Dan
It was an interesting read. You are a great teacher. Thanks.
Simanti.
India
So logical. Never thought of basic reference points. Like the finished art!
Don’t you have to have a proportional canvas to your picture? Doesn’ t the image get distorted if the measurements are not related?
Hi Dan, thank you for the gridding technique. I liked the finished painting. Reflections are great.Can you please give some tips about reflections ?I would like to see some reflection art works of famous artists and explanations. Thank you Dan.
If you divide your reference photo into thirds and the canvas into thirds you will have generally the right proportions. I think that’s what’s he’s emphasizing, a general way to get the proper placement.
You are right Grace. The canvas should be in proportion to the photo otherwise drawing with the grid would distort the image. Image if the canvas was 12″w x 6″h and you used the same photo reference and gris as the example here. Everything would be a lot wider. If there was a tree the trunk would be a lot wider than in nature. You can see the difference even in the example given.
Hi Grace – yes the canvas needs to be around the same proportions as the reference to avoid distortion (my canvas is slightly different, but it doesn’t bother me to be honest).
Thanks! Dan
I Dan
Love your posts
In fact ive been using them as guidance in my initiation in painting.
I would like to have them st hand when i work. So have you thought of a book or maybe naking the posts available in pdf version for easy printing.
Thanks
I’ve been drawing and painting for years but never thought of the grid technique for accuracy in my initial drawings. Thanks for a great tip!
Thanks Jos! Yes – maybe I can put something together if time permits.
Can I print this information?
Sure – you might need to adjust the settings though.
Thank you so much for sharing this information! This is something I have been trying to understand.
Thank you Dan. This was very helpful to better understand the grid method. I like your finished painting too.
hi Dan,
as always very instructional, but not exaggerated, which makes it more enjoyable and easier to follow.
I like this approach much more than the gridding with small boxes and over-exact measurements. It leaves room for imaginations. Thank you for this very useful article.
I really like your suggestion of using a 3×3 grid. I was shown using smaller squares and it felt too much like tracing the image.
Will give this a try for sure. Thank you!
Hi Dan
Great work like your tutorials thank you for the in sight
i been using in this Technic for years now it is easy and 100% correct, more artist must use this technic.
it is so much easier and save time
Regards
Martin (South Africa)
Wow!! Thanks! My first art instructor taught me this technique about 50 years ago, and is really an incredible help when painting from a photo. It can even help when doing abstracts, believe it or not.
As Grace says above, “Don’t you have to have a proportional canvas to your picture? Doesn’ t the image get distorted if the measurements are not related?”
The ratio of the photograph and the painting must be the same otherwise distortion will occur. If the photo is 8×10 and the canvas is 8×12 this method will distort.
Hi Dan,
Thank you for this insightful article. I have tried so many times to use the 3rd’s grid but always ended up so frustrated. I always thought you had to copy everything from the photo to each individual grid. I like your idea better. Thought I might try using ¼ inch artist tape (may be quilters tape) to make my grid on the canvas instead of having pencil lines.
Keep the ideas and lessons coming. I really look forward to them. Thank you.
I wondered the same thing that Grace and John said about the proportional aspect. Because that was some of the problems I was having, the photo was one size and the canvas another. It doesn’t come out right. Has anyone else had this problem? Is it because I was trying to be too exact with the drawing?
Hi Ruthann. Sorry for my delay. I commented above but will comment here as well. The canvas needs to be around the same proportions as the reference to avoid distortion (my canvas is slightly different, but it doesn’t bother me to be honest). Thanks!
Hi Dan,
I thought the grid was for changing positions of parts of the photo to suit your painting.
This method seems a bit dodgy, I mean you might as well trace the photo & be done.
I hate to be critical as I like your posts but ???
Thanks, Dave M (Australia )
Thanks Dave. I have since updated the article to have a bit about ensuring the proportions are the same for the canvas and photo. Otherwise, there would be distortion. With that being said, I use this technique mostly as a rough guideline, so it is not perfect. Feel free to be critical (I have thick skin! Thanks!
Dan
Thanks Dan – can’t wait to try your grid method as what I have done before has been so tedious that I just gave up on it.
Nice timing for this article, Dan. I started a layering and glazing class today and the last thing we talked about this afternoon was transferring our image to canvas using this grid method! Our instructor did a demo showing the same method of using the grid to place the horizon line and the major elements in the image. Not the first time this has happened. This summer, we were plein air painting in a large field full of various shades of green. His topic that day was how to mix those varying shades of green. And that night, there was your article about greens!
And getting back to that grid method… I don’t know if anyone remembers the drawing puzzles in the Dell Puzzle Books? I used to get them all the time and there was a grid puzzle in every edition. Draw the lines in each grid in the picture frame (the squares were numbered) and when it was done, a complete picture would appear. So, I’ve been using the grid method since I was about 8 years old… 🙂
Thanks, Dan – I’m starting to oil paint after a 40 year break, using grids. Followed your advice to simplify; took out dead waterlily pads made the painting better. Sorry for this long reply.
Previously I projected a slide onto a paper then transferred that to canvas. Digital photos changed that; I place a half inch grid over an image on the computer then have an 8 x 10 print made, then draw on a one inch grid. This gives a 16 x 20 final size.
I have to re-draw a new grid for every painting. Is there a market for pre-printed one inch grids?
Hi Fred. Not sure sorry – but I am sure there is (seems to be a market for anything these days). Dan
Thanks Dan,
This was very helpful in starting a 36″ x 24″ seascape with old sailing ship and lighthouse. I will be arranging several smaller photos of the ships, lighthouse and rocks etc. and this technique will help provide order in the painting.
Wonderful writing!!!!!
Wonderful remarks — Ann U.
I really liked your choice of composition. The reflections in the water make an interesting study in balance using the grid. I’m excited to perhaps, actually try painting this myself as a learning tool. Thank you for giving clear “to the point” instructions.
I truly liked this post, it really is awesome. I might have a couple suggestions though, but I’m not causing an argument :p Anyway, keep up the great work, and until next time!
Thanks Teeninga! Feel free to email me any suggestions (dan@drawpaintacademy.com). Always happy for feedback.
Dan
Hi Dan. Is the grid solution, also used for portrait paintings? Or is it another demention, instead of the 3×3?
Hi Dan. Is the grid solution, also used for portrait paintings? Or is it another demention, instead of the 3×3?
Hi Maria! You could use it for any subject. Just make sure the canvas size has the same dimentions as the photo / composition frame.
Thanks!
Dan
ɨ ʀɛaʟʟʏ ɛռʝօʏ tɦɨs ʟɛssօռ
I learnt a lot.
God bless you sir
Two weeks ago I had the pleasure of plein air painting with Joseph McGurl at a special afternoon event. He uses a tool he created called a sight-size-viewfinder. It’s a physical grid that you can hold in your hand or mount on your easel. You use it to compose a scene the same way you would with your grid generated in photo editing software. Here’s a link to an article about how he uses it, if you’re interested:
https://www.josephmcgurl.com/page/12018/joseph-mcgurl-sight-size-viewfinder
I never pass up reading your postings because I always get a free lesson…and good ones. Your generosity to teaching is notable and rare. Thank you so much. I wish I knew how to grid without math..such a failing…transferring the grid on an 8×10 to a 6’x5′ canvas was so frustrating for me I gave up..and guessed. Loved your tool here but do not have computer skills either so just wish I could find a way to grid like you let us do here and be able to have the math done to convert…hum….